Anyway, to the point
How do you batch scan film and have the same setting applied to all
I do this by the following methods
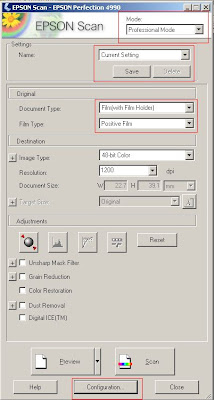
Firstly you must put Epson scan into an appropriate mode, Professional. Lets look at the main pannel where I've marked some important places
 The next step is done in configuration, so click that.
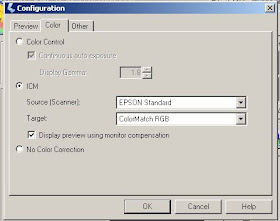 we need to choose appropriate colour handling from the three options available.
The first option of Colour Control (gosh these poor Japanese keep following Amerikan Speling) will automatically duff your stuff and you'll have to make educated guesses as to which profile you'll assign to your image in photoshop. Note that I said assign ... not convert ... important point.
So I have my target set to ColorMatch RGB in this instance as I find it works well enough for gamut contained in Negatives ... and wider gamuts may just introduce noise.
I am a little superstitious so I often close the dialog box at this point and then bring it up ... you know ... just in case.
Next we need to do a preview of the image do not use thumbnails that's again where the computer will decide for you ... and wherever possible, don't send a robot to to a humans job. Preview the whole plattern and manually select a rectangle on that.
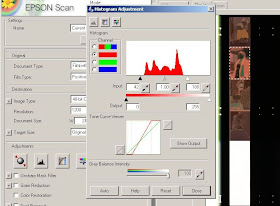
and then adjust each of the colour channels (red green and blue)
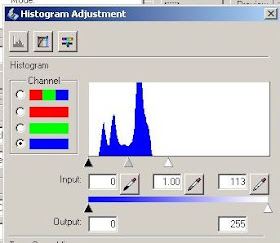 Notice that I've left a little space either side of the histogram in the red above and even in the blue here. This is important as often there is some shadow details or high light details which are not shown in the histogram but which you can identify are clipped later.
With respect to the blue, its important also to shove it right over there to the left. I have found that this alters the scan time to make it longer. I believe that this activating some sort of exposure compensation and is giving a longer exposure to the channel. My results discussed elsewhere in this blog support this theory.
Now we have a general setting which will more or less be adequate for all negatives (well all the ones I've got here fit within this range).
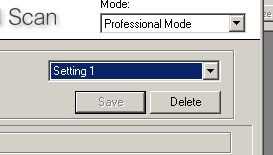 So now you can do the next important step and click save settings. Stupidly it seems you can't name it, but that's ok for me as I only have two, one for negatives and the other for slides.
Now, next time you open up (and every time after that) if you select Setting 1 (or 2 ;-) after you've done your preview and it will put a marquee back right were you put it and reset the settings in the histogram to what you've just painstakingly set up.
Great!
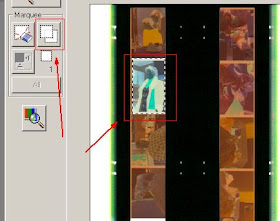 Next important section, how do we make more on this platen?
You use the copy selected tool that appears in the preview window (as in the diagram to left).
Click it and another marquee will appear with exactly those settings. So move it to cover the other image you want to scan from the strip.
Repeat this for as many as you want on the preview area.
Now, Ctl + click each image (which you want scanned) and click scan and all those images will be scanned into your application.
Click Scan and job done!
Now as I use Photoshop I have a customised Action set up which does:
- assign profile (to Epson ColorMatch RGB in my case)
- invert
Destination settings (like 48 bit or 1200dpi) are changed globally so will be applied to all not each. I guess this makes sence, but I can understand some may wish to have one scanned at 1200 and another at 4200dpi (I don't work this way).
works for me ... let me know if it works for you!
You may also find the following useful links:
- quick neg scan tutorial
- using the Epson for bulk scanning of 35mm colour neg (and getting your desired settings applied across all evenly)
- registration problems on older Epson scanners and why you shouldn't go too far in trying to adjust this or that because when you improve focus you may disturb registration
- using your scanner to understand film density.
- driving your scanner software differently to effect some changes in scanner side exposure on Epsons (meaning better noise characteristics in the dense areas of your negs).
- don't forget colour management on your Epson (its not where you might think it is)
- determining and tuning focus (if you suspect its out...)
- Black and White neg scanning
Thanks for the update- just reading it, but wanted to pass on that the web page (both Windows and Mac) seems a bit off: after the line beginning "and then adjust...and blue)", it appears something is cut off (true a few other places). Is the word "mode" partially hidden below the screen grab of Histogram Adjustment? Am I missing any important parts pof the text? thank you!
ReplyDeleteRick
Hi
ReplyDeleteI don't think you're missing anything. I think that what you're referring to is that I have not neatly trimmed up my cut and paste figures from my screen grabs.
I'm curious what do you change in the configuration for scanning slide film?
ReplyDeleteHi
ReplyDeletenothing, I scan positive and negative using the same configuration of the scanner. The only thing I change is to set the individual levels for each of the colour channels (red green and blue). Of course I invert the negative in photo editor and don't invert the slide.
Hi, many thanks for this informative post. I'm scanning w/ the 750 after having access to one at my university's photo lab. Great scanner. Hence I bought one and am trying to do batch scans just like I did on the other scanner. All my settings seem to be identical, however, when I batch scan, it seems all the images are being saved under just one file. For example, say I'm batch scanning 12 slides, the job says it's scanning 12 slides. However, the finished tif file is just 1 file, not 12. Opening that (huge) tif file in Preview (I'm using a Mac) all 12 images are there, but they seem to be wrapped up into that one file. I've never encountered this before. When I try to open that 1 file in Photoshop, only the 1st scanned slide image appears, the other 11 do not, though the data is clearly there somewhere. Does this make any sense. Sorry if I'm not clear enough. Any suggestions greatly appreciated. Thanks!
ReplyDeleteMatt
ReplyDeleteI can only think that you are not actually drag selecting each area then clicking select all for each of those selections.
However as you mention some other points that mitigate that I'm a little lost.
I don't use a Mac so can't comment on the behavior there.
There are some settings in photoshop which enable or disable batch scanning.
I do worry that you may be saving them all in the one TIFF file as a multipage TIFF.
This could be dangerous. Examine the TIFF size to identify it its 12 times larger than you'd expect it to be.
When bulk scanning into Photoshop *the images should not be as files* (they should only be as "untitled").
I don't think that Photoshop handles batch scanning properly, and so maybe is not
It occurs to me that may be your problem. As far as I know Photoshop does not properly support batch acquisition (perhaps a photoshop expert can clear this up) but I thought that it supported:
* scan multiple image into memory
rather than
* scan image, save as file
which Irfanview does.
Perhaps you need to investigate which software does this as I don't use Mac so have no experience there.
Thanks so much for your reply!
ReplyDeleteYes it is all very strange, particularly because I was able to batch scan w/ the same Epson scanner and Epson software on a Mac at a university photo lab the last few months. I would load up my 12 slides, create a marquee for each, select all, then scan. The software would say it's scanning 12 files. When finished I would see 12 separate files. Here, I'm getting one monster tif file, which is clearly all 12 slides as one file. However, when batch scanning, it says that I am indeed scanning 12 files. Photoshop only reads the 1st slide. Preview shows all 12 scanned slides but under the umbrella of 1 file. I've never seen this happen before. I definitely don't want a multipage tif. Hence now I'm just scanning 1 slide at a time. Means I can't walk away unfortunately and do the laundry or grab a coffee!
Thanks again for your suggestions.