Thursday, 8 May 2008

holga at 6x12

Hi

I've now done some tests of my new Holga using the 6x12 mask. This little thing is impressively wide.

kitchen6x12

I was wandering around the kitchen during the 4 minute exposure, so I'm the 'fog' in there

tree6x12

I'm really impressed! More than just impressed with the width, I'm really impressed with the tonal range I get from the film, this really kicks but and shows how close to multi exposure HDR digital techniques that Negative is (all in one click too). I've got a page on that here, but especially the kitchen image and the image I took in 6x9 are truly amazing. This is it here

loungeRoom

not bad at all (especially for $50)!

Tuesday, 6 May 2008

Holga pinhole camera

Having recently started using 120 film, I wondered about making or buying a 120 pinhole camera. I did a little searching online and found that a basic wooden box camera was some hundreds of dollars. While its fashionable to be able to spend hundreds on toys I'm not so fashionable.

Just as I was resigned to making my own (perhaps from a junked folder) I came across the Holga pinhole on ebay. It arrived yesterday, and I've tested it and posted my first findings on the camera here. I'll probably post more as I find it.

The camera is a little bigger than I'd imagined, but considering that it does 6x9 and 6x12 I guess that I shouldn't have been surprised.

In terms of features, its surprisingly well appointed, with not only a lens cap (an able shutter in itself) and a shutter (seen to the left of the camera).

The camera back has the typical red window for determining the exposures (NB by reading the paper backing of 120 film) meaning that 220 is out of the question.

Also, the manual is not only unclear on this issue but entirely wrong. To use the 6x9 mask you need to put the switch up (with the arrow pointing to 16) and the number beside 12 visible. Then, you need to read the numbers as if you were taking 16 exposres (which you aren't) and use every second number. I tried evens first, and found that I had too much wasted leader and a ½ a frame when the film ran out. I'll use 1,3,5 ... next time.

As you can see from the paper tape here the locations for the window do not correspond with the correct location for 6x9, rather they're (as the numbers suggest) for 645 and 6x6. So to get (for example) 6x9 one will need to start at 1 and wind to 3 for the next frame. There will of course be double the border gap between frames :-)


The film access is by removing the entire back (no sophisticated hinged door here ;-)

These little latches double as the neck strap holder, and slide down (quite easilly) to allow the back door to fall off. The neck strap (when attached) prevents this (note to users).

You can also see the 'film advance' knob here. It has the feel of a cheap ratchet mechanism associated with a kids toy. I don't know how long it'll last, but hey, it only cost $50!


Another lovely touch on the camera is a bubble spirit level. This is a very handy feature, considering that you need to be using this on a tripod and as it also does 6x12 getting things level is really important for some landscape shots.

I'd reckon that when using the larger format that it might just be handy. The camera also comes with a shutter release cable as well as the masks for 6x9 or 6x12 (as you can see below).


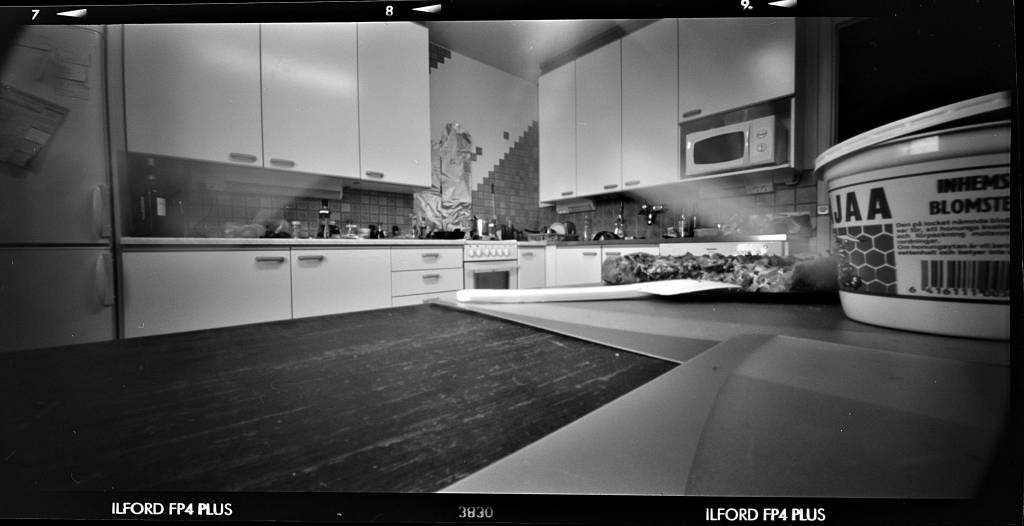
Lastly, how well does it work? Well quite impressively in my opinion. Here's a few images from my first roll of film. I set exposure using my digital camera(at f5.6) , and calculated the required shift exposure by multiplying the time by 1000 (based on 210 which is near enough). I used ADOX CHM 120 film. This kitchen image in particular is actually the best tonal range (to match my scanner) I have ever had from the film.


the lounge room. Note again the exceptional range here. this is based on 15th @ f5.6 for the shadows, and even the full sunlight on the floor only just hit the edge of the film capacity! HDR pinhole!


Lastly I'd like to leave you with an 'eggs with oranges' comparison. This is an image which I've taken with at a different time also with my 10D. Comparison is fascinating. The lighting is (of course) different, but its from the same balcony of the same apartment.

First the overview


Then a 100% segment


Then the image that my 10D gets with a similar angle of view lens (a Tokina ATX at 15mm). This is taken on a tripod with mirror lock up. You'll notice that the composition is not exactly the same, this looks more to the right.


Then the 100% segment.


Conclusions:

For sure, the Holga image is grubby, but (of course) its largely diffraction limited. If I could use f64 on the 10D it wouldn't look so crash hot (let alone f135). So the Holga is damn fine value for money, and a welcome addition to my image kit!

tunturi climbing

A trip up Kesänki Tunturi (pictured below) which is right next to Ylläs (which for non Finnish speakers is pronounced more like oolas).

A group of us decided to spend Vappu in Lapland. Despite being a bit north of the Arctic circle, snow melts there by mid spring.

I'm not so much into down hill skiing, so we decided to try to climb this hill . These hills are called Tunturi in Finnish or a Fell in English. As it happens the Fell in that link is where everyone was going down hill skiing, and across the gorge from where we were climbing).

Snow conditions were 'trying' as there had been well over a meter of snow remaining on the ground by the end of winter, and with daytime temperatures now in the 12 ~ 17°C range we were barely supported on our skis and it was way too tedious trying to take steps through groin deep wet snow. So, we did our trip in 3 stages
  1. track skis on the tracks to the lake
  2. off track into the deep stuff as far up the mountain as we could
  3. leave our skis, and climb the loose rocky surface to the sumit (520 meters)
We carried a change of boots, as neither of us fancied climbing in ski boots.

The trip up was slow, with the snow seeming to support your weight, then giving way suddenly and your foot sinking down to your knee. If you've skied in this sort of stuff you'll know what I mean, but falling over is a pain in the ass big time.

I managed to make it all the way to the top without falling once (which amazed me) while Anita fell through between her skis a couple of times. Since she's without a doubt the more experienced skier, she was carrying the pack (making balance harder) and cutting the trail too.

By the time we got to the place where there was no snow for skiing (without really damaging our skis), it was already pretty steep and quite warm thank you very much.

Slopes changed to about 45° at about this point, with some sections feeling quite steeper. There was lots of loose rock, making it quite tricky climbing. Much of the upper part of the Tunturi is without tree, so if you you slip here you've got a few meters to tumble along the rubble before you hit trees ...

The slope certainly looks steeper from where I was sitting.

Of course part of the problem is that I'm getting a bit old and fat for doing this sort of thing. I can do something (perhaps) about the fat, but the old is a challenge we all face.

Anyway, a quick bite of food and some berry juice and we started our way up to the summit. At about ½ way up to the top from where the trees end, I took this picture of Yllas tunturi (like all images, click on it to enalrge it).

There are no trees on the summit, and as you get closer to the top, the become more like shrubs than trees.


Naturally the view from the summit was excellent, and well worth the trip up!


On the way back down from summit we took a less steep route rather than go down across the steep and loose rocks. We figured that going groin deep in snow was easier on the way down than the way up.


Still you had to walk carefully, as you could check the snow carefully to see if it supported you, then after you'd put your weight on it, it would suddenly give way and you'd sink down.

Cos the snow melts from underneath, you can then find loose rocks which then move and you can twist an ankle just as easily.

But all in all we had the best day of our 4 day trip to Yulläs doing this ski / walk / climb. The scenery was worth it as was the view from the summit.

Thursday, 24 April 2008

old cameras still work

Just spent a little time with my first roll of colour 120 film in my Bessa (listed elsewhere on this blog, just search for bessa). I can only say that it has passed with flying colours. The image below links to a rather bigger 3832 x 2628 pixel image (which is about 10 MPixels), Yet this is only from a 1200dpi scan of the film. For people used to working with 35mm, that minature format requires 2700 dpi (and preferably 4000 dpi) to get substantial images. Scanning this at even 2400 dpi would give 7864 x 5256 or 41 megapixels.


Dang it all, blogspot resizes it to 1600! Oh well...


Now, this is a 1950's camera. It has no mod cons of any type (no metering, no focus assist, primitive film advance).

Used right, this goes close to giving the sort of detail that you can get with a 1Ds MkIII. Certainly its not as fast to use, or have any features that would make it popular to people photographing Wimbledon or Pro golf, but for an amateur photographer who has a 5 or 6 megapixel compact digital and is seeking better 'landscape' images ... well look seriously at a 6x9 film camera!

I personally like the the Bessa as its a folder, meaning it folds down to a little bit smaller than a video cassette and slips into a side pocket of my backpack. For those who don't feel like an old folder like this you should seriously consider a Fuji GS690 as these are superior optically and have range finders (for focusing the camera).

Size maters (for film that is ;-)

I thought I'd put a few more samples from my flickr account

forest floor

and a detail segment

center segment

click here for full size

notice how the tree I chose for focus stands out? This short depth of field can be an asset that you just don't get with smaller formats (like 35mm or digital).