I have had 2 Bessa cameras now I find that I like them. I found that I prefer the simplicity of the Bessa I over the Bessa RF cameras and some time ago sold my RF. Sadly I made an attempt to service the shutter on the first Bessa I I bought (blog post on that here) but ended up damaging the threads of the lens when disassembling it. I have been variously distracted in the intervening time with things that some readers of my blog will be familiar.
For some time I have been looking for a Skopar lens version on eBay and recently I picked one up. Its a tidy camera with everything in largely good order (except that the shutter is a bit sticky, but I'm not going to touch this one ... yet).
I put my first film through it this week and was stunned by the results. I uses a roll of Fuji Superia X-TRA 400 through it and scanned the results on my Epson 4870 flatbed scanner.
WOW
The camera is not without issues (who isn't) and light leaks interfered with a number of the images, and operator error interfered with a few more. However where I didn't screw it up (not withstanding the light leaks, which were probably operator error too) the stunning shallow depth of field on what is essentially a mild wide angle showed me just why it was I loved this format.
Further the sharpness of the lens from side to side is (in my view) sharper than the Vaskar lens on my earlier one.
I was so impressed with the sharpness and detail I went and took another shot of the same scene as one of the negatives (without a flaw) with the GH1 so that I could make a comparison. It is this which I wish to show you in more detail.
Bessa I - overview
GH1 - overview
Anyone who has done much with colour negative knows that scanning colour negative to get exactly what a digital camera gives is nearly impossible, so please forgive the colour differences.
However firstly I'll point out that the 6x9 camera produces an image which is a ratio of 2:3 where the GH1 produces one of 4:5 (well in this setting). I happen to like 6x9 as its the same image dimension ratios that 35mm is.
Methods:
I set the zoom on the GH1 to give the same horizontal width as the angle of view of the Bessa.
I scanned the film at 1200 dpi. Both cameras thus produced an image which was more or less 4000 pixels wide. Of course I could probably get 2000dpi out of the scanner without difficulty and looking at these images I'm inclinded to believe that I would indeed get more detail out of the film ... it would not just be the scanner equuivalent of 'upscaling'
So, lets have a look at the details:
Bessa - segment 1
GH1 - segment 1
Dam that's close ... ok, lets look over to the skyscrapers in the LHS background
Bessa - skyscraper segment2
GH1 - skyscraper segment 2
I think that the Bessa is actually resolving the details in the buildings better than the GH1 is. That's astounding as at this level (100% pixel view) we are clearly at the limits of the GH1s capacity and yet there is scope for better out of the Bessa negative
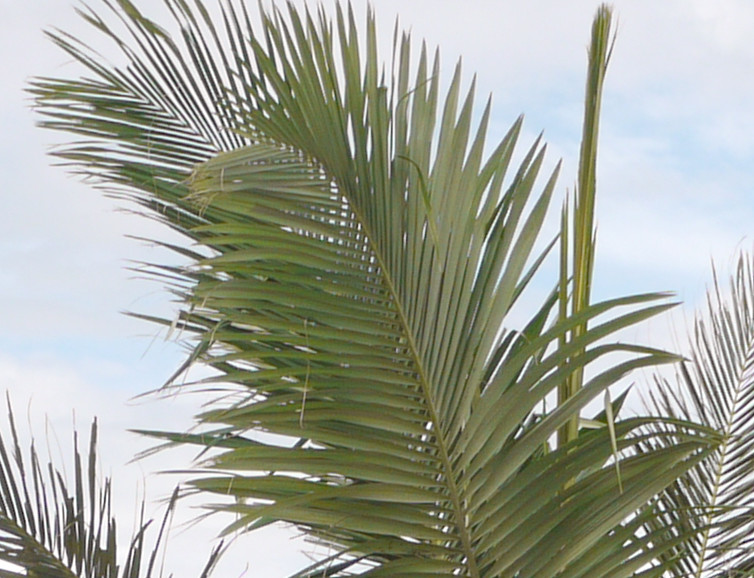
Bessa - segment 3
GH1 - segment 3
Well again (forgetting tones) the Bessa has done a better job of resolving fine details in the leaf (particularly that fresh frond that is vertical and as yet unspread).
If you disagree that there is enough in it to call, then that means that simply this is a tie. So I will go as far as saying that this digital camera which was released in 2010 has caught up to what 6x9 film cameras with box brownie film could achieve back in the late 1950's. Certainly when I did this with my Canon EOS 10D the Bessa with the Vaska lens was its equal.
This does not mean that I'll stop using the GH1 (or any other digital camera for that matter) but does re-enforce why I keep using the Bessa. For there are times when Negative can capture a better image than digital can (such as high contrast situations). My initial view of what to use the Bessa for was for those times when I wanted to have something light weight as a backup camera and didn't want to drag the large format camera around with me.
For me this shows that if you are wanting to use a 6x9 folder for some images, that you don't have to feel that you are not going to get top notch results. If you aren't getting results like this out of it, then you are doing something wrong or you have not set your camera up properly (AKA doing something wrong)
:-)
Showing posts with label 6x9. Show all posts
Sunday, 7 April 2013
Friday, 9 September 2011
Camera systems - limits desires and wishes
musing missive
Readers of my blog may know that (among other things) I've ruminated about wanting a full frame 35mm camera for some time. As a nearly disengaged Canon EOS user, I still keep an eye on the auction for the prices of a 5D (first version) and ponder about the benefits to me in my photography of the fuller frame size.
I have mainly organized my camera gear around the 4/3 format and have moved away form EOS (read sold my stuff) to facilitate that. For almost everything the 4/3 format seems to me to be the best compromise of:
- light weight and compact
- lower cost
- high quality images
- access to great optics outside the camera system
Recently someone posted a comment on my post about "shallow normals"
I have been thinking about full frame for a while for the same reason in part (also resolution). Unfortunately it means either ponying up boatloads of cash or switching systems to Canon and still ponying up lots of cash (though not as much). Of course, film still works well for me in my trusty film SLR, but I need a good scanner to really make it work. My flatbed is lackluster.
and it started me thinking again (not that I stop for long) about what I'm missing with my existing 4/3 camera system, and that is of course shallow depth of field with a "normal" lens.
If I want infinite depth of field I'll choose a compact digicam and just about every photo will have exactly that: everything in focus. Its a bit dis-interesting if you ask me. What makes some pictures jump out is that ability to focus on the subject. In fact its so important a concept we actually incorporate it into our language:
Bill, you have to focus on the job if you're going to get it right.
Just to recap on what it is which makes a shallow depth of field, it is in the main the ability to open up the aperture to a large diameter. It is not (as is commonly thought) just the F-Number. A normal lens for Full Frame is 50mm, and a typical aperture for shallow would be f2 or so on that system (f1.4 even better). So being able to open the lens aperture to 25mm wide or more will give a nice shallow field of focus. This is a diameter of half the focal length of the lens. Smaller formats make this difficult to achieve because (for example) on a 4/3 system a normal is about a 25mm. So such shallow normal would need to be 25mm in diameter, which makes for a lens diameter equal to that of the lens.
As it happens a shallow normal on full frame (or bigger) is as cheap as it gets, but on smaller formats becomes increasingly difficult and expensive to achieve.
Most of what I like to photograph is in the wide to normal area. In the ten or more years I've been using Digital I've waited for the time when digital can allow me to completely replace my 35mm film bodies and replace them with Digital. While it can do most of what I want to do, it doesn't do everything.
Its a little strange to me that in the twelve years after buying my first digital camera something which will more or less replace my 35mm camera has not emerged. What has happened however is; I get better telephoto than I've ever had (and for a much lower price), by using Digital I get better control over the process than I've ever had, get access to images quickly, and get in the main much better images than I did before.
I'm pretty clear in my mind now that smaller formats are better for telephoto, and larger formats are better for wide. The image below is a wide angle taken with 6x12 format on 120 roll film.

I just would not have been able to achieve that with a smaller format.
So when I'm thinking of using my longer lenses, 4/3 format is what I would reach for, but when it comes to "normal" to wide I struggle with the limits of the smaller format.
Clearly with telephoto getting shallow depth of focus is easy.
I would argue that had I used a small digi cam for this shot and had the background in focus that the shot would be far less interesting, you eye would not be drawn to the birds body (well ok, butthole) and the background would distract rather than enhance.
The same is true I wanted to use a normal lens (not tele, not wide), many images look better having shallow depth of field. For example in this image below which was taken with my 50mm f1.8 on my full frame camera when putting a family member to rest.

The focus is on the subject that really drives your attention to the matter and the background is not lost, it remains in the picture yet focus is not on it.
This is what can be done with a shallow normal and smaller formats just don't have access to this because it is a function of angle of view, capture format and aperture diameter (not f-stop).
Modern (read young or only "digital native") photographers are usually completely ignorant of this because they don't think in sensor size as commonly as film photographers thought of film format sizes. In fact if you think "full frame" is large (and you don't know much about large format) then I suggest you read this post.
For example, this is 35mm negative overlaid on 120 roll film in 6x9 format.

Kirk Tuck on his blog is currently re-discovering what the advantages are of shallow normal lenses in portraiture using 120 roll film cameras (which are the format in black and white in that above image). On his format a shallow normal still needs 20mm aperture diameter. His 80mm is a normal and f4 is a 20mm diameter.
options
So many things are about compromise, taking photographs can be too. So for me then, what holds me back from going for a 5D which would give me full frame and access to shallow normals?
I can summarize this as size, weight and money.
Despite selling most of my EOS and EF stuff I have kept the following:
- EF24 f2.8
- EF50 f1.8
- two EOS film bodies (like really, wouldn't get anything for them)
- Olympus 21mm f3.5 (gosh I love this lens on full frame)
- Olympus 50mm f1.8
- Olympus 100mm f2.8
- a bunch of Canon FD stuff which I use on my 4/3 system
One thing that the 4/3 stuff has in its favor is low price. You can get a used G1 for peanuts and I could go buy a new G2 right now for less than $300.
The irony is that while the bodies are cheap in 4/3 the lenses are not. While a 50m f1.8 is under $200 for almost every full frame system, the equivalent in 4/3 is double that: around $400 (or more here in Australia).
The options of the 4/3 system has spoiled me in price expectations in some ways, as I struggle to feel that a used 5D (which is a 7 year old camera) is worth the extra $800
As well as the additional cost that I'd be lumbered with a blob of a camera. I've had 10D and 20D and trust me the micro 4/3 camera allowed me to breath a sigh of relief for carrying on hikes. This comparison of the G1 with the very useful 14-45 lens fitted to a 10D with a lightweight fixed focus lens like the 50mm f1.8 shows the difference in both bulk and weight (check the numbers on the scales)
And comparing the 10D and the 20D are about the same size an so when comparing them with the 5D we see that there is not much difference in size between all of them.
In some situations the size of a camera like these is not an issue, but in other situations it is. Hiking is one such situation as is attending a function. Just recently I've heard people suggesting that in street photography the bigger cameras are obtrusive and put people off, while smaller cameras are tolerated.So size does matter, both camera and capture format. I've previously observed that the G1 and the older Olympus 35mm OM cameras are actually the same size. In these pictures the camera taking the shot does not change location, and the cameras are placed in exactly the same spot
the G1
and the an OM-10 35mm film SLR:
So if they can produce small phones with the electronics to power an 8 megapixel camera, then I'm quite sure that a camera the size of the G1 is entirely possible.
If I could get that then I would not hesitate at all. It would be ideal if we could have different sensor sizes available in the same body size so that we could have an excellent situation: we could extend what our lenses covered by just changing bodies.
- my 21mm would be an excellent compact wide
- my 50mm f1.8 would be both a great shallow normal (on FF) AND a portrait lens (on 4/3)
- my 200mm f2.8 would be the great compact and light weight effective 400mm that it is
- my 300mm f4 would be the great effective 600mm that it is
So in the mean time I'm probably unlikely to move towards the Canon 5D despite the allure of the shallow normal in my photography. I'll leave you with one last shallow normal shot, to your health!
Tuesday, 17 February 2009
fixing a floppy Bessa folder
readers of this blog will know that I quite like my Bessa I and Bessa RF folders. They are great cameras but can be less than ideal producing soft images at times. I'm an analytical kind of guy so I quickly applied a little investigation into this camera to sort out why its not so perfect.
It turns out that a little wear had occurred and some play had been introduced in the rigidity of the front element. Carefully folding and unfolding it I noticed that this part of the mechanism which completes the locking down of the 'front standard' needed assistance.

If you grab your camera (assuming your a Bessa RF owner) you can see here the place I mean. The suraces which the red arrows point to meet when unfolding, and the
arm with the white masking tape on it merges in behind that "can opener" shaped one to lock the front standard (when thinking of the bessa as a non adjustable view camera). This had developed some wear in the mechanism and was allowing the front element to swing a little. This would be desireable in a view camera but its not what you want in a rangefinder ;-)
How I've solved it is to place essentially a small shim over the small arm there. In the photo above I've used masking tape to test the idea, but I've now settled on another simple method that is non-destructive and reversable. I have bent a small section from a aluminum beer can over the arm and secured it with a thin bead of blu-tac. I put the bead of blu-tac it on the inside of the aluminum along where it will sit on the arm. I used the edge of a metal ruler to form the section of aluminum shim so that it folds in a neat "3 sides of a box" and sits neatly over the arm.
This rig now alters the Bessa to have a nice solid front and has returned a snappy feeling to the unfolding (rather than the wobbly feeling before). I've checked the alignment of the lens carefully with both film and ground glass and its been working fine ever since.
Here is a sample of the full width of the horizontal middle of a 6x9 frame at f8

I think that you can easily test your front element by
using this you can get an idea how far tilted the lens is from the focal plane (measure in X and Y axis to make sure).
My Bessa is now pretty spot on (as can be seen above)
It turns out that a little wear had occurred and some play had been introduced in the rigidity of the front element. Carefully folding and unfolding it I noticed that this part of the mechanism which completes the locking down of the 'front standard' needed assistance.
If you grab your camera (assuming your a Bessa RF owner) you can see here the place I mean. The suraces which the red arrows point to meet when unfolding, and the
arm with the white masking tape on it merges in behind that "can opener" shaped one to lock the front standard (when thinking of the bessa as a non adjustable view camera). This had developed some wear in the mechanism and was allowing the front element to swing a little. This would be desireable in a view camera but its not what you want in a rangefinder ;-)
How I've solved it is to place essentially a small shim over the small arm there. In the photo above I've used masking tape to test the idea, but I've now settled on another simple method that is non-destructive and reversable. I have bent a small section from a aluminum beer can over the arm and secured it with a thin bead of blu-tac. I put the bead of blu-tac it on the inside of the aluminum along where it will sit on the arm. I used the edge of a metal ruler to form the section of aluminum shim so that it folds in a neat "3 sides of a box" and sits neatly over the arm.
This rig now alters the Bessa to have a nice solid front and has returned a snappy feeling to the unfolding (rather than the wobbly feeling before). I've checked the alignment of the lens carefully with both film and ground glass and its been working fine ever since.
Here is a sample of the full width of the horizontal middle of a 6x9 frame at f8

I think that you can easily test your front element by
- unfolding the camera as if taking a photograph
- opening the film door of the camera exposing two light sealing plates at the back (these will allow the camera to sit on the film plane with the lens facing up
- place a flat and light spirit level across the front of the lens
using this you can get an idea how far tilted the lens is from the focal plane (measure in X and Y axis to make sure).
My Bessa is now pretty spot on (as can be seen above)
Monday, 9 February 2009
lens tests: looking for better pictures, what's missing?
Amateur Photographers (perhaps especially landscape photographers) are often almost obsessed with how to get the most of scenery detail into their pictures. I guess that its because most photographers seem quite attached to their particular equipment (in some cases almost religiously) that the first thing examined is getting a better lens. So sites with lens tests are consulted, to see if this or that lens has more or less resolution than another seeking a better lens than they have.
This seems like the right path but it misses out on understanding a couple of critical points.
Perhaps you've read this before, in my reading in the past its never been shown clearly just what this means, so in this post I'd like to shed a little light on thes important points.
It may seem (later in this comparison) that I'm attempting some sort of film vs digital discussion, and I'm not. I'm trying to discuss something bigger ... in fact its bigger and denser capture. I just happen to have only MF and LF in bigger capture.
Part 1: Lens Testing charts
To the left you can see the result of a lens test using Norman Koren's test system. The lens being tested is my "nifty fifty" the EF 50 f1.8
Looking at this it seems that the lens runs out of grunt shortly after 50 line pairs / mm (line pairs per millimeter), and you could argue the toss that it goes to 60.
This is not a bad result with some saying that getting better than 50 lp/mm in the real world (with all the factors like camera shake, focus issues .. against you) is as much as you can get. Being a digital system what I've got here is a final usable result which will directly translate onto a print.
(BTW If you're not familiar with terms such as line pair / mm, I suggest reading this.)
So I thought that I'd test also my EF 24mm f2.8 lens (which in 35mm full frame is my favourite landscape lens). At left is a 100% crop of an image taken (in RAW) using flash as the primary illumination (for increased contrast and to eliminate any issues of shake even on a tripod).
Again not a bad showing for what is not thought of as the hottest lens in the canon stable. It seems to run out at about 60 lp/mm.
This all looks good, but what I didn't mention yet is that the method for the test is to photograph the target at a distance of 51 x "focal length".
Since this is a 50mm lens, this means that the target is 2550mm (or 2.5 meters) from the lens or 1.2 meters with the 24mm lens.
Now, just think about this for a moment:
How often do you stand that close to the subject when you take a picture with a 50mm lens or 1.2 meters with the 24? Especially with an APS sensor DSLR (not a full frame one) it is just what you'd do for a portrait and not what you'd have in most scenery.
What is more common is using a 24mm a few more meters away in a scene like this:

So, I put the lens test chart over there on the wall ... to see what I'd get ... well here's the 100% view if it..
Wow, nowhere near as good is it.
You can see that its not giving the wonderful results of the test chart above. Well, that's because its now further away in the scene, and the subject detail is now smaller (being further away). Inspection shows that we can barely read the details just past 10 lp/mm.
So from this perhaps you can see what I mean when I say: lens test charts aren't like the real world).
So knowing how the lens is able to perform is one thing, but what you can get with it in the real world is another thing. It all comes down to what is the "feature size" in your picture and how does this relate to the parameters in your testing.
Part 2: " other limiting factors in the system"
Ok, so now that I've shown the issues involved with "Lens test charts are not scenery" I'd like to move on to "other limiting factors in the system"
Consider your camera, a camera like the 10D (or the 5D for that matter) will have a limit of something like 50 lp/mm because of the array of the sensors (see Bob Atkin's article on that here). Look again at the details of the 24 and 50mm lens above, notice how they coincidentally run out of detail at almost exactly the same point?
Sure cameras like the 20D and 50D have higher detail sensors than the 10D, but this essentially means no matter how much better lens you get, you'll see no difference without spending more money on a higher resolution body.
Welcome to the one of the reasons why camera companies love digital cameras.
Conclusion: Alternatives to the lens arms race.
So, if you're going to spend money on sharper lenses, you'll need something better to capture that. You could use a Canon 5D II or something better spec (Nikon and Canon both make things like that. There is even the alternative of the MF digital backs.
But its all starting to sound expensive for the landscape photographer isn't it, here's where I'd like to show another test with a different camera system.
I'll start with my old Bessa RF camera, this is a 1940's folding 120 roll film camera which uses a 6x9 format *(6x9 if you're not familiar with film and its sizes the please take a quick look at this article which sheds some light on that topic).
The Bessa is by no means any kind of bench mark, in fact its about the cheapest 120 roll film on the market. My Bessa RF can be had for less than a new lens for a DSLR (I see them on eBay regularly for between $100 and $300).
The Bessa RF uses a 105mm lens and so using the same test target and system I need to position the camera 5.36 meters from the target. This is a scan of the entire 6x9 cm image on the film (pardon the gudge at the top, that's from my tape where I taped a bit of film into the camera because I'm too cheap to sacrifice a complete roll for a test image).
Now, another important point here is that these film scans were made with an old Epson 3200 flatbed scanner, which cost a couple of hundred bucks. There is no doubt at all that with a more professional scan (send it out if you have a beauty which begs to be printed big) you will be getting even better results than shown here.
Now, this time I'll start with the overview image of the test setup.
Did you notice that this is exactly the same angle of view in the scene that I used in my "real world" use of the 24mm lens from above.
Why? well because of the bigger format film the 6x9 to get a wider angle it needs a longer focal length lens. In this case its 105mm.
So in some ways this old camera is designed to take best advantage of real world photographic and optical issues to make the most from what it has.
Using the same method above I tested the lens on this camera and found that it had a much lower result than the EF 24mm in the lens test.
Looking at the result (below) perhaps you can pick its somewhere just after 20 lp/mm that the lines merge into mush.
So in test setup the Bessa scored 20 while the 10D scored over 50. This makes the Bessa look bad and the 24mm on the 10D look good ... but only if you forget to look at the scene and focus on the test result numbers.
When comparing scene for scene the older camera actually makes a sharper image for the same scene than the camera with the lens which tests better.
In a usable scene the Bessa ended up with 20 lp/mm available in the scene VS only 10 lp/mm for the 10D.
So what small formats gain in terms of specifications, they can also loose in terms of what you can get in your image.
Thus you'll end up with features that are much finer in this image than in the 10D's image. How interesting, a 60 year old camera with an ordinary lens is doing better in some ways than a modern DSLR.
Why? Because what the Bessa lacks in sophistication and accuracy it makes up with in generous lashings of image area.
Hopefully I've shown that by using the lens test charts for reference that taking images of real things shows up the issues of buying gear based on lens test charts and there is more to it than just simple numbers. I have an image which has the same "angle of view" using a lens which 'tests to much lower resolution' but in the real world makes an picture which is much more detailed than another camera system. Here's the over view of each again to show you the relative sizes.

So if you're thinking that you'll spend a thousand bucks on a 'better' lens for your DSLR to make sharper landscape images, perhaps you might now consider adding new tools to your methods of making images not just spend more money on nifty lenses for your DSLR.
This represents only the beginning of the scale in MF gear, and with great cameras and systems out there for literally give away prices its really hard to go wrong.
But if you go for a higher quality MF camera (to make higher quality images) you'll need a higer quality scanner in your work flow. I don't personally feel like making that sort of investment, so I went to another alternative again. Large format.
Size matters when it comes to images as I've just shown with the comparison between a 6x9cm (in reality 56mm x 87mm) image negative and a smaller 22 x 15mm. I prefer larger formats again for my landscape photographs. Using the smallest of Large format 4x5 (which has an image area of 92 x 118 mm) I can get even larger capture, beter control over my image focus and still make use of cheap scanners to get great images.
Here is a sample of the same scene with my 4x5 camera mounted on the tripod.

Because its using a 90mm lens (quite close to the 105mm in the Bessa) its about the same distance from the wall. The angle of view though is significantly broader, showing in landscape the same height that the others showed in portrait orientation. No looking at the detail, obtained from the lens its nearly the same (although being a 90mm it was a little closer to the target than the 105mm lens, creating a little bigger image of the chart).

this is almost the same result in sharpness but with a system which captures more than double the area of view than the digital. For example this picture

has detail like this:

click for full detail
and as its 14 000 pixels wide (while a DSLR will give you about 5000) will make nice detailed prints well over a meter wide if you want it.
I hope from this long (and perhaps difficult) analysis of the subject you can see that the bottom line is that if you want to make bigger more detailed prints of your favourite scenery, then rather than going to all expense of newer and 'better' lenses you will end up making much sharper prints if you use the right tools for the job.
This seems like the right path but it misses out on understanding a couple of critical points.
- Lens test charts are not scenery.
- There are other limiting factors in the system.
Perhaps you've read this before, in my reading in the past its never been shown clearly just what this means, so in this post I'd like to shed a little light on thes important points.
It may seem (later in this comparison) that I'm attempting some sort of film vs digital discussion, and I'm not. I'm trying to discuss something bigger ... in fact its bigger and denser capture. I just happen to have only MF and LF in bigger capture.
Part 1: Lens Testing charts
To the left you can see the result of a lens test using Norman Koren's test system. The lens being tested is my "nifty fifty" the EF 50 f1.8Looking at this it seems that the lens runs out of grunt shortly after 50 line pairs / mm (line pairs per millimeter), and you could argue the toss that it goes to 60.
This is not a bad result with some saying that getting better than 50 lp/mm in the real world (with all the factors like camera shake, focus issues .. against you) is as much as you can get. Being a digital system what I've got here is a final usable result which will directly translate onto a print.
(BTW If you're not familiar with terms such as line pair / mm, I suggest reading this.)
So I thought that I'd test also my EF 24mm f2.8 lens (which in 35mm full frame is my favourite landscape lens). At left is a 100% crop of an image taken (in RAW) using flash as the primary illumination (for increased contrast and to eliminate any issues of shake even on a tripod).Again not a bad showing for what is not thought of as the hottest lens in the canon stable. It seems to run out at about 60 lp/mm.
This all looks good, but what I didn't mention yet is that the method for the test is to photograph the target at a distance of 51 x "focal length".
Since this is a 50mm lens, this means that the target is 2550mm (or 2.5 meters) from the lens or 1.2 meters with the 24mm lens.
Now, just think about this for a moment:
How often do you stand that close to the subject when you take a picture with a 50mm lens or 1.2 meters with the 24? Especially with an APS sensor DSLR (not a full frame one) it is just what you'd do for a portrait and not what you'd have in most scenery.
What is more common is using a 24mm a few more meters away in a scene like this:

So, I put the lens test chart over there on the wall ... to see what I'd get ... well here's the 100% view if it..
Wow, nowhere near as good is it.You can see that its not giving the wonderful results of the test chart above. Well, that's because its now further away in the scene, and the subject detail is now smaller (being further away). Inspection shows that we can barely read the details just past 10 lp/mm.
So from this perhaps you can see what I mean when I say: lens test charts aren't like the real world).
So knowing how the lens is able to perform is one thing, but what you can get with it in the real world is another thing. It all comes down to what is the "feature size" in your picture and how does this relate to the parameters in your testing.
Part 2: " other limiting factors in the system"
Ok, so now that I've shown the issues involved with "Lens test charts are not scenery" I'd like to move on to "other limiting factors in the system"
Consider your camera, a camera like the 10D (or the 5D for that matter) will have a limit of something like 50 lp/mm because of the array of the sensors (see Bob Atkin's article on that here). Look again at the details of the 24 and 50mm lens above, notice how they coincidentally run out of detail at almost exactly the same point?
Sure cameras like the 20D and 50D have higher detail sensors than the 10D, but this essentially means no matter how much better lens you get, you'll see no difference without spending more money on a higher resolution body.
Welcome to the one of the reasons why camera companies love digital cameras.
Conclusion: Alternatives to the lens arms race.
So, if you're going to spend money on sharper lenses, you'll need something better to capture that. You could use a Canon 5D II or something better spec (Nikon and Canon both make things like that. There is even the alternative of the MF digital backs.
But its all starting to sound expensive for the landscape photographer isn't it, here's where I'd like to show another test with a different camera system.
I'll start with my old Bessa RF camera, this is a 1940's folding 120 roll film camera which uses a 6x9 format *(6x9 if you're not familiar with film and its sizes the please take a quick look at this article which sheds some light on that topic).
The Bessa is by no means any kind of bench mark, in fact its about the cheapest 120 roll film on the market. My Bessa RF can be had for less than a new lens for a DSLR (I see them on eBay regularly for between $100 and $300).
The Bessa RF uses a 105mm lens and so using the same test target and system I need to position the camera 5.36 meters from the target. This is a scan of the entire 6x9 cm image on the film (pardon the gudge at the top, that's from my tape where I taped a bit of film into the camera because I'm too cheap to sacrifice a complete roll for a test image).
Now, another important point here is that these film scans were made with an old Epson 3200 flatbed scanner, which cost a couple of hundred bucks. There is no doubt at all that with a more professional scan (send it out if you have a beauty which begs to be printed big) you will be getting even better results than shown here.
Now, this time I'll start with the overview image of the test setup.Did you notice that this is exactly the same angle of view in the scene that I used in my "real world" use of the 24mm lens from above.
Why? well because of the bigger format film the 6x9 to get a wider angle it needs a longer focal length lens. In this case its 105mm.
So in some ways this old camera is designed to take best advantage of real world photographic and optical issues to make the most from what it has.
Using the same method above I tested the lens on this camera and found that it had a much lower result than the EF 24mm in the lens test.
Looking at the result (below) perhaps you can pick its somewhere just after 20 lp/mm that the lines merge into mush.
So in test setup the Bessa scored 20 while the 10D scored over 50. This makes the Bessa look bad and the 24mm on the 10D look good ... but only if you forget to look at the scene and focus on the test result numbers.
When comparing scene for scene the older camera actually makes a sharper image for the same scene than the camera with the lens which tests better.In a usable scene the Bessa ended up with 20 lp/mm available in the scene VS only 10 lp/mm for the 10D.
So what small formats gain in terms of specifications, they can also loose in terms of what you can get in your image.
Thus you'll end up with features that are much finer in this image than in the 10D's image. How interesting, a 60 year old camera with an ordinary lens is doing better in some ways than a modern DSLR.
Why? Because what the Bessa lacks in sophistication and accuracy it makes up with in generous lashings of image area.
Hopefully I've shown that by using the lens test charts for reference that taking images of real things shows up the issues of buying gear based on lens test charts and there is more to it than just simple numbers. I have an image which has the same "angle of view" using a lens which 'tests to much lower resolution' but in the real world makes an picture which is much more detailed than another camera system. Here's the over view of each again to show you the relative sizes.

So if you're thinking that you'll spend a thousand bucks on a 'better' lens for your DSLR to make sharper landscape images, perhaps you might now consider adding new tools to your methods of making images not just spend more money on nifty lenses for your DSLR.
This represents only the beginning of the scale in MF gear, and with great cameras and systems out there for literally give away prices its really hard to go wrong.
But if you go for a higher quality MF camera (to make higher quality images) you'll need a higer quality scanner in your work flow. I don't personally feel like making that sort of investment, so I went to another alternative again. Large format.
Size matters when it comes to images as I've just shown with the comparison between a 6x9cm (in reality 56mm x 87mm) image negative and a smaller 22 x 15mm. I prefer larger formats again for my landscape photographs. Using the smallest of Large format 4x5 (which has an image area of 92 x 118 mm) I can get even larger capture, beter control over my image focus and still make use of cheap scanners to get great images.
Here is a sample of the same scene with my 4x5 camera mounted on the tripod.

Because its using a 90mm lens (quite close to the 105mm in the Bessa) its about the same distance from the wall. The angle of view though is significantly broader, showing in landscape the same height that the others showed in portrait orientation. No looking at the detail, obtained from the lens its nearly the same (although being a 90mm it was a little closer to the target than the 105mm lens, creating a little bigger image of the chart).

this is almost the same result in sharpness but with a system which captures more than double the area of view than the digital. For example this picture
has detail like this:
click for full detail
and as its 14 000 pixels wide (while a DSLR will give you about 5000) will make nice detailed prints well over a meter wide if you want it.
I hope from this long (and perhaps difficult) analysis of the subject you can see that the bottom line is that if you want to make bigger more detailed prints of your favourite scenery, then rather than going to all expense of newer and 'better' lenses you will end up making much sharper prints if you use the right tools for the job.
Tuesday, 15 April 2008
Bessa useful lens limits
To add a little more to flesh out this camera to a potential buyer (for using not for those who simply collect), I thought I'd explain that this camera will simply not give sharp images from edge to edge at less than f11.
There is debate about the Vaskar lens on the camera, and while some say that the lens isn't sharp other swear that it is. Here I'll say that it can be and that it depends on the photographers choices.
Here's why.
For large format camera users looking at the film plane with ground glass is a normal and even essential thing to do. Large format cameras even have the corners cut off on the ground glass, making it easier to actually do this.
The reason you'd want to look here is to see if you've moved your lens too far, and run out of the area where the image from the lens actually falls (you see, large format cameras move the lens around to give control over focus and perspective see this explanation). So I popped open the back of the Bessa early on in the piece to see what I can see. I've done it again here to explain my assertion above.
In this image, I've taped a bit of translucent (foggy) plastic sheet to allow you to see the image formed by the lens, and the lens through the corner of the frame.

You can just see the lens through the torn off corner of the palastic and you can see its not quite perfectly round. Looking at the image below, taken at f4.5, you can see that the shape made by lens is not perfectly round. This will mean that less light will fall on the edges of the film than in the middle. This will make the image darker at the edges (vignetting) and will also reduce the image quality too.

This image is taken at f8 and you can just see that the the lens is still slightly obscured in the bottom third at the left.

its not until you get to f11 that the lens circle is now nice and round

So basically this means that the lens needs to be stopped down to about f11 or lower if you want edge to edge uniform lighting, or even edge to edge sharpness. You'll notice we're not right at the corner of the film plane here, so to be on the safe side stopping down a little more is needed. In practice I've found that you need to stop down at least f16. So, essentially this means that this is a "sunny 16" kind of camera or use a stable support (Eg tripod or solid base) and then use f16 (preferably smaller) and 1 second or longer so you can get reasonably accurate exposures.
Further, there is no accurate markers in setting the aperture (no dent to feel the position of the aperture setting as in more modern cameras) and no 1/2 or /1/3 stop markers. Meaning you've got to 'guess' the adjustment and being more accurate than full f-stop is challenging (meaning that trying to set 1/2 or 1/3 stops is guess work). This is ok with black and white, and possibly colour negative, but I think it makes a challenge for slide or 'positive' film.
However, if you can set it at f16 or f22 (and use a tripod) it gives very nice results. Like this close focus example at f11:

You can see (if you click on the image) that the edges are starting to fuzz ... this was exposed at f11. Below is and a segment from the center of the negative. Please click on either to see larger versions.

So, if you can put up with the difficulties of using this camera:
There is debate about the Vaskar lens on the camera, and while some say that the lens isn't sharp other swear that it is. Here I'll say that it can be and that it depends on the photographers choices.
Here's why.
For large format camera users looking at the film plane with ground glass is a normal and even essential thing to do. Large format cameras even have the corners cut off on the ground glass, making it easier to actually do this.
The reason you'd want to look here is to see if you've moved your lens too far, and run out of the area where the image from the lens actually falls (you see, large format cameras move the lens around to give control over focus and perspective see this explanation). So I popped open the back of the Bessa early on in the piece to see what I can see. I've done it again here to explain my assertion above.
In this image, I've taped a bit of translucent (foggy) plastic sheet to allow you to see the image formed by the lens, and the lens through the corner of the frame.

You can just see the lens through the torn off corner of the palastic and you can see its not quite perfectly round. Looking at the image below, taken at f4.5, you can see that the shape made by lens is not perfectly round. This will mean that less light will fall on the edges of the film than in the middle. This will make the image darker at the edges (vignetting) and will also reduce the image quality too.

This image is taken at f8 and you can just see that the the lens is still slightly obscured in the bottom third at the left.

its not until you get to f11 that the lens circle is now nice and round

So basically this means that the lens needs to be stopped down to about f11 or lower if you want edge to edge uniform lighting, or even edge to edge sharpness. You'll notice we're not right at the corner of the film plane here, so to be on the safe side stopping down a little more is needed. In practice I've found that you need to stop down at least f16. So, essentially this means that this is a "sunny 16" kind of camera or use a stable support (Eg tripod or solid base) and then use f16 (preferably smaller) and 1 second or longer so you can get reasonably accurate exposures.
Further, there is no accurate markers in setting the aperture (no dent to feel the position of the aperture setting as in more modern cameras) and no 1/2 or /1/3 stop markers. Meaning you've got to 'guess' the adjustment and being more accurate than full f-stop is challenging (meaning that trying to set 1/2 or 1/3 stops is guess work). This is ok with black and white, and possibly colour negative, but I think it makes a challenge for slide or 'positive' film.
However, if you can set it at f16 or f22 (and use a tripod) it gives very nice results. Like this close focus example at f11:

You can see (if you click on the image) that the edges are starting to fuzz ... this was exposed at f11. Below is and a segment from the center of the negative. Please click on either to see larger versions.

So, if you can put up with the difficulties of using this camera:
- limited useful f-stop range
- single focal length
- no light meter
- focus by number (needing some way to correctly pick the distance)
- no 'dent' to be reliably sure of f-stop selected
- no partial f-stop marks
Subscribe to:
Posts (Atom)