Wednesday 31 March 2010

legacy Olympus lens on EOS camera (digital or film)

to Raita ... may your photographic journey be fun

Today I'd like to put a quick tutorial on how to mount and use an Olympus OM lens on an EOS camera.

This is essentially done using a small metal adaptor which mimics the camera side for the lens being used, and then mimics the lens side of an EOS lens so that it can be put on the camera.

Now, EOS lenses are fully electronic, meaning that all of the control of the lens by the camera is done by an electronic interface (you can see this on the camera when you take a lens off as a bunch of little golden buttons).

Since the OM lens is fully mechanical it has no capacity for this sort of thing.

Now, keep in mind that lenses are essentially simple creatures, despite all the mystery that modern lenses seem to have, they focus and they have an aperture iris (which is just like the iris of your eye, and gets smaller to allow less light through to the film / sensor).

Quite simple really.

Ok, firstly lets cover mounting the adaptor onto the lens. Most camera systems have some red dot on the body and on the lens to guide you as to exactly where to hold them to orient them bring them together and lock ... so match the dots, bring the two together and turn till it clicks


So, now the lens is fitted to the adaptor, its ready to be used. You can check that it operates and you can see the iris stop down as you change the aperture control ring on the camera (remember, its not electronic-magic, its mechanical)


Remember, it doesn't just get dark as you stop down, the depth of field (what in and out of focus) gets wider ... so if you stop down with the lens on the camera focused on something you may see this in the viewfinder (I say may, because some people can't get past seeing that it just gets darker)

Now, as we see, adjusting the aperture actually stops down the iris (makes it smaller). On modern cameras (electronic or mechanical) we have a cunning system which would allow the lens to be fully open (making it bright to see, and easier to focus) and stopping it down just as you press the shutter. Of course the EOS camera has no such mechanical control, so the adaptor simply keeps that lever pulled and stops the lens down to exactly what f-stop you've set on the lens.


Now, lets put it onto the EOS camera ...


So because this lens now works in a pre-automated way (you know, things weren't always automatic...) it means that as you stop down the viewfinder will get darker. This will confuse your electronic camera which does not know that
  • it can't control the lens
  • what aperture the lens is set to

so you need to tell the camera that the lens is wide open. This is because the camera will only be able to control the shutter. Sure, you're making it darker by stopping the iris down, but the camera doesn't know that.

Depending on the camera you may need to tell the camera that there the lens attached is out of its control or you may not. You can tell by seeing how the camera reacts to having the lens mounted.

Keep it simple: use Av mode


First, lets keep this simple by putting your camera in Av mode. Now I picked that because in Av the camera does what its told regarding to aperture and picks the right shutter speed (lets assume it gets thing right ;-) for the aperture you have chosen. We will be picking the aperture (set on the lens) only this time the camera just won't know what its going to be.

Now just before you rush off, we need to check something (though if your camera isn't an old EOS you may be in the clear), there are two different behaviors for EOS cameras that are fitted with a mechanical lens:

If the display reads “1.0” (or any number other than “00”) then you have the old stop-down metering style.

If the display reads “00” then you have the new stop-down metering style.

I think its quite likely that you will have "00" showing with the Olympus on your camera. Anyway this is covered at this link on EOS stop down metering. Recommended reading for a rainy day ... when you can't be taking pictures.

Ok, on my EOS camera I need to manually set the aperture in Av mode to 1.0, be sure to check yours.

So, I can only use my camera in Av mode or Manual (but I have to remember not to change the aperture). The newer EOS cameras (and I think all the EOS digital cameras) use the "new method" which allows your camera to work in:
  • P (program),
  • Av (aperture priority) and
  • M (manual).


Check your cameras "stop down" behavior and if you need to set it, set it, but probably you will not need to worry about anything.

So, just set Av and go take some pictures.


Ohh ... and don't forget to focus :-)

One of the reasons AutoFocus cameras have become so common is that most people completely forget to do this ... in the heat of the moment. Manual focus offers you control but with that comes responsibility ... you can't blame the camera for a blurry photo if you didn't focus.
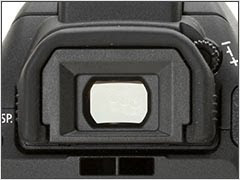
Many cameras have diopter adjustment, which compensates for if you need glasses or not.

So just as it may be difficult to focus your eyes when wearing grandad's glasses, if the diopter adjustment has been knocked off center it maybe impossible for you to see anything clearly in the viewfinder too.

This is normally located on the back of the finder, and you'll see a little wheel with a + and - on it ... as in this figure.

When focusing (if you haven't ever done it before) keep the lens wide open (f1.8 on this lens) for easiest and brightest view. Focus by turning the lens as I did in my above video and when the subject looks sharp then its focused.

Don't forget, those numbers with m and ft on the lens are actually accurate. You can measure (or guess) the distance to your subject and 'prefocus' the lens to that point and just take.

Heaps of photographers who like to "snap on the street" use exactly that technique for their candid photography (when you haven't got time to focus but you want to get it right).

Stuff like this candid from the 1950's by Vivian Maier were undoubtedly done in just this manner.

For example, from Philip Greenspun's pages on photogrpahy we find this advice on zone focusing:

"The classic technique for street photography consists of fitting a wide (20mm on a full-frame camera) or moderately wide-angle (35mm) lens to a camera, setting the ISO to a moderate high speed (400 or 800), and pre-focusing the lens."
Its easier with wide angle lenses of course ... but if the subject is further away (like 5 meters) its not so hard ... either way its something worthwhile to know about

Simple.

To me the greatest benefits of these lenses come between f1.8 and f5.6 ... I prefer to use these lenses at f1.8 through to 2.8. The image may look a little nicer at 2.8 but 1.8 will give you a little more than 1 stop more shutter speed (thus these lenses are called fast lenses). That can make the difference between needing 1/30th of a second and getting 1/90th ... if your subject won't sit still that'll make all the difference.

Its actually still bright enough to focus at f4 on the lens (if you ask me) so you don't need to open and close it all the time, but if you're going to close down to 5.6 or smaller then you may as well use a zoom anyway.

The real advantage of these lenses is how bright (and thus how fast) they are as well as their lovely shallow depth of field, so keep it at 1.8 or 2.8. for maximum benefit :-)

Taken with my 50mm wide open (that means f1.8 ;-)

siiri

Tuesday 30 March 2010

the naked truth

meaning naked as in uncovered ...

For ages there has been something separating digital photographers from film photographers. People don't often even know its there and those who do often don't even remember its there.

In management we talk about glass ceilings that prevent advancement, but in digital photography I'm wondering if the glass ceiling is indeed all the filters.

These are required to prevent the ugly aliasing effects which are associated with Bayer arrays or the heavier filters applied to prevent the sensors from seeing IR (which will disturb the colour as we perceive it), where they are quite sensitive, and to further limit the spectrum to Red Green or Blue as each respective sensor needs to be to assemble colour from the Bayer Array.

In my recent post about the 2010 Shootout I had some thoughts about this issue, and some of the comments I got reminded me of another digital camera of the distant past which seemed to side step many of these issues and take advantage of the technology with a different philosophy and design criteria.

That was the Kodak 760M camera.

Back in 2004 the above review of this camera made a simple statement which seems to have become lost:

Without an anti aliasing filter and no Bayer color matrix, the resolution of a 6 mega pixel monochrome camera is astonishing. In monochrome, 6 mega pixels effectively does what it takes 12-24 mega pixels with a color matrix


So forgetting for a moment any of the issues of how many more megapixels we can cram into a sensor, think for a moment about how much light is lost putting the sensors behind all those filters. Think about it, its well documented that a Wratten 25A deep red filter kills 3 stops.

In fact in that above review of the "special" Kodak camera (nothing more special than not munging up the sensor) Pete Meyers found his ISO was way way higher than he expected:
Correct exposure for my work meant not clipping the whites. I ended up in shock at watching exposure times go from 1/60 or 1/125 of a second with my Leica M6 and film, to 1/800, 1/1200 and even 1/1600 of a second for the same aperture with the DCS 760m. With a base ISO of 400 exposures times are brisk – another advantage of a digital monochrome over a color based sensor.

very interesting, thats a 3 or 4 stop increase.

So (if you ask me) the cost of colour digital is we get sensors which are 1600ISO but if you could just filter IR out and get rid of the other crap (I've got an IR filter anyway, and I'm sure Leica M8 users are familiar with using one too) we'd have black and white digital cameras which would give us jaw dropping image clarity and be equivalent to 12800 ISO all with existing technology.

Considering that Canon and Nikon are already putting out sensors which are 12,800 ... well that's 102,400 ISO imagine the stage photographer's joy of being able to use fast shutter speeds or even stop down a little to get better contrast.

The mind boggles ... so you guys in at Nikon and Canon, try to keep in mind that not everyone wants colour and munged black and white..

Monday 29 March 2010

david vs goliath: spending the R&D money wisely

Its an old story, big vs small.

While this blog post is ostensibly about images, its also about how producers spend their R&D budget for products and what goes into production.

Let me start with an analogy.

This is my Ducati, its a 1989 750 Sport and was made by Ducati before the modern SS series really took hold of the market.

It was made at a time when their budget was small and they were owned by Cagiva. The company was trying hard to catch up with the Japanese bikes which had long since stopped being the wobbly things which took a genius gifted rider like Mike Hailwood to tame and bring to fame.

Based on the frames used in the race proven 750 F1 bikes, the 750 Sport had a real packet of problems to present for the owner. It was in many ways as frustrating to own as it was fantastic to own.

After decades of ownership of Hondas and Yamaha motorcycles owning the 750 Sport was an elegant exercise in understanding what it was the separated the two philosophies and the budgets. Yamaha no doubt had a small group of people dedicated to solving specific issues such as where to put the battery. Ducati on the other hand had clearly just a couple of hours to sort out where to put a battery in the frame (and undoubtedly the race bikes did not have them) and chose perhaps the worst possible location imaginable.

Check out how many 750 Sport owners have the knee of their jeans speckled with holes from battery acid spitting out ...

Just like motorcycles, camera makers have similar production and design issues and looking at an image from my friend over at Soundimageplus, I think I am seeing one. He posted this image recently on his blog, to examine what he finds on his Leica M9 (the lucky lucky bastard)


Leica M9 high ISO lightroom testLooking at a strip he has placed on Flickr, he's photographed a scene at a variety of ISO's and then compared camera JPG to what he can get with LR and no particular massive amount of work.

Its interesting to see just how much better the LR images are compared to the in-camera JPG images.

Now, looking at this thumbnail set to the left here they all show really similar colour rendition, and that's a good thing. The JPG thumbnails also seem to be punchier. But its when you look at the image carefully you start to see that the JPG engine employed by Leica is really not anywhere near as good as those of companies like Canon (who are finally starting to get theirs in good order) Nikon or Panasonic (whom I'm getting more and more respect for with every RAW file I process).

Lets look first at a moderate sample, not this is not incredibly zoomed in or pixel peeped in any way.

First, this is an overview (yes, just an overview) of the red channel of the
in camera JPG image
in camera JPG

that amount of noise is not a good thing at this magnification and you can hardly even read the name of M-AUDIO on the end of the keyboard there

what... didn't see it? Well look at the the RAW sourced LR image
RAW sourced

So its not going to be any surprise that looking at a segment of the JPG file is going to show "noise" in the smooth tones like the shelf...

JPG

while the RAW image will make a beautiful smooth big print

RAW

just like any stock agency wants....

This comes back (in my view) to the same sorts of problems that earlier cameras from the big companies (in this case Nikon) had with in camera JPG vs RAW. I wrote that back in about 2005. In that (pre blog days) I wrote the following:

Considering that
  • most people plug their cameras into the computer via USB and the proprietary software
  • the software performs transformations on the images in many cases on transfer
  • Media cards are now no longer a major limiting factor on the number of images
  • computer software upgrades are easier than camera firmware upgrades
  • alternative systems exist for advanced users
  • JPG costs the makers, whereas a raw format like DNG would perhaps be cheaper for them to implement

Actually, this could serve to make the cameras cheaper, as the camera makers would not have develop and include proprietary embedded image processors for their cameras.


so it seems to me that its still true, although while we lack any "conduit" to pipe our images though to download, perhaps software like Lightroom works out better anyway ...

Anyway, if Leica have managed to shave thousands off their camera by minimising the on-board processing and focus on the hardware that's fine with me ... as I get better images from my Canon 20D RAW images now with the software tools I have than I did back in 2005 when I first got it.

As Canon has long since given up developing the hardware engine of that camera (like you could only ever tweak it with firmware anyway) I'm glad that I used RAW, as years later when I want to get a print of this:


Lake Pielinen 2

I can do it better than the JPG from the camera....

Sunday 28 March 2010

funny things

I am in the midst of packing up my stuff go back to Australia and was packing my Epson 4990 scanner for the journey. While sealing the box, I noticed something on the original shipping document. You see I bought my Epson 4990 used on eBay ... there being nearly nothing like this in Finland I bought it in Germany and paid (don't ask) to get it shipped here. The funny thing is that according to the shipping consignment note, it seems like I bought it from Noritsu Deuctschland.

Funny, after being a fan of the Noritsu scanning process often associated with 35mm mini-labs to find I buy a used Epson flat bed from them.

go figga

the 2010 shootout: a brief review of their review

Show me an artist who knows nothing about their materials and I'll show you a poor artist.

So when people wonder just why the hell do I waste my time understanding my media I don't mind, clearly they don't know much about how to work with anything.

As a photographer we rely on media which now more than ever is changing rapidly, as a photographer I want to be able to make the best "go" at capturing something fleeting I can. Knowing my materials is critical to this.

So from time to time I examine what I have and what's around and try to see if I would benefit from this or that and how.

One of my friends recently pointed out this comparison to me
http://www.zacuto.com/shootout

which is a more detailed analysis over a greater variety of digital SLR cameras and a couple of films.

These guys did a world class job, working with the worlds best and showed their results to top cinema photographers. I encourage you to watch that video ... its a little 'long winded' but worth 30 minutes of your time.

Some things I observed from it, which I think seem to coincide with many of my own observations over the last year of examining my Panasonic G1 and film.

Now the purpose of their analysis (being cinematographers) was on colour rendition and contrast response to lighting (shadows and highlights).

I don't want to regurgitate their findings here, but I'd like to point out some things which I noticed and was not clear among the points which they brought out

First, looking at the the two film stocks (which of course are their reference as cinematographers)


Quite an amount of detail is visible in the patterns of the glass bricks behind the bath tub (why these guys always choose chicks in tubs is beyond me), but look at that part of the digital images.


just blown out ... (although it appears nicely in the reflections on the water), maybe thats what people are used to accepting with digital, and maybe its just a detail ... after all what artist would be interested in the details....

Everyone in their audience also thought that the results were really good. Putting aside for a moment this issue; if you were a small budget producer you could buy a 5DMkII for less money than you could hire an ARRI camera for a 3 week shoot.

That has to be attractive for any director / producer.


Then they did another scene. The topic of discussion was mainly about the light bulb ...


clear an "normal" in both of the film shots ... but in the digital's it looked washed out and nasty.


Every digital camera tested behaved like this ...

This is exactly consistent with my previous findings of how well film handles high key items like this:


Film:


Digital


as well as other examples, even HDRI


All very interesting.

They discussed briefly in their "brain storming" discussion this concept and called it "blooming", I have my own theory of this. I feel that this is not only related to the sensor, but is related to the combination of anit-alias filters / IR filters / blah blah

I mean think about it for a moment.

The sensor on a digital camera has a number of layers over it for a variety of purposes (including protecting it).

Film is simply naked at the time of exposure, so there is nothing over it to flare up ...

More, film has this concept called an anti-halation layer which is specifically designed to prevent this happening at the deeper layer of the film as it's illuminated and perhaps glows internally.

I'd also suggest you look at the contrast of the images in the high key light of the naked bulb.

The digitals all show some sort of flare overall, which I'm suspicious is related to reflections from that shinny surface of the sensor and reflecting back to the back of the lens ... which is shinny too.

I feel there can be no way around this and its an inherent advantage of film, unless we can make sensors naked and matte in surface.

While your watching that video, I recommend that you keep an eye out for the way that the makeup on the model shows shinny cheeks more on the digitals than on the film and the ugly way that her face blows out as she approaches the bulb.


in comparison the film remained beautiful and faithful in the face of lighting adversity....


lastly I'll suggest you take some screen shapshots (as I did) and examine them yourself, because there are differences in the final balance that their colour guy got. The GH1 Panasonic was rated least hightly (although they were impressed) yet interestingly they managed to get its white whiter and a higher level than the other cameras tested.

Check the levels on the bulb in all the shots, only the film managed to make white and had the best control. Now this could be as a result of their WWW compression, or it could be something else (like effort needed to keep things under control in post production).

This was a very interesting test and there is much more information to be had that was directly presented. Perhaps they all yakked about it, but it would be nice if more of it was presented.

Thursday 25 March 2010

the digital vs film tennis match: advantage digital

I used to play tennis a lot back when I was in school and growing up. In tennis the scoring system at a tie point goes "advantage server" or "advantage reciever". If the opponents are well matched it could go on for ages.

As a person who loves film, but uses a digital camera perhaps more, I personally feel torn between digital and film cameras depending on the situation. Just as in tennis, if you're at a deuce you can't win a game by scoring a point from the serve, you have to score another point more.

This first point is called the advantage point, but you still have not won the game. This is just how I feel about Digital vs Film. Every time I find a point towards one, the other gives me a point back, bringing me back to deuce.

Overall digital seems to have the advantage (although it is not game set and match).

My friends sometimes ask me if I prefer film or digital. Perhaps they find that I'm using a film camera and knowing that I'm a camera gear head wonder why I'm not using digital ...

I tell them that depending on the situation that I may choose one or the other as they each have advantages, not everything looks like a nail so does not need a hammer (or a nail-gun).

For some reason people seem to want to be a "supporter" of one team, but to me that's just not how it works. Photography is not like football.

The advantage that digital has (in my view) is that the photographer has more control over the processes. While this can be a disadvantage, it means you can rule out things like:
  • finger prints on your negs
  • scratches on your negs
  • dreadful printing choices at the minilab (no, I wanted that to be black)
  • misunderstanding exposures (because people never look at their negs)
  • needing to own a film scanner
  • needing to learn how to scan
  • learning about colour profiles and management
  • calibrating your equipment

With a digital camera you can look on your PC and pick what you want, get them printed and never even think about fiddling with the images.

I think that its definitely at the point now where DSLR cameras like the Panasonic G1 or the Canon 550D (to name only two) can produce images which rival the best you can get with 35mm film (as a long time digital and film user I can say this is only a recent development. My Canon 20D was not superior to my 35mm EOS in terms of image quality). Out on a bright sunny day the difference between tripod mounted well focused and carefully executed images seems to show only a slight advantage to 35mm (see below).

neg-G1-compared1

This does make you wonder why you paid thousands for a digital camera when humble 35mm negative (which I bought from the supermarket) exposed via 30 year old technology would actually slightly out-class it.

... but of course you'd need the right gear and technique to get this advantage from the 35mm film, even if that gear wasn't actually expensive you need knowledge and technique.

With a image which is slightly fuzzy with motion blur from poor hand holding technique or poor focus you would not be able to tell which was which, so any advantage possible with the film will likely be lost due to poor capture or poor post processing of the film without experience and knowledge.

Some people make the argument that one is likely to learn better exposure and technique with a digital because of the immediate feedback to what you're doing (should you be interested in looking) ... again an advantage to digital, perhaps it makes a better student tool.

Plus (another advantage digital), without any effort at all the digital camera gives you a result with no more post processing than moving the file from the camera memory card to your computer.


Digital cameras also have features which help the photographer doing more challenging things to get the best results, such as live view and mirror-less through the lens focusing operation. This macro image below shows the failings created by mirror slap which just doesn't happen on a mirror-less camera like a Panasonic G1

?

the bottom half is the G1

So while on a good day I can get an image like this from my 35mm camera:


which I could not get with a digital at all ... I of course need to have a scanner to do it, because the middle men (minilabs and printers) will likely muff up their steps leaving me with an ugly print which (without experience) will make me think I've failed when I have not.

Experience and knowledge are needed to make the best from film, whereas digital can give any person a powerful tool with the ability to take and review their shots on the spot. With film if you don't know what you're doing you quite likely won't know you've fluffed it till well after the shot.

Especially in this day of used equipment film can actually be far more cost effective than digital, but if you don't know how to use it ... well ... you've lost that advantage.

Having experience and knowledge of my tools, I know that I can take my film equipment (and not 35mm, but 120 roll or 4x5) and go out and make images like this:


which there is no way I could get with digital even if I spend 10 times more. This is an advantage to me, but perhaps not to everyone.

Once you get your DSLR and start learning, the more you learn and the harder you press into post processing (HDRI, Stitching, ETTR) the more you start to learn things which will help you with film photography. Eventually even those raised on digital come to discover that film has some advantage and after they try it are almost hooked. Some even discuss giving up digital all together.

For me the digital offers so many advantages, that even though I love using a roll of neg in my 35mm camera (or sheets in my big camera) I would not choose to give up my G1 ... it is such a versatile image making tool. I can take some images (even only one) and then send that online to some place right away ... an advantage not possible with film.

But ultimately with so many knowing nearly nothing about photography (and dare I say even unwilling or uninterested to learn), simply wanting to "take pictures" this gives digital the advantage straight up.

so the score is advantage digital ...

Wednesday 24 March 2010

mirror mirror, who has the hardest slap of all

as obvious as this is going to sound, not having a mirror is a huge advantage for micro 4/3, because I don't need to lock the mirror up in macro photography.

I know this sounds obvious, but it just slapped me in the face yesterday making a comparison between my 50mm lens with extension tubes on 35mm and with my G1.

Forgetting about the other optical issues, look at this screen snapshot of two images, one taken with my 35mm camera, the other with my G1. Both with the exact lens and stack of extension tubes, both focused on the same point.

?

Its often been said by camera makers "ohh, you don't need mirror lock up, we've sorted vibration out" ... but macro and telephoto users know that mirror induced vibration is right in the place where it hits you the most ... around 1/30th of a sec and down to 1 second.

Both these were taken on the same tripod with only swapping out the camera from the "system"

Clearly the G1 only crops out the middle of the full frame image, but even with effective focal length being similar to double, its not really like putting a 100mm on a full frame because your working distance is not the same.

Still ... not bad

?

so, if you ever wondered about the benefits of mirror lock up ... mirror-less may help you to get it.

great, now I never need to worry about locking up my mirror when I do my (irregular) macro work :-)

4/3rds DOF: and full frame film (swings and round-abouts)

Today I thought I would go out and explore the theory of the different DoF that exits between 4/3 and full frame. The theory is that the effective focal length is doubled on 4/3 while the Depth of Field achieved is more or less equivalent to an fstop of 2 stops darker on the full frame.

Essentially a 50mm at f2.8 on a 4/3 sensor should more or less equal to what a 35mm camera will produce with a 100mm at f5.6

method


So with a roll of negative film in my 35mm camera and a sunny day to be outside I thought I'd go and expose some film. I armed myself with a 35mm camera with an Olympus 100mm f2.8 lens and put a Olympus 50mm f1.8 onto the G1. Everything was mounted on a tripod and the G1 was carefully focused using the EVF magnification ... naturally 35mm was only focused by eye.

I took images at 1 f-stop intervals starting at f1.8 and going up to the max of each lens.

This actually brought with it a few issues, as in full sunlight my 200ISO film was a little challenged (but coped) while the sensor was washed out at 100ISO at f1.8
That in itself is an interesting finding for me, and worth noting.

Now for the full overview of 35mm Film 100mm at f5.6

snowLS4Kovrvw

and then, a full overview image from the G1 with the 50mm at f2.8

P1070871.2.8


As you can see I did not get the framing perfect, but the foreground (focus point on the bush) and background blur relationships are similar in both. Obviously the 4/3 has a different aspect ratio to the 35mm (which is 3/2) which makes absolute comparison of the views more difficult, but then that was not my aim here. Essentially the 35mm format seems to cover the same vertical view but a slightly wider horizontal view ... again nothing new there. I just wanted to see it myself (rather than just read words).


Now, if we use the f4 image from the 35mm camera and put it against the f4 from the 4/3 we get this (zoomed in a little more for extra clarity)

bothAtF4

so clearly the 4/3 gives more apparent depth of field at the same f-stop. This is because the diameter of the aperture is the main factor in DoF issues, not the f-stop (please see my other page on that).

F-stop is a relationship of focal length over aperture diameter. It is the ratio of the focal length divided by the diameter of the hole. So the key point in understanding this is that while the angle of view of the 50mm lens on a 4/3 sensor is the same as the angle of view of a 100mm on 35mm (or full frame digital) to get the diameter to be the same number you need to open up the 4/3 lens two stops more.

Thus it can be said that if you are taking pictures with a 4/3 camera for the same depth of field intent you can get an extra 2 stops light (if your lens is fast enough) or use an ISO 2 stops lower and getting the same shutter speed.

People who use full frame digital will say that 800ISO on the 4/3 cameras (like the G1) is about the limit, and their cameras give better clean images at 1600ISO ... well keeping a consistent DoF and shutter speed the same, 2 stops takes you to 3200 on the full frame camera and suddenly the G1's noise looks better (comparing it at 800 to the 5D at 3200)

G1@ 800 -> 5D @ 1600 -> 5D @ 3200


The down side?


Of course if you happen to want a shallower rendering then the smaller format is indeed no longer a benefit. This is particularly significant as you move from tele down to normal and wide. In the above landscape image I found that I really liked the f4 rendering above, which would need f1.4 on my G1 to get the same out of focus look.

Well, that's OK, as I have a 50mm f1.4 lens ... however this reveals another difficulty, and that is contrast. I am not sure why, but the images I see on my comparison (which is problematic being film vs digital) indicated that the 50mm needed to be stopped down to f4 to get better contrast, as it was just not as punchy at 2.8 as was the 100mm, let alone 1.8 especially towards the edges.

This of course can be brought up to some extent in photoshop with local area contrast in unsharp masking.

But with the wide open lens, coping with the bright light of the day (even 100ISO) was causing unrecoverable blowouts of the snow. So you'll need to have a ND filter handy if you wish to be shooting at f1.4 in sunlight.

Below is f1.8 (as my OM 50mm lens is f1.8)

P1070870.1.8

This was 100ISO on the camera (while the negative film was 200), even still the negative didn't have any problems with blow outs. I'd need an ND filter on my G1 to have made f1.4 workable.

Below is the image from full frame with 100mm at f2.8 ... its my favorite of the group because it makes the subject stand out more from the background. I've made this one the largest image (you can click on any of these images to load a larger one, its helpful to do that in a new tab to make better comparisons anyway)


I was intending to post all of them up here (and I still might) but like all research (that I seem to do at least) the examination of the images led me to do something else. I initially intended to put the negs on the glass of my Epson 4990 and just scan them at 2400dpi for an over view. But when I started scanning I found something ...

the unexpected


I was so impressed with the details I saw in my 35mm film, I pulled out my Nikon LS-4000 and scanned the f5.6 image at 4000dpi for a good look at the image.

now, the LS-4000 creates a 5608 x 3657 which makes the horizontal detail a little more magnified than the 4000 x 3000 that the G1 produces from the 4/3 sensor. So I scaled the 35mm image back to be 3000 pixels high and the features matched nearly perfectly in size.

Looking at the focus area the features and detail in the image from the 35mm film shot are simply outstanding

neg-G1-compared

click on either of these images, but remember that then you're looking at 100% view. Your screen is probably 100pixels per inch and a print will be 300 pixels per inch.


neg-G1-compared1

So on a print any of this small amount of grain will essentially blend into the background.

I encourage you to load that above image in a fresh window or tab, and sit back about 2 meters from the screen. That will be about what a close examination of the print will give ... and remember, at the native resolutions printing at 300dpi the 35mm scan will print to 18x12 inches and the 4/3 will print to a slightly smaller 13.3 x 10 inches.

While the G1 image is certainly cleaner in noise the 35mm is actually holding more details. So either will scale up to print larger but I reckon that the 35mm image will look better ... I'm going to have to try that out.

Not bad from 30 year old technology!

While these images may match in depth of field and view, they don't match perfectly in detail ... I think that the 35mm nudges ahead on all counts. Even though this is "merely" 200ISO Fuji Superia negative film.

I know that from other examinations of full frame vs 4/3 that I like the ability to get more shallow rendering from the larger frame and I know that from other examinations that negative has much better ability to grasp at all the scene brightness of a high contrast scene than does digital.

Looking at this I'm now really keen to examine a 5D and compare it again to modern films, because its looking to me like the only thing a full frame digital has over 35mm film is convenience and speed of production.

Its funny how so few examinations of this in the past seem to get the results I'm getting here and now.

Perhaps people don't know how to drive the film scanners ... I don't know.

meanwhile, I'm waiting for some 35mm to come back from a scan on a Hassleblad X-5

keep ya posted

Tuesday 23 March 2010

quite a blow

With thoughts of moving back home to Australia, places I love like Fraser Island are coming back to my memory ...

I was looking for an image to test an idea on and ferreting through my collection found this one of an advancing sand blow on Fraser Island.

The wind blows the sand in from the coast and with the right conditions a large dune of sand advances across the landscape, filling in any lakes and killing the trees that happen to be in the way.

They are quite a natural feature, and not caused by any man made activities. Its almost like the sand island swallowing the trees.

You can see one forming here


View Larger Map

They are an interesting feature of Fraser island and responsible for some of the interesting formations you can see on the sand dunes.

Like this example where there were old dead trees seeming to arise from the dune.


As an Australian Europe is clearly a well trodden old world, so tts a wonderful place to go and see the world as it once was ...


before everything became covered in cities ...

Monday 22 March 2010

missing the point: a proposal for an alternative

one of the problems (in my view) with digital imaging is that it seems to be mired in the past. People are stuck thinking in terms of representations of the image and forget about the fact that we do manipulation.

Now in my darkroom daze putting a negative on my enlarger and making a print was the way I made a picture. The negative was something I evaluated as a intermediate but not something that I regarded as a goal in itself.

Today we (well most of us) use digital cameras, which record the data in numbers.
For example a 3072 x 2048 image from a 10D camera takes:
  • 1.3MB as a JPG
  • 6.7MB as a RAW
  • 18MB as a EXR file (which is using zip compression internally!)
the alternative to this is to render your RAW file as a TIFF in 16 bit and store that or keep your RAW and store metadata files which show your processing to get it to where you like it (which is what Adobe Lightroom does).

The disadvantage of all of these systems except storing a JPG is that you do not have something which can be viewed without applying instructions to process it. Particularly in the case of the EXR file which is intended to hold a dynamic range well beyond that of a normal image.

While HDR can be a great tool for converting the relatively unphotographable and making a rendering of that (as in below)


again we are not really storing a finished product that can be opened and viewed.

The disadvantage of 8 bits however is that it will not really support much fiddling before it starts to make the image quality fall apart. Changes such as
  • contrast fixes,
  • dodge and burn
  • colour space conversion
all erode the image. If you don't do it carefully and keep your original you'll end up with less quality. which we're all trying to maximize in the first place.

I can see a few people fidgeting in their seat and wanting to say "what about 16 bit TIFF" ... and of course that's an alternative to the 8 bit representations we have in JPG (or BMP or TIFF or ...).

A 16 bit tiff of the above image is 36MB so its actually greediest to store even if you can just open it.

As it happens as photographers we seldom want to do anywhere near the sorts of calculations that HDR or other ray tracing graphic artists want to do. Most of our cameras are actually only capturing 12 or 14 bit in the first place, and even then (as I showed recently) we seem to be pushing the limits of their ability right now with little real data additions to our images between the 10D (2003) and the G1 (2009).

So it would seem we don't need to be storing more than we are generating, and we really don't need more than 8 bits for representation.

Lets get to the core of the problem as I see it


we want a way to store digital picture information which is not a greedy space hog, but which allows us to make some alterations to the data in a non destructive way.

We picked an 8 bit representation for a number of reasons:
  • its a convenient size for a computer being one byte
  • 8 bits provides 256 levels of brightness which is enough tonality for the human eye
However over the last fifteen years this has gone from simply capturing an image to accepting that post processing is a requisite component. So formats have gradually evolved (often with no real intelligent guidance, so much as marketing pressures) we have moved from the older 8 bit representation and moved towards 16 bit representations to allow us greater "precision" in making adjustments.

This is where ignoring maths a school has let the majority of us down, as we often fail to get the most important point of this.

The decimal point.

Now of course graphics programmers (especially CGI programmers) have been working with formats like Radiance and openEXR have been around for a while and offer the image processing person quite a powerful storage system but not without a couple of drawbacks mentioned above.

Perhaps what we need is to combine the two criteria above
  • its a convenient size for a computer being one byte
  • 8 bits provides 256 levels of brightness which is enough tonality for the human eye

and look for another way to do the same.

Looking into the openEXR and Radiance formats the answer they used was to choose floating point numbers. This allowed them to move something, then move it back without significantly losing information.

There are 8 bit representations of fixed floating points numbers which have been around for decades which would allow us to keep our file sizes compact and give us far more flexible image formats. Since we really only need to keep those 256 levels we could use this sort of binary representation of our number and:
  • keep the file as "rendered" for display
  • facilitate far less desctuctive edits
  • keep the memory requirements and processing demands lower

I'm not sure how to push this forward, but I thought I'd start here


A comment by Tim has had me consider more carefully my wording in the above blog. I've certainly left a few things "implied" and perhaps require a "mind set" context of what I was thinking. Not knowing how to write that succinctly I left ambiguity in my writing (and may have made logical errors on the possible ranges available in fixed point representations). These questions make a good framework to begin addressing those shortcomings in my post.


1) No data format can be viewed without processing at all. JPG needs a 'lot' of processing before being able to view it. I think you mean 'openable with most standard operating sysems without any additional software installed'.

This is of course both right and wrong, as no "operating system" can indeed open most files without additional software installed.

Of course we all think of the entire suite of applications which gets installed on a modern computer as part of the operating system, but they are infact a suite of applications. Browsers, text editors, email applications ... they are all there "standard" when you buy a PC (be it Mac OS-X or Windows).

By processing I meant doing something more than just opening and displaying. Of course JPG is a file which contains data which must be decoded (as one may decode a zip file) to expand it and then put data into memory for display. So it does require more processing than a BMP or a TIFF to open and display.

However that is not what I meant by processing. A RAW file can not be simply displayed and as I'm sure Tim should be aware of requires actually generating the proper colour pixels into a grid which is not what is recorded on the sensor. The demosaic of the RAW generates a proper RGB pixel at the intersection of the recorded red green or blue pixel (note a sensor only records a red a green or a blue, the colour is created)

This then is recorded in a linear fashion, and must have a curve or gamma applied to it, again more processing before then being fitted to within the 8 bits that are used by output devices (like screens or printers).


2) 8 bits might be enough to store the brightness range of the eye (arguably) but not enough to store which 8 bits in the full range of brightness from dark to pointing at the sun.

exactly and as I addressed that HDRI is a separate and distinct practice. I think that one does not normally need to record this sort of range, 8 bits seems to have been pretty good, and 12 is certainly enough for anything short of HDRI.

I don't want to be able to discern sun spots while holding shadow details on the underside of a leaf. I think that accurately is the key word here and negatives have been holding detail and tonal range sufficient for our desires for rendering scenes, perhaps even exceeding digital captures in some ways.

Compared to opening a RAW file or worse a HDRI file almost nothing is done in processing a typical 8 bit JPG or BMP or TIFF file.

This would mean you couldn't accurately store a picture from a digital camera because you didn't have enough resolution (although you do have the range).


I think you've confused resolution (the ability to resolve two dots as being two dots not a singe blob) from dynamic range or scene brightness range. I'm not entirely certain that the floating point needs to have so much more precision to give 256 discernible steps. I should check that out.


3) The fixed precision 8bit encoding you linked to is actually a 32 bit encoding


oops ... I'll fix that link, thanks.

When you send a file to a printer, even if you've got it in sRGB, the file will be "bent" more to fit the printers output specific profile.

storing things as floating point would reduce this enormously.


4) If you were to use 8 bits to encode in an EXR style way (EXR is 16 bit), you would need to use 5 bits for number and 3 bits for exponent resulting in a wide brightness range but a very low fixed precision accuracy


probably ... but (not having done the calculations) would perhaps be quite sufficient to represent much more than 256 levels with rounding happening at display time not at edit time. I have not thought through how such a system would work in principle, and then again since I don't want my intellectual property stolen and this is a blog post not a scientific paper I would perhaps keep that to myself.

The problem as I see it comes from the results of successive edits. For example, if you apply a different curve to the scene (or parts of it with dodge and burn) you may result in numbers which for adjacent pixels (for example) receiving calculated values of 165.2 165.3 165.4 165.5 Naturally this will all be written to 165 and you now have lost a tone change and been left with a tone.

5) Any newly invented image storage file type will suffer from your first mentioned problem of no being openable on all standard systems.

that is a problem ... as is introducing any new formats.

Saturday 20 March 2010

RAW and WMM: what's he building in there

Most photographers have by now heard of RAW, however WMM is a TLA for "White Mans Magic". Meaning something complex that you can't understand. Having just written about my explorations of RAW and Exposure I thought I would put up a little more information which I have been finding in peeling back what is in RAW files (using some tools and dcraw)

As I mentioned before, with film determining exposure was a reasonably straight forward affair (although still seems to have and continue to mystify many).

Essentially you just used a tool to measure your film density and you could understand from that if you were under exposing or not.

The graph here is the density for negative film.

Of course you needed to measure this, and before we had digital tools this may have been tricky. But since the mid 1990's this has been easier as Scanners as it happens make good and simple densitometers.

With Slides however its much easier, you just look at it. If it looks dark you got it under exposed and if its washed out then you over exposed it.

If it wasn't for the fact that slides were notoriously difficult to get prints from I reckon more and more people would have used slides. As an aside here I'll mention that while slides look like the sorts of thing that is projected at the movies, the cinema industry actually uses negative to shoot with and the "prints" are what you see on the projectors. Cunning.

An important point is that the quantization of analog data from the sensor is not the same as the absolute values that the sensor is producing. Unlike film, where density is determined by light levels (up to a saturation point) the Analog to Digital Converter (ADC) is tuned by the camera maker to match the sensor (pixel) output. So while we have numbers we don't really know what they correspond to without making known source measurements. More bits is better up to a point, but after that only if more bits means greater ranges of analog readings.

Well, anyway ... I know how digital cameras record their data on the sensor, which I covered in that previously mentioned article on exposure:

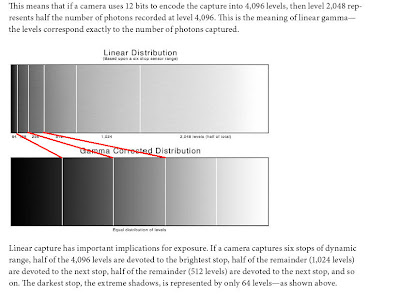
The RAW data is the Linear Distribution, mapping that to an image is where the Gamma Corrected Distribution comes in.


Of course you don't have to map it according to that, and many don't. Although maybe most cameras do, that's changing with makers addressing tone mapping concepts in camera.

Well, anyway before I get carried away, lets get back to analysis of my images.

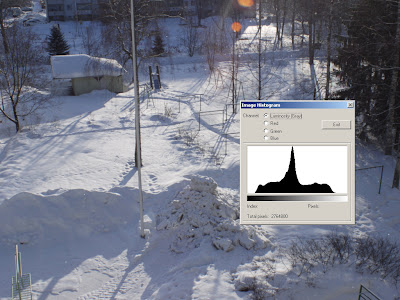
Below is the data set from the image which looked like this


now, look at that histogram and there is no data in the very black and no data in the very white. Suggesting no blow outs. Now look at this data table below. Data seems to start from about the 27th level in the count...


and sort of run out at about step 3988. Remember this is greater than 8 bit data and as it happens these data levels fit within a 12 bit range (binary value 111110010101 if you wanted to know)

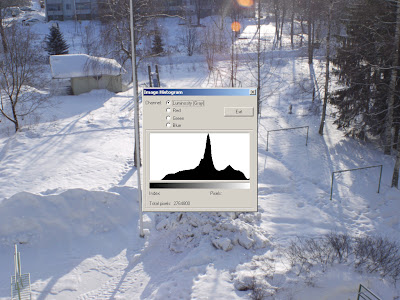
Looking carefully you can see that data representing high levels is trickling to a standstill as we approach 3988. Now, lets look at the next image in my bracketed sequence


which is just showing clipping, but interestingly still has a gap where nothing is really black. Looking at the data from that image we see that indeed low level data starts a little later ...


we are starting to see a little clustering happening around 3972 level ... The bunches of data show more and more levels are approaching the clipping point.

But its funny to me, its almost like its being scrunched together before it hits the mathematical limit. This starts to look like some sort of compression algorithm is being applied to it before the analog signal gets digitized. This sort of signal processing is actually common in the Audio industry, even before digital we used 8 to 1 or 10 to 1 compression leading into the more ugly infinity to 1 compression (limiting) to prevent tape saturation.

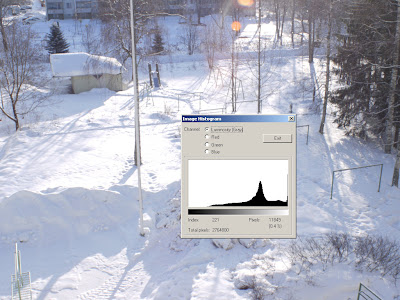
Lets look at the camera generated JPG image where we have really obvious clipping


and a slightly extended area of no data, looking at the data from that RAW image the data doesn't start appearing until about level 120 (although note that green is well under way there)


and we have the same bulb of numbers appearing at the end and a soft fall into a hard limit of 3989 again.

So to me it seems that the hard limit is 3989, and nothing goes over that (or reaches it) and that as data approaches it it gets scrunched up in a bundle rather than just clipped with a smack.

The data for this is available here for those who are interested to see the data.

Because I am not able (yet) to look at the actual raw data, I am employing dcraw (which is the most reliable source I know for converting RAW, and is used by dozens of software vendors to make their products work) to decode this and then using another tool to explore that, I can not be certain this is not an artifact of dcraw. What I do know however is that this is not confined to my Panasonic G1.

Here is a sample from my 10D, a much older camera, and one from the generation where people really do talk about "hard clipping".


we see a few things of interest in this dataset:
  • the data starts much later, with nothing before 128 (a significant number in digital)
  • all the data channels start much earlier
  • the two green channels are not equal at their cut off point and the blue cuts off earlier(perhaps making ugly images at that point).
  • it goes a wee bit higher in the range than the Panasonic
So, like all research this leaves as as many new questions open as it answers my initial one. I'd really like to know if
  • what seems to be low level truncation of data in the 10D results in the reputation for "clean files" that the Canon has;
  • if the ugly high lights of the Canon are related to the scaling of data;
  • if the ugly noise seen in the Panasonic when tonemapping is related to the gentle trail in of data at the start
  • if all this means that we can just use camera JPGs more on the newer cameras, not needing to rely on tricks and tools to get better images?
  • are we loosing real data by not compressing more effectively, perhaps cameras doing log encoding of the data in the first place would get us away from some of the noise (you know, optics have flare and stuff ... we don't all do astrophotography) in the system and have better access to the high count (bright light) data.
Certainly with this last point I've found that the benefits of RAW processing in the case of the G1 reveals less than it did with my 10D ... seems like things might be getting easier.

... just as long as you get the capture right in the first place.

stay tuned for more as I find it out.


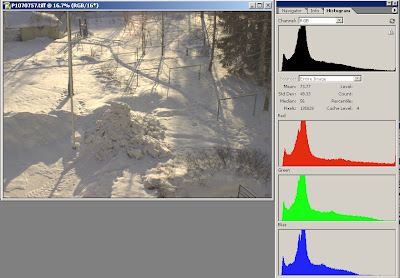
PS I thought that incase anyone had not thought about this, I'd take this time to demonstrate what a histogram is. If you remember this image from my previous post...


well if we take the data from that spread sheet and in Excel plot a graph averaging its values over the range it covers, we get this.


so now you perhaps see your histogram in a better light ;-)