Showing posts with label tone mapping. Show all posts

Sunday, 22 January 2017

On Phone Camera Processing just got better

Hi

Using the computing power (and beautiful screen colour rendition) of your phones to process RAW images taken with your actual digital camera (not just the phones cam) is an attractive idea. In an earlier post late last year (here) I explored using Snapseed to process the RAW files from my Panasonic camera on my phone (an Oppo F1). But as it turned out there was a problem for me in getting the Panasonic RAW files to play with Snapseed, it only works with DNG files, not the RW2 produced by the camera (no such problems with iPhone versions now nor dcraw for Android BTW). As I like the way that Snapseed works (its interface) I have wanted a way to get this happening on my Android devices.

Well now there is an app for Android called raw2dng (playstore) which does exactly that step for me.

So I now:

  1. pull the SD card from my Camera
  2. plug it into the SD reader 
  3. plug that SD reader into a USB OTG cable
  4. open the app and select the images I want, save
  5. Open the new DNG images in Snapseed and process 
Sweet!
I think that its not actually any slower than any other process because it is still constrained by the requirement to read the RAW from the SD card and then process and write the data to the DNG. Its faster than using the PC (which you may not have) as an intermediary step as it saves an extra cycle of read / write.

Example


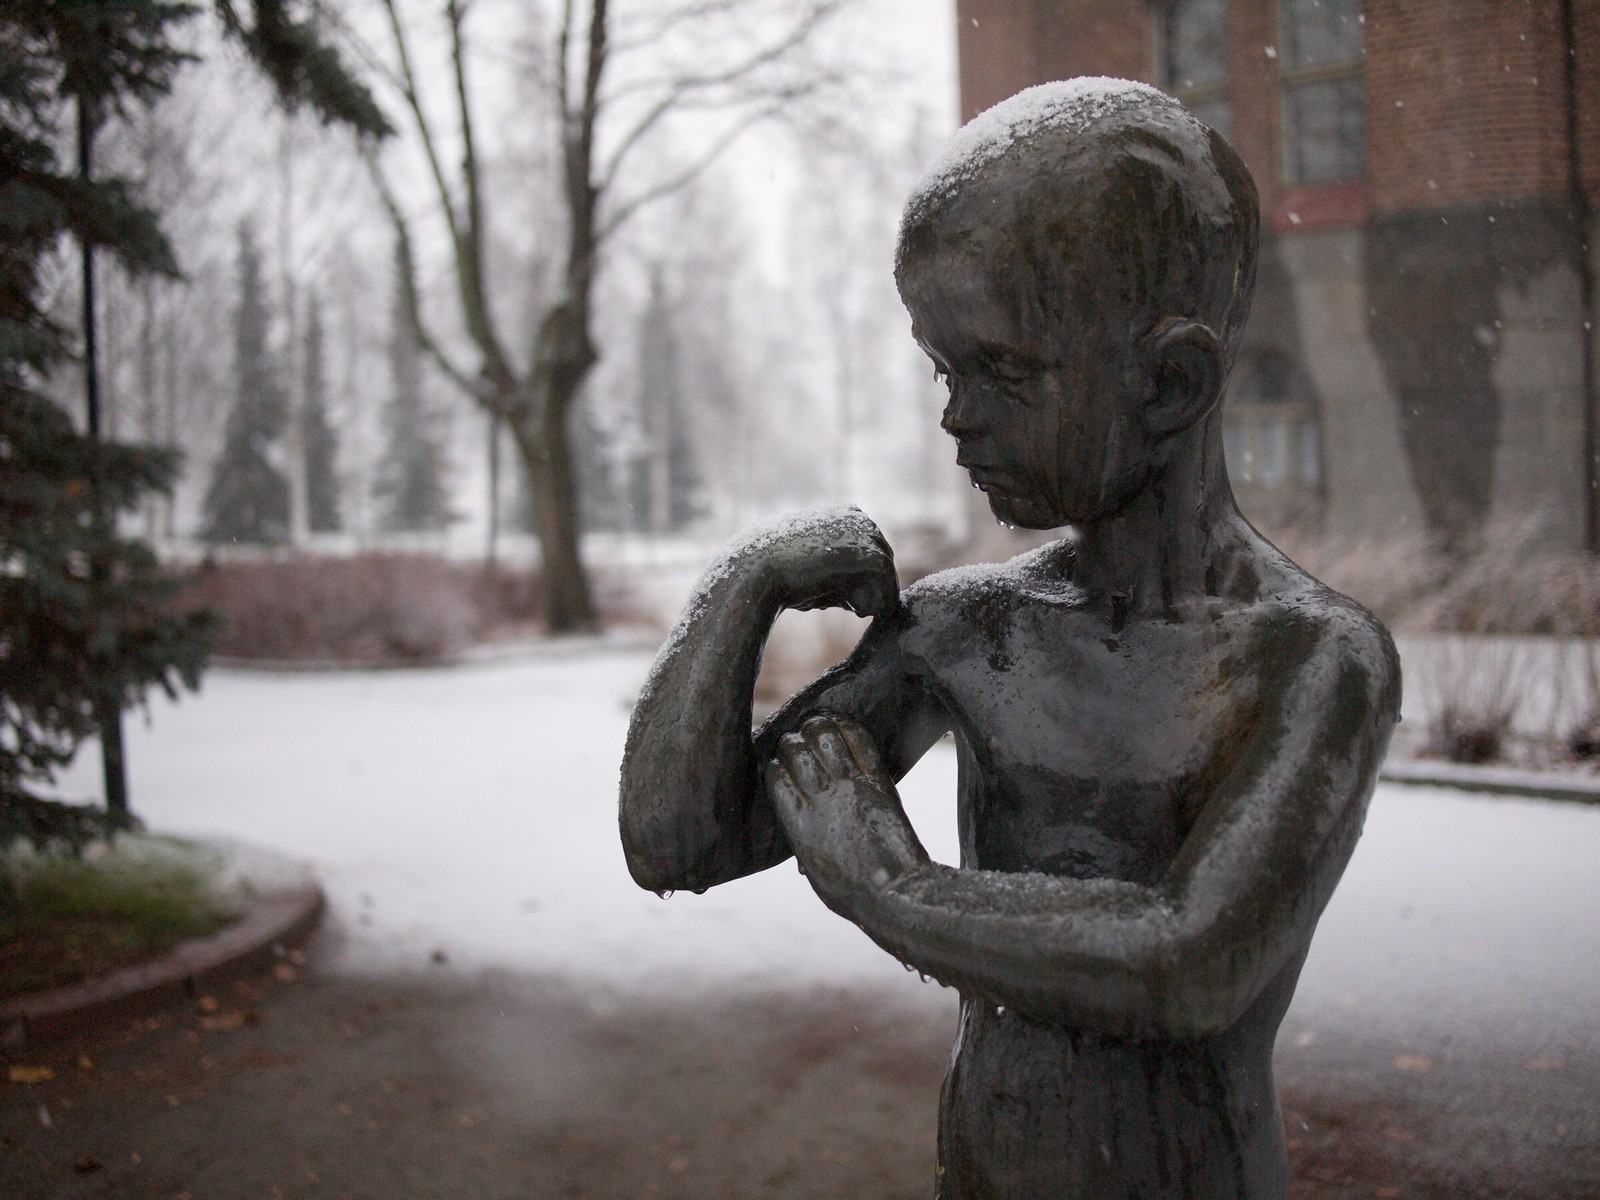
A sample: this RAW file was (I was a bit agressive on EV compensation) set to -1 EV as I was worried about snow being washed out on the kids head. This is the JPG extracted from the RAW file:


while on that point it boggles my mind that people are still wasting camera space by picking RAW + JPG when all RAW files include an embedded JPG anyway (so you can see it on your camera).

Then running that through Snapseed I just did a quick and dirty of develop (no compensation) and HDRI (held back a bit in strength and picked "Nature" filter)


which isn't bad when you consider it.

Of course if I just wanted to pull the JPG's out of the RAW files on the card I could have used DCRAW for Android (which is a bit clunky, but quite powerful) to save the embedded thumbnails to my phone.

For reference, this is an attempt with Snapseed to just pull up the exposure +1EV and hold the highlights back a tad


also quite good, but missing the details of fallen leaves in the grass over there on the left ... which is why I like to tonemap (and always did a little doge and burn when I was printing negatives back in the wet process days).

So there you go ... make better use of your camera with your Phone (if you have Android, dunno how that goes on iPhone)

Tuesday, 1 November 2016

as Computer Camera and Phone gradually intersect

Since buying the Oppo phone I've been gradually doing more of my photography with the phone than with the camera. Not just because its convenient to have the camera in my pocket (which I've had for years now anyway) but because the on device post-processing is just that much better.

This started out as me wanting to test how well my Phone's camera did with Snapseed compared with the PC but ended up asking the question of "is my Phone a suitable platofom for image processing" in general. The answer is "almost".

Know your tools

The phone is a 1.7GHz Quad Core (well actually its an OctaCore but the other quad core is 1GHz) and my PC is a 2.5GHz dual core i5 (running quad virtual cores), so they're both quite fast enough to do processing.

In the past I've had Android tablets which have had lousy cameras, and if I'm going to send an image to a device from my Nokia it may as well be my PC because I'm usually at home when I want to do something like that, and the PC is just easier.

However having my new phone with a decent camera, that does RAW capture and enough grunt to do the processing it seemed obvious that I'd start to do this (and I have).

Today I wondered if Snapseed was actually doing as good a job at taking a RAW file and doing something with it as my previous work flow of

  1. capturing on my Panasonic m43 camera
  2. transferring to my PC (and in this swapping out PC for Phone)
  3. processing there
  4. publishing from there

So to answer that question I thought why not do the counter intuitive and transfer a RAW file from my GF-1 to my Oppo and process there? I wanted to do what I consider the "hard work" image processing which pushes captured image data to the limits, and that is to make a HDR (yes, I know, its really a tonemap, as I'll need multiple images to properly make a HDR ... but this is for the general public too)

The Panasonic RAW format is proprietary (aren't most of them) but the Oppo uses DNG. Snapseed (my preferred RAW processing tool on the phone) only works with DNG, so to do this I used Adobe DNG converter to convert my GF-1 file into a DNG and transferred it.

I took two shots of the same things and did some comparisons. I'll present one here as they all more or less led to the same conclusion.

So I took this shot with my GF-1 using the Panasonic 14mm  f2.5 lens (to provide almost the same angle of view as the Oppo F1) 


that is of course the camera JPG .. and then this shot with the Oppo


they aren't totally perfectly exposed the same, but if you've ever worked with a phone you'll know why .. That too is the camera generated JPG.

process

So to make the comparison I did three processes:
  1. processed the RW2 on my PC using Photomatix (as I normally would do directly with the RAW file)
  2. then I converted the RW2 into a DNG and loaded the DNG onto my Oppo and generated an image with Snapseed
  3. then I used the Oppo's DNG on snapseed and processed that
This is what I got:

GF1 on PC with Photomatix


GF-1 on Phone with Snapseed 


and lastly the Oppo's own camera (as DNG) on the phone with Snapseed


which has a colour balance difference to the pretty similar renderings of the GF1 (in both places) but you know it doesn't make you point and shake your head going "oh dear, that's terrible".

They look pretty darn close if you ask me.

What this says to me is that Snapseed is doing a pretty good job of processing the images, either from Cam or Phone. As we have the (I'll assume higher quality) RAW file from the GF1 processed on both systems looking similar I think its fair to say that the phone RAW files won't benefit much from being moved over to the PC and processed there.

The astute will spot that the GF1 has not had lens corrections applied by Photomatix but has had it done on Snapseed (it applies same to the Oppo too). (award points for either way as you see fit)

Pixel peeping

Processing on the phone has never been what I intend for doing "gallery prints", however as (at the moment) I'm unable to process the DNG's made by the Oppo (I could do that on another machine I no longer have access to which has PS CS6 on it) anywhere else but on the Oppo it seems just as well to do that.

So for the completeness, lets have a look at some 100% crops

GF1 - PC - Photomatix


GF1 - Oppo - Snapseed


Oppo - DNG - Snapseed


Even at this level, almost nothing stands out as being "gosh" ... all have good details, all show similar noise (especially of interest being the two processing locations for the Panasonic GF RAW file). Minor disparities like colour grading and saturation can be easily fixed and the differences only exist because of comparing them.

The GF RAW file shows better contrast (thank god) in both places and better colour saturation (which was hard to balance between PC and phone because my Phone screen is so much more punchy in its colour range).

Not much in it really and clearly the processing of the GF file was good in both places. Meaning that I may as well just process my Phone RAW files on the Phone ... unless I'm really wanting to work it.

conclusion

So this shows to me that RAW and then the more challenging HDR processing of those files seems quite equivalent on both locations. Actually if one is after a "rock and roll" processing look, then the advantage is on the Snapseed Tonemapping because it was literally far less work. It was literally:
  1. load
  2. develop (tweak exposure if desired)
  3. click HDR and pick the look
  4. click done
Whereas on the PC I've never had it so easy, its been (and was again):
  1. load into Photomatix
  2. pick the HDR look I liked
  3. save
  4. open again in Photoshop (because it saves as not quiet the right profile) and convert to sRGB
  5. adjust the curve (because I usually end up processing as a gamma of 1.4)
  6. add in some local area contrast (cos it often looks a bit flat)
  7. save

the future

As an outcome from this process I'm of the view that I'd actually like to process more from my camera on Snapseed on my phone (especially when out and about).

Why? Well the screen on my Phone is just beautiful while the screen on my laptop is a bit "flat" in gamut (and really most of the new OLED phone screens are beautiul ... and 1080p too.

To do this would be great, but while tantalisingly close but not yet there. Why?
  1. getting the camera native files from camera to phone is tricky, products like EyeFi do not handle RAW files from all the myriad formats well so you're going to be stuck using the JPG, and so what's the point?
  2. Snapseed (which is free) only processed DNG, which means you'll somehow need to convert your cameras RAW file to a DNG before you move it to your Phone
So essentially this means (in my view) that on phone processing (or on Tablet processing) will need a better job of moving those RAW files over to the device from the camera.

There is no doubt in my mind that once the software makers of the WiFi SD card systems (needed for transport from Camera to Device) get their act together and stop using (what seem to be) antiquated file filtering methods and get the various RAW files onto the Devices we should be able to do this. Already DCRAW is available for Android and it will make a 16 bit file from my Panasonic RAW files

Maybe next year.

Wednesday, 17 February 2016

Sony A7 RAW file weirdness

For some time I've eyed the Sony A7 as a full frame camera (on which to use some of my Olympus OM 35mm film lenses for a start) which is not as much of a "Behemoth" as the 5D and similar SLR cameras are.

However its come to light over the years that the A7 RAW format is somehow not the "right stuff" and as its also my preference to avoid Out Of Camera JPGs I'm sort of "stuck" on dropping a thousand bucks (Australian < > US Dollar sucks) on even a used one to sus it out.

Fortunately I have a friend on the Net (thanks Yu-Lin) who does have one (for more or less the same motivations) and he's kindly sent me some files for analysis.

preamble

Firstly I suggest the reader toddle over to this site where the issues of posterization are shown and explained and also have a look over here at the examples that were perhaps the first reportings of this.

In this post I want to present some findings which I've made with a few tools like dcraw and rawhistogram (downloaded from here).

Using this pair one can actually make a spreadsheet of a summary the data captured in the RAW file and see what's there. I think its actually pretty much what DxO do when they rate the sensors of cameras. However there are clearly differences because DxO rates the sensor output at 24.8 bits and the EOS 6D at 23.8 bits ... so I remain out to sea there.

I am not entirely certain that what I'm seeing isn't some sort of artifact, but if it is, then its an artifact that will encumber most RAW processing engines.

Lastly I recommend reader to have a quick look at my older post on RAW and White Mans Magic over here. If nothing else its a good starter into the analysis method used.

Note however that the output of the Analog to Digital Converter (ADC) is just the assigning of analog numbers to digital numbers and there is no intrinsic "scale" in that. Meaning that the output does not represent the count of photons only the number assigned to a count of photons (recalling that a sensor pixel analog value translates more or less to photon count). So a longer range just means more accuracy in the quantification of that output signal not that the sensor has a higher threshold for capturing light.

findings

So, firstly Yu-Lin sent me this image:


which he exposed to avoid clipping ... my initial question was to see how well the shadows held up and what could be pulled out of the RAW file. So he sent it to me and I processed it into this:


which I'm sure you'll agree shows a remarkable rescue of the shadows (no discusson on if that's better, I just wanted to see). In particular I used Photomatix to do the tone mapping, and its normally a good test of what horrors lay in the lower levels to reveal themselves when pushed out. For instance this is a more detailed look at what I got from the shadows:


which I'm sure you'll agree is quite impressive noise wise.

So far so good ... its all looking fantastic to my eyes (and I'm not actually worried about anything that follows here really)

But when I tossed the RAW file into my processing system I found the following interesting points. To be clear the processing uses dcraw with the following switches  -D -4 -t 0 -o 0 -v
So there is no "stretching" of the data. Presented below are essentially the histogram counts for each quanta. As its not "demosiaced" we have Bayer R G G and B channels.

where does it start?

The data starts recording quite late in the binary buckets ... meaning that quite a few bits are wasted in the low end. In fact the data starts showing only at quanta 128


fair enough ... so they decided to get rid of "floor noise" ... My G1 (from that earlier blog post) started recording a bit earlier at about 36, but not as evenly representing in the channels ... meaning that there was data in Green before Red or Blue (in that order).

where does it end?

So this led me to then look at "where does the data set finish", which was where I found interesting things. The data sort of changed recording at quanta 1523, to recap 16 Bit can record up to quanta 65535 if it was presented with that level from the sensor. Often it is not (fully 16  bit, and here is where we get to the possible method DxO uses) and ends somewhere else much lower (in quanta number, using less of the available significant bits).

For instance in the case of my G1 it ended in a clump around 3989 and with my 10D  around 4007 ... which is a long way short of 1523

However what came to my attention as I was paging down the data, was that after position 800 the Sony started skipping data points, writing data at every second quanta not every quanta.


Interested I aske Yu-Lin for a file that contained over exposed (clipped) data for analysis and found things got even more interesting.

Like that file it started "skipping" every 2nd data point, but then went to recording at every 4th data quanta when it got down far enough.


... then at every 6th


then every 8th ... which went on till the data just stopped at quanta 4157


like what the fuck?

So while at first glance it would seem that the Sony A7 records data from quanta 128 through to 4157 (which seems a really good showing) the reality is that Sony have not got much data in there at all. Probably over half the quanta are missing (I'm too slack to count).

This may go towards explaining why DxO rates the sensor as having more bit range (or data range) than the Canon when the Canons I've seen do not employ such tricks to "compress" the RAW files (by having them more or less empty).

Why this may not be the end of the universe...

Anyone who's done any work processing images should know that there is a non-linear compression applied (or curve) which has a toe and a shoulder. This results in the lower end of the data range being streched (putting a challenge onto the quantisation of it) with the top end being compressed (or squeezed together). Let me recap this (from another source):


So perhaps Sony has had a go at "optimising" its data knowing what's going to ultimately happen to it to try to get "more into less".

In my history of working with Sony products (from Audio days onwards through MiniDisk and into Computers and digital audio recorders) I would suspect that Sony is doing something like this.

I know that with my Sony PCM-M10 recorder they employed a super scruffy MP3 encoding which resulted in high end truncation .. but one could ask was it "obvious" listening or only something one can pick up in analysis.

Well a bit of both. If you happen to post process images (as I also post process sound) it did show up as being faintly less clear, but only if post processing the MP3 ...

Is this a "valid" technique on the part of Sony? Well that's your call ... what I'd like them to do is at least make it more transparent. Because as it is they seem to fudge greater data depth on sensor reviews than perhaps they deserve ...

Saturday, 23 July 2011

digital vs neg: Australian light

Back in Finland I compared my m4/3 camera (Panasonic G1) to 35mm film and found that in situations of higher contrast that negative film captured the scene better and that in situations of lower contrast digital revealed more of the subtle textures.

As Australia has different light to Finland (perhaps more contrasty) I wanted to explore how well my findings held here. It was also an opportunity to compare fuji frontier scans with what I get from my Nikon LS-4000 as I have done previously with Noritsu systems.

As mentioned in a previous article, its amazing how well negative does in coping with contrasty light like this:

Good shadow details, great highlights.

summary


I was impressed how well I could pull images out of RAW files from the GH1, with the right processing tools you can do outstandingly well compared to negative.

Noritsu machines scan better than what you get with Fuji Frontier

Getting a high quality scan out of a Frontier operator is like getting milk from a stone, and you just wouldn't buy a digital camera producing as few a megapixels nor as shitty a quality.

discussion


So, getting on with it, I made the comparison using my EF 24 f2.8 lens on the 35mm camera and the 14mm end of the 14-45mm Zoom on the GH1. I was expecting that the 14mm would equate to 28mm on the 35mm frame, but wondered how aspect ratio (width over height) would effect this.

I used Photomatix 4.x (which has a nice little batch processing mode) to process my RAW files to get that little bit more out of the file (for that little less effort). See my posts here and here about that.

As it turns out the 4000dpi scan of the 35mm frame using a 24mm lens produces pixel for pixel sizes which are quite close (but not 100% exact) to the 14mm lens on the 4/3 frame. The angle of view and amount of scene captured varied ... you can see that below where I've overlaid the frames as best I could.

So the 24mm (as expected) reveals a wider frame than does the 14mm on the 4/3. You may notice how well I've matched the colour and contrast between the two VERY DIFFERENT media.

This makes comparisons a bit tricky as at 100% views (pixel peeping) because magnification is different, just as 100% views of a more telephoto image will reveal more detail than a wider angle. Essentially the digital has a slight 'resolution' advantage in this. None the less...

So, lets take a look at a central portion of the image where there is some shadow detail and bright reflective objects in full sunlight.

Firstly, I see that seven though the 35mm image covers a wider capture than the 4/3 does the feature size of things on the scan is actually a little larger than on the 4/3, which is impressive. The dynamic range capture is pretty equal although the digital looks a little punchier which suggests it wouldn't quite be up to the wider range of highlights than the negative is.

Next I notice that there is greater details in the brickwork and lovely smooth texture in the wall of the building on the digital.

This smoothness of texture really shows itself on skies:

The smooth clear blue is perfect and the small clouds are almost lost on the negative. I guess this is where film folk liked Slide. But to me if you're going to swing with blocked up shadows and blown highlights that slide film brings (without a projector) then you just may as well use digital anyway.

The digital from RAW with this processing is impressive stuff and makes me really question where and why I'd use negative ... I'll need to test this again on a 5D and see how that goes. I've read they have less noise in the shadows than the 4/3 does, which would really assist with this sort of processing.
Lastly I thought I'd present a comparison with the out of camera JPG and the RAW processed in the manner I work with.


Look to the left over at the building and see how much better the contrast range is reproduced, check out the shadow details under the trees, and generally just how much punchier it looks. Sure you may not like the saturation, but that can be dialed down easily!

Lastly I'd like to present 2 images take looking into the light:

Negative:

Digital

the sky blowouts are a little offputting on the digital as is the slightly garrish colour which no doubt came from handling highlight recovery of blown channels. Clearly some HDRI or plain old under exposure would help with on the digital, but then the shadows will either be ink or noisy.

So Negative still copes with the really harsh conditions better ... well in my view at least.

conclusion

The Photomatix processing of RAW files (automated batch) is now giving me in full sunlight the sort of contrast handling that I once reached to negative for, meaning that I'm now more inclined than previously to reach for my 4/3 digital than I am for negatives. There remain some issues which digital needs to be handled with care.

Its not black and white is it :-)

Wednesday, 19 January 2011

Photomatix 4 - tonemapping and RAW conversion

I normally take pictures with the camera set to capture RAW and embed a mid sized JPG into the RAW file. I like doing things this way as I get to quickly suck out the JPG using dcraw (god I love that tool) or process the RAW file should needs be.

As it happens I have quite come to like Photomatix as my processing tool for my RAW files.
A classic tool for stuff like HDRI and even tone mapping.

Back in 2009 I wrote a blog post on how to use tonemapping to try to make the best from problematic images (I recommend you have a quick flash over there and have a gander at that post). The other weekend I was out and we stumbled across a young Kookaburra who was just on his first flight. Being a bit stupid he let me get close to him while making worried sounds and I was able to take this shot with my FD 300 f4 lens mounted on my G1 Panasonic.

P1100906

It was OK, but the exposure was a little dark for my liking. It was under shade and backlit but I didn't really compensate enough to get the best results. So I plonked the RAW into Photomatix and got a much better result ....

young Kookaburra

Like the old ad used to say "try that with a cheaper foil". I genuinely don't think that this is even possible to do with Photoshop curves and layers with doge and burn and all manner of tricks.

Instead of laboring for hours I spent some 5 minutes with it on Photomatix. Compared to the previous version the new version is even easier to drive and supports my G1 files directly.

The first step was to just pick "reduce noise" and not pick "reduce chromatic aberrations". I think noise reduction is helpful and since its a legacy lens the software will have totally zero idea as to which lens it needs to correct for ... not that the FD needs much CA work.

I also make sure to pick a white balance which most closely represents the shooting situation ... after all its RAW so you can do that again no matter how you shot it.

Next it opens as a proper image in 16 bits in Photomatix and I can make some quick choices to alter it


I have found that I like either the enhancer smooth or enhancer default (not being into the garish) and then just wind a little onto the strength and saturation to suite my tastes (nothing severe). Click process and voilla ... get a 16 bit TIFF or JPG if you prefer. Don't get too anal about the colour as Photomatix is not able (as far as I know) to work with managed colour and calibrated displays, so just get the look more or less right and process.

too easy

I recommend you load those two images in different tabs so you can switch between them and see the difference.

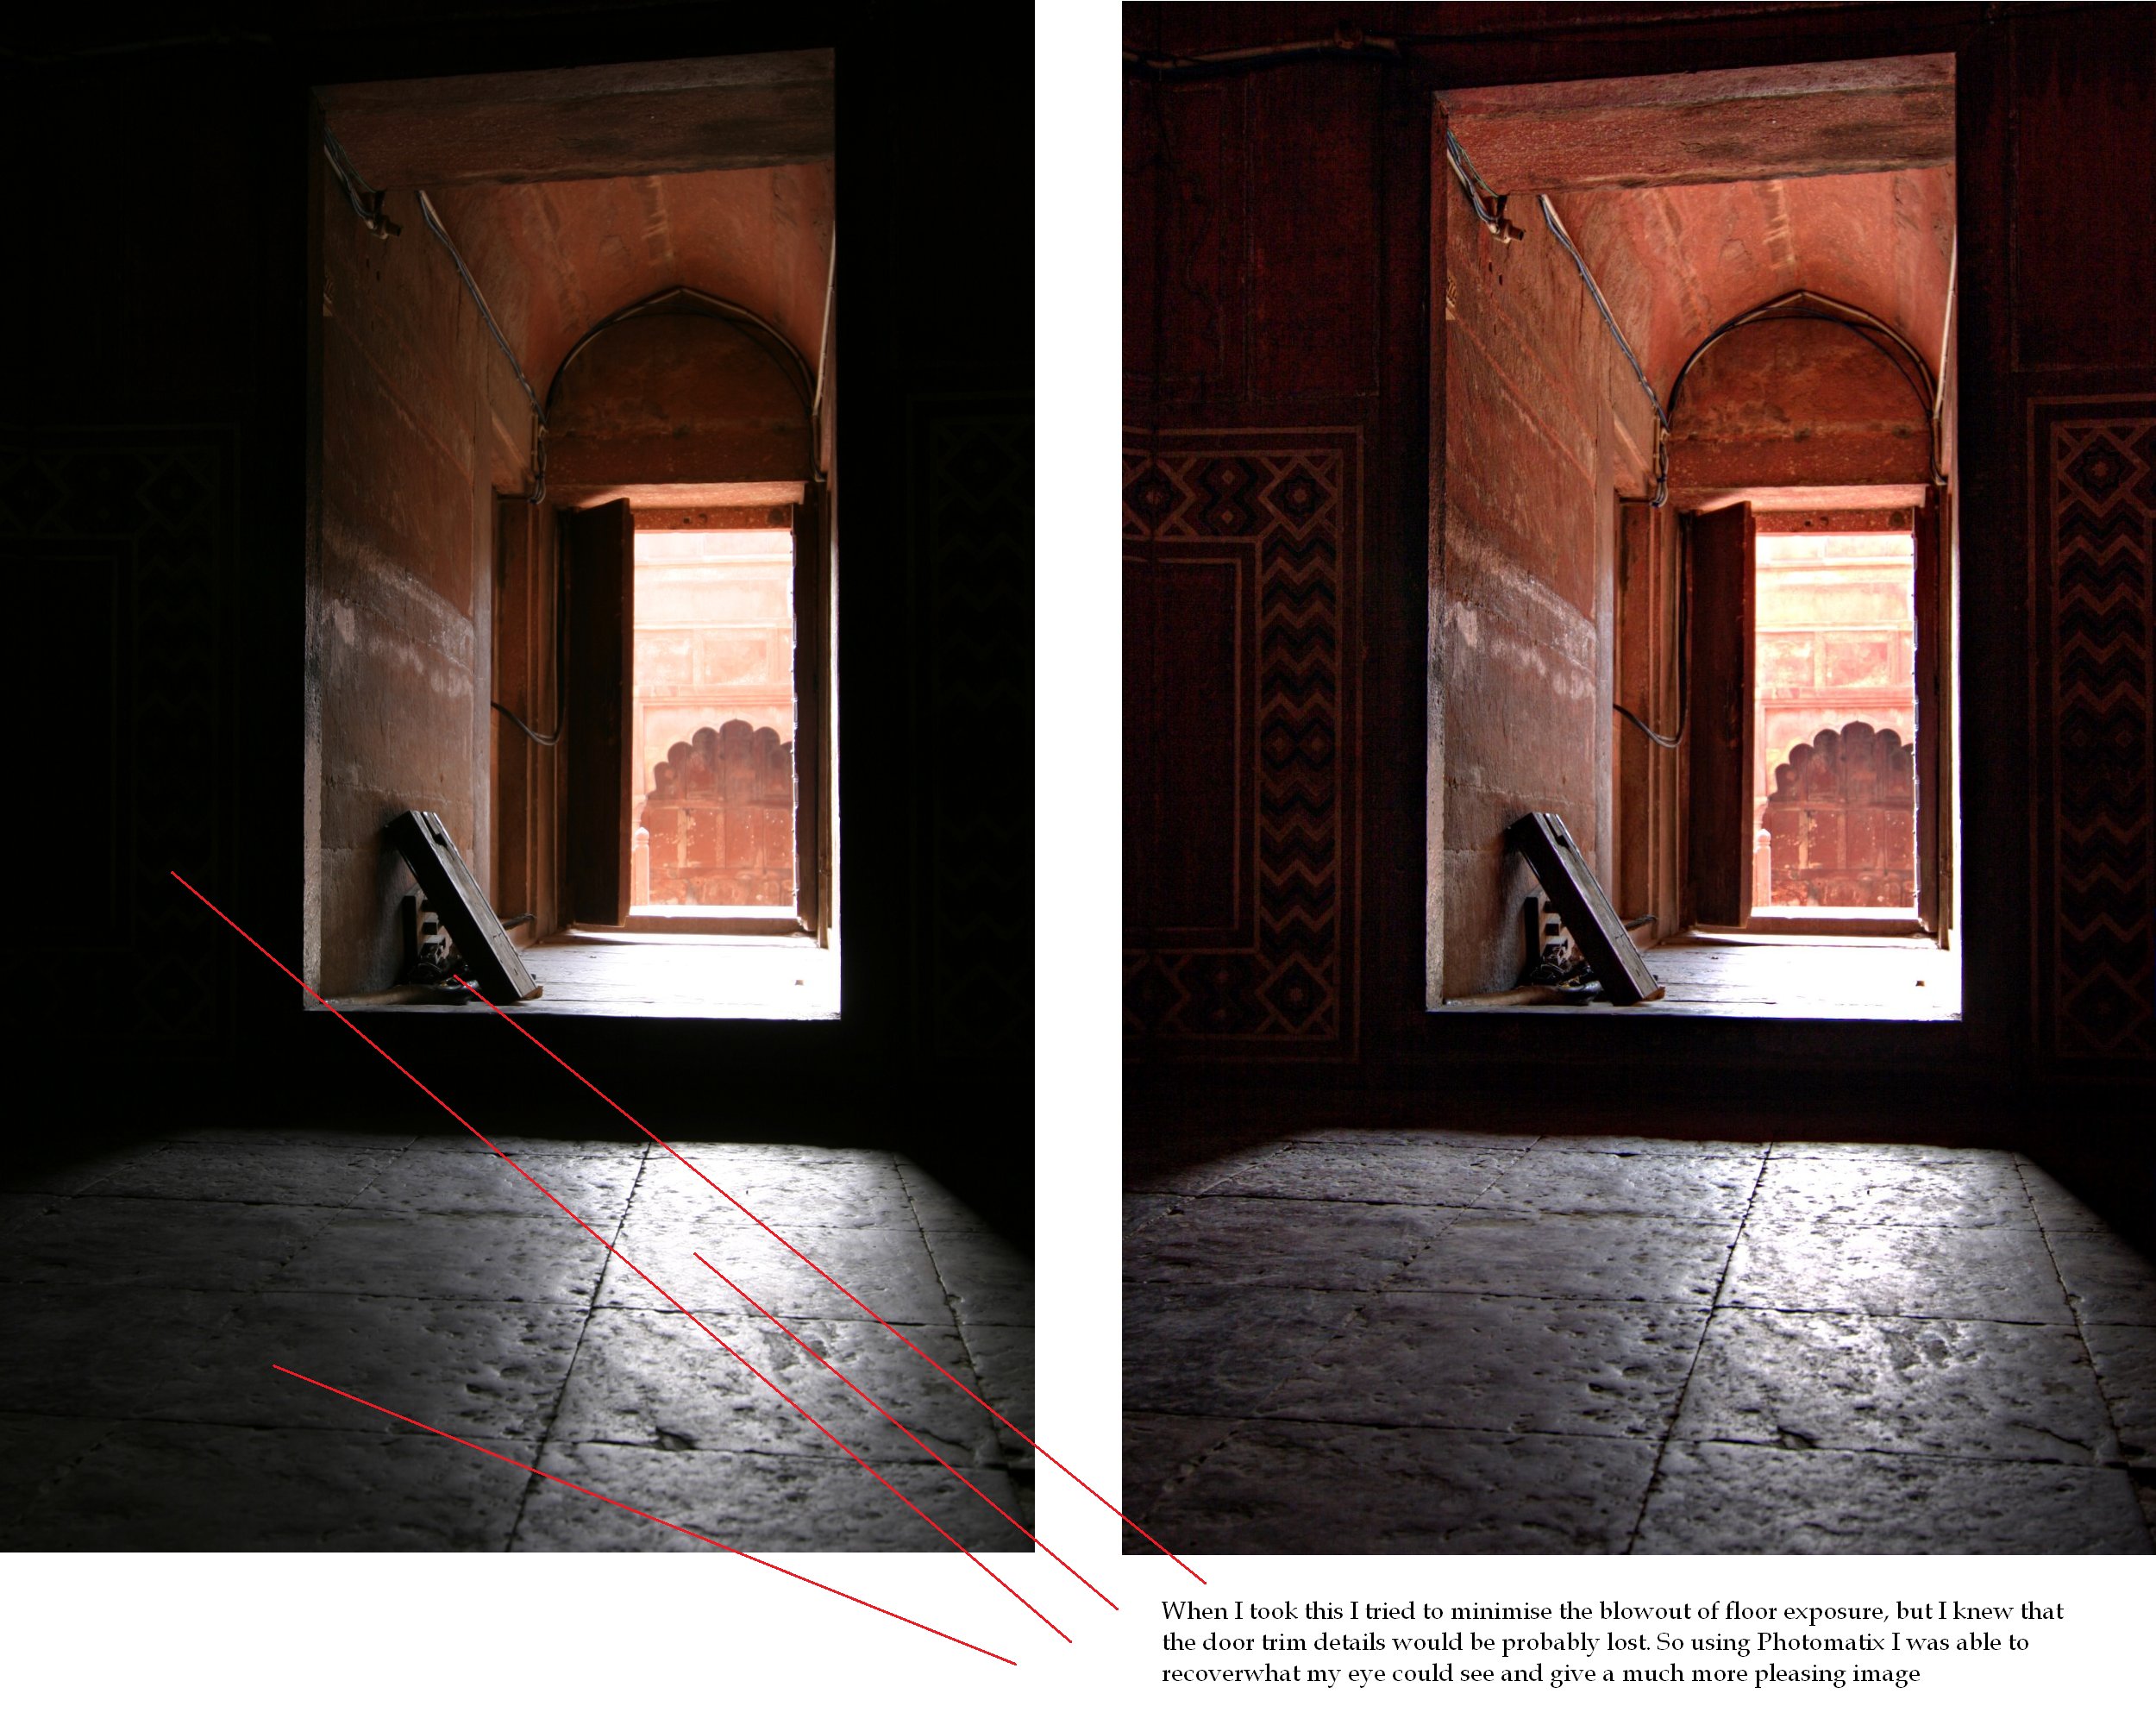
This image (taken with my 10D in India some years back) is a good example of what better software can make of a RAW file, which does not clip the whites and (by dint of being RAW) preserves the entire capture of data including the shadows. Note the better shadow details while maintaining the highlights

This is exactly what good software should do, to properly tonemap the RAW capture (often 12 bits) into the 8 bit space of the JPG ... the HDR mode on the Oppo is doing an acceptable job of this, but needs (it seems) two exposures to do it, while the standard software algorithm in the camera is not doing that very well at all.
See how you go.

Monday, 3 January 2011

New Year trip

We went down to visit family over the new year (and check out some camping areas). We had intended to go camping, but the flooding and rains put us off a little

We dropped in to Ebor Falls on the way through as its a personal favourite of mine. Its always hard to get good shots of the area due to the contrasty nature of Australian scenery. I didn't have 35mm neg on hand so I had a go at HDRI's hand held and tested out the new changes in Photomatix 4 for processing.


Ebor-falls

I also liked this image looking back up the valley more or less into the sun.

eborValley

While we were back in the carpark my wife noticed a "funny Kookaburra" up in the tree. It seemed to me to be a young one recently out of the nest. The G1 with the FD300 does quite a good job of birds.

young Kookaburra

Tail feathers weren't well formed and he had a stumpy beak still. Again I used Photomatix 4 to process and convert this RAW image into a nicely tonemapped rendering. Does quite a good job

We had a great time and there was some wonderful scenery in the New England area (while Queensland suffers under the floods)

Sunday, 15 November 2009

tonemapping raw tutorial for the lazy photographer

since I've talked about this to a few people and spent some time describing it I thought I'd put it here so I can refer to it from now on ... and maybe if anyone finds it in google it may be useful to them.

Ok, first this is the JPG that came from the camera ... something really challenging with lighting extremes.


CRW_0456

loading the RAW into Photomatix I select (more or less) what I think makes a good 'starting point' of an overly flat image with low strength and very long gamma ... note the settings.

step1

I save this as a TIFF and then load it into photoshop


step2

where I apply "local area contrast" which is essentially unsharp mask:
about 15% ~ 25%
about 50 ~ 70 pixels radius


step3

to this I then give a quick curve tweak giving the final item:

step4-done

Did you notice the extra colour detail in the scroll work on the left hand side?

I might drop the saturation a wee bit .. but hey, that's up to taste. There may be of course ways of doing this in photoshop with some masks and whatnot, but this all takes a few clicks and can be automated for "batches" of images which are "all contrasty" or whatever.

Monday, 2 February 2009

film VS digital capture: revising old work

Setting the Scene

An important thing for learning and discovery is that as you learn more its handy to go back and revisit old works that you've done. Soon after I got a 20D digital SLR I was interested to know how well it compared with my (used for a long time, comfortable with the results) 35mm film. It didn't take long to sus out that the smaller sensor on the 20D (compared to 35mm film).

So, soon after getting my new toy I wanted to test which was better (as clearly I understood which was cheaper to take photographs with ;-)

Initially (we're talking 2005 here) I used only ACR to convert the RAW files and had to process then in Photoshop to make my images.

Since I like to take an image with my camera that looks like what I want (not simply what the lens forces me to) it was not easy to compare the two systems I took an image with each camera using two lenses from the same spot for evaluation.
  1. Canon EOS 630 EF 50 f1.8 (@ f8) I used 200ISO negative film.
  2. Canon EOS 20D EF 18-55 @ 35 (@f8)

My first results were as to the left with quite different colours on both systems. Initially I felt that the image from the 20D was more neutral and was impressed with how close they were. The shadows rendered on the digital from the 20D were cleaner than the film and there was over all.

So while I liked the digital image for its clean appearance I thought that the film image had better colours and tones. Note: while it was much clearer the 20D image was much smaller than the film scan.

I've downsized the Epson segment to match the native size of the segment from the 20D and pasted them side by side here to see.

The image from the 20D seems sharper but you can't get it to show as nicely on a print because 1) you can't see 100% view on the paper without a magnifying glass, and 2) if you print it so magnified then the pixels look funny.

So essentially while it has fewer pixels they're 'nicer looking', so you can upsize it about 70% to effectively the same size (as the 20D could tolerate uprezzing to the same print size as I could get from the film). I placed that discussion here on my personal pages which contains all the details.

I didn't have access to a good scanner at the time I did the above mentioned www page, I only had an Epson 4870 scanner and so when I eventually sent the negative to a friend with a Nikon LS-8000 I was surprised how well it did. Below is a sample from each scanner (I've resized both to 4000 dpi) they are closer than I expected.


The Nikon brings the balance back more towards film being a better image than my 20D in both tone and clarity at a large printable size. So now with the background set, lets look at the tone mapping image.


New Tools applied to old RAW files

Recently I've started using Photomatix for making better "goes" of rendering RAW images. I've been pleased with the results (as in that blog entry), so it recently occurred to me to revisit the above tested RAW image and compare it with the film scan.


My first thought when I got it how I wanted it to look in Photomatix was that looks really good. then I thought: I wonder what it would look like compared to the Negative.

So here it is ...

Surpirsed? I was!

The tone mapped RAW image brought out the sorts of contrast enhancement which the natural 'organic' feeling compression (heel and shoulder) that negative film does naturally.

But the now the digital (which does a better job of recording low contrast details than film does) brought out the clouds and textures of the clouds better than my negative and certainly better than my ACR conversion had done.

This scene is quite a low contrast light scene (taken in Finland in late spring) which neatly fits within the range of a single digital capture. Negative on the other hand would be able to cope with a much brighter or contrasty scene because it would be able to still expose for the shadows and the highlights would not clip as the digital would.


For those with an eye (or interest in) the details I've put a 200% magnification of the tone mapped 20D RAW file below to compare with the film scans above.


I think that it shows that tools like tone mapping goes close to bettering what the results from scans of negative film can achieve with far less expense and technical (photoshop and or scanning) skills needed.

So, 7 years into the age of the digital SLR we now have the tools to get the image from a high quality APS sensor digital SLR into the same ball park that supermaket grade film and a good scanner can do.

I've phrased it like this to draw emphasis to what I believe is an important perspective:
  • that the tools are both very similar in what they can do
  • as the digital tool sets continue to develop (with tools like HDRI and Tone mapping Photomatix) we can make better images from our RAW images (another reason to use RAW)
  • that as I come to learn more about digital I find how really good the results were from my film images
I used to argue that the main drawback against digital was the upfront cost of investment, back when I got my 20D (2006) it was AU$2000 for a body only and that would perhaps also require you to buy different lenses (because a 24mm is no longer wide and a 50mm standard becomes a telephoto) if you bought one. At the same time I could buy a Nikon LS-V scanner for AU$700 and get scans as good or better than the one above from the LS-8000. Back then I argued that one was better off to get a film scanner and keep using you 35mm SLR.

But since 2006 that field has changed, with used 20D's and equivalent cameras to be had for less than $500. Its nearly a toss the coin decision.

If you already have a compact point and shoot digital camera I think it comes down to how much you expect to use your camera for serious images and perhaps personal choice.

But still an old 35mm SLR like my 630 has a much bigger and brighter view finder (helpful for critical focus) and with just a 24mm and a 50mm lens makes a much lighter travel companion that my DSLR with the lenses it needs.

Tuesday, 18 November 2008

tone mapping for the lazy photographer

I don't mind the look of HDRI, but then it is often a look not something which seems natural (although that depends on the artist). HDRI properly needs at least 2 spaced exposures of the same scene. This can be a problem, as it requires a tripod to best ensure that the camera doesn't move between shots and even then the subject can move between shots (like clouds) introducing annoying artifacts.

But those issues aside tone mapping tools which come with products like photomatix are very handy tools for the lazy Photoshop photographer, expecially because you only need one exposure. Think of it as a quick version of the sort of "dodge and burn" that a professional dark room worker would have done for your negative in the past.

So for example on a trip to India I (fortunatly) took most the images using RAW capture on my camera, I did this thinking that RAW is my negative and as processing software improves I'll be able to benefit from these advances and process my images better (than if I'd only kept JPG). Take this image:


A quick run through tone mapping improves the look well beyond what I could do without some hours of fiddling in a photo editor like Photoshop. At first glance it seems like its just been brightened, but it goes beyond that ... the clouds are no brighter and look at the shadow details in the area under the trees to the right, and the colours it can pull out in the crowd up on the left near the Taj itself.


Its stunning isn't it! So, if you didn't already have enough reasons to set your camera on RAW, then here's just one more :-)

I'll put another example below just to leave you with the idea. But try it, it'll help you pull more out of some of your RAW images with less effort.