An issue with Yamaha motors is that the alternator stators are mounted on the inside of the crank case covers and a magnet that is on the crank spins to generate the electricity. It has the benefits of being a systems with minimal moving parts, but has the disadvantage of exposing the insulation around the wires to corrosive stuff in the oils. It was pointed out to me back when I had a Yamaha XZ550 that this was the cause of the alternator stator dying on that bike too ... (in adequate oil change regime). More details about that can be found
here, and much of the mechanicals of that are almost identical to what the Yamaha T-Max has
So this is what the crank case cover looks like when taken off. The stator is the bunch of coils on the left where I have a blue arrow and circle pointing to the dead winding. You can also see the path of the wire through the (
note it appears upside down relative to how it sits on the bike)
then I have the coil taken out, you can more clearly see the charring of the insulation around the wire windings.
Then on the frame there is the connector to which the stator plugs into. This essentially goes directly to the regulator (which is on the other side of the bike).
An important test is to also check that the three wires that come from the stator into that plug do not connect to ground. That was the give away for my situation.
You can see that heaps of body paneling has to be removed to get at all of this. You can see the magnet that spins generating the voltage in the coils. I've covered it all under gladwrap (
clingwrap?) to protect it all from dust and dirt while I waited (2 weeks) for the parts. Because the cooling system has to come off as well as the crank case cover it becomes a messy exersize.
With the new stator fitted and it all cleaned up ready to go back together.
You can see also in the top right of the above image the place where the water pump protrudes into the crank case. This is driven off a gear inside the engine too. So that's all of it. From here it all goes back together and the cooling system put on and the pannels and blah blah blah.
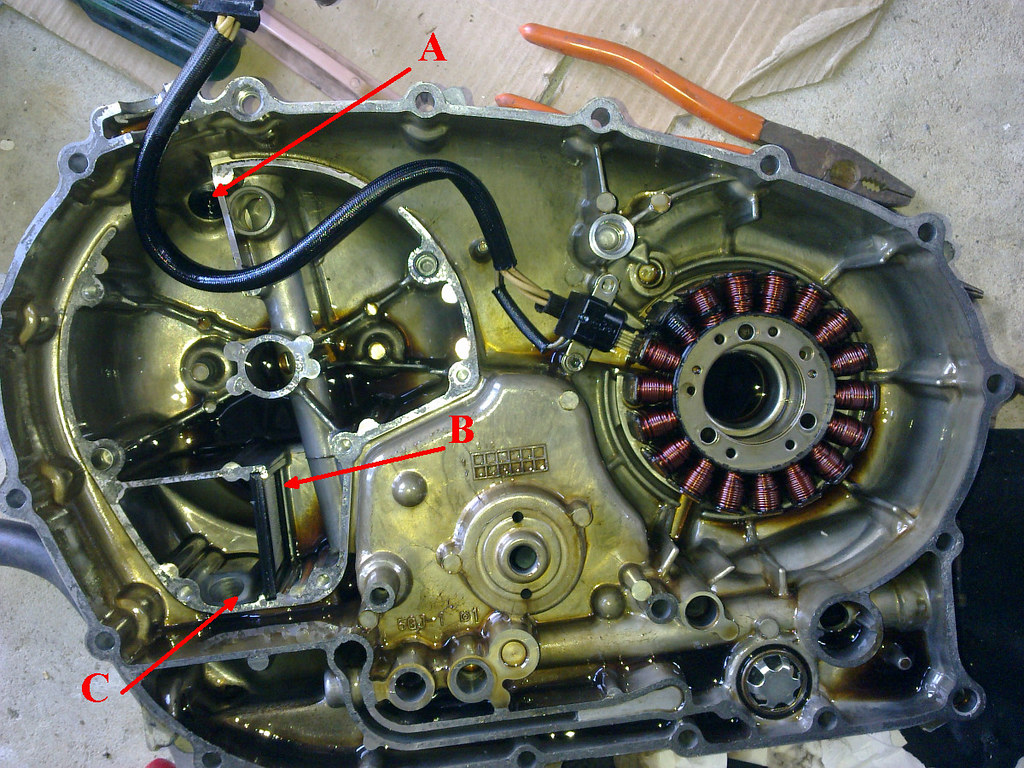
for the benefit of anyone doing this (and to explain why I was considering issues with the oil view window and oil filling here are some pictures of the crank case cover with the stator in place.
* stator on the right
* view window just below it
and you can see that there is a cover inside the cover, with a bearing in the middle of it. This is also a support for the clutch.
This view is not seen on any of the PDF manuals I have seen.
when removing that cover (which you'll need to do to get the wires out for the stator you reveal the insides of this chamber.

You can see:
A) the oil filler cap entry to the engine
B) the gross particle filter
C) the drain from this into the rest of the crankcase cover area.

I suspected that the gross particle filter was blocked with lots of crap.
The crap came (inevitably) from cleaning off the surface before fitting the gasket again. The cover side which you see is easy to clean without hassle but the engine side is more difficult. I drained a little of the oil to discover that it was actually reasonably contaminated with bits of muck.
Note also the thin oil gallerys on the bottom part of this cover. Important to not clog them with crap when putting the gasket goo on the surfaces. So as directed, apply a thin bead ... you aren't icing a black forest cake here

All seems to be good now
Oh, and the forks needed seals too...
PS
NOTE: I have had further issues with the charging system which I have gone into
here.
In a nutshell,
there is what I believe to be a design flaw in the early model which leads to excessive draining of the battery in some situations (
for many riders in warmer climates, most situations I suspect). I feel that this will have a
direct influence on why the stator coils burn out -
NB they are being used at their design limit all the time and overheat.
I have identified a solution for that in a post
here. The solution is doable by a competent handy man or under direction any auto-electrician.