Amateur Photographers (perhaps especially landscape photographers) are often almost obsessed with how to get the most of scenery detail into their pictures. I guess that its because most photographers seem quite attached to their particular equipment (in some cases almost religiously) that the first thing examined is
getting a better lens. So sites with lens tests are consulted, to see if this or that lens has more or less resolution than another seeking a better lens than they have.
This seems like the right path but it misses out on understanding a couple of critical points.
- Lens test charts are not scenery.
- There are other limiting factors in the system.
Perhaps you've read this before, in my reading in the past its never been shown clearly just what this means, so in this post I'd like to shed a little light on thes important points.
It may seem (later in this comparison) that I'm attempting some sort of film vs digital discussion, and I'm not. I'm trying to discuss something bigger ... in fact its bigger and denser capture. I just happen to have only MF and LF in bigger capture.
Part 1: Lens Testing charts
To the left you can see the result of a lens test using
Norman Koren's test system. The lens being tested is my "nifty fifty" the EF 50 f1.8
Looking at this it seems that the lens runs out of grunt shortly after 50 line pairs / mm (line pairs per millimeter), and you could argue the toss that it goes to 60.
This is
not a bad result with some saying that getting better than 50 lp/mm in the real world (with all the factors like camera shake, focus issues .. against you) is as much as you can get. Being a digital system what I've got here is a final usable result which will directly translate onto a print.
(BTW If you're not familiar with terms such as line pair / mm, I suggest reading
this.)

So I thought that I'd test also my EF 24mm f2.8 lens (
which in 35mm full frame is my favourite landscape lens). At left is a 100% crop of an image taken (in RAW) using flash as the primary illumination (for increased contrast and to eliminate any issues of shake
even on a tripod).
Again not a bad showing for what is
not thought of as the hottest lens in the canon stable. It seems to run out at about 60 lp/mm.
This all looks good, but what I
didn't mention yet is that the method for the test is to
photograph the target at a distance of 51 x "focal length".
Since this is a 50mm lens, this means that the target is 2550mm (or 2.5 meters) from the lens or 1.2 meters with the 24mm lens.
Now, just think about this for a moment:
How often do you stand that close to the subject when you take a picture with a 50mm lens or 1.2 meters with the 24? Especially with an APS sensor DSLR (not a full frame one) it is just what you'd do for a portrait and not what you'd have in most scenery.
What is more common is using a 24mm a few more meters away in a scene like this:

So, I put the lens test chart over there on the wall ... to see what I'd get ... well here's the 100% view if it..

Wow,
nowhere near as good is it.
You can see that its not giving the wonderful results of the test chart above. Well, that's because its now further away in the scene, and the subject detail is now smaller (being further away). Inspection shows that we can barely read the details just past
10 lp/mm.
So from this perhaps you can see what I mean when I say: lens
test charts aren't like the real world).
So knowing how the lens is able to perform is one thing, but what you can get with it in the real world is another thing. It all comes down to what is the "
feature size" in your picture and how does this relate to the parameters in your testing.
Part 2: " other limiting factors in the system"Ok, so now that I've shown the issues involved with "
Lens test charts are not scenery" I'd like to move on to "
other limiting factors in the system"
Consider your camera, a camera like the 10D (or the 5D for that matter) will have a limit of something like 50 lp/mm because of the array of the sensors (see Bob Atkin's article on that
here). Look again at the details of the 24 and 50mm lens above,
notice how they coincidentally run out of detail at almost exactly the same point?Sure cameras like the 20D and 50D have higher detail sensors than the 10D, but
this essentially means no matter how much better lens you get, you'll see no difference without spending more money on a higher resolution body.
Welcome to the one of the reasons why camera companies love digital cameras.
Conclusion: Alternatives to the lens arms race.So, if you're going to spend money on sharper lenses, you'll need something better to capture that. You could use a Canon 5D II or something better spec (Nikon and Canon both make things like that. There is even the alternative of the MF digital backs.
But its all starting to sound expensive for the landscape photographer isn't it,
here's where I'd like to show another test with a different camera system.
I'll start with my old
Bessa RF camera, this is a 1940's folding 120 roll film camera which uses a 6x9 format *(6x9 if you're not familiar with film and its sizes the please take a quick look at
this article which sheds some light on that topic).
The Bessa is by no means any kind of bench mark, in fact its about the cheapest 120 roll film on the market. My
Bessa RF can be had for less than a new lens for a DSLR (I see them on eBay regularly for between $100 and $300).
The Bessa RF uses a 105mm lens and so using the same test target and system
I need to position the camera 5.36 meters from the target. This is a scan of the entire 6x9 cm image on the film (pardon the gudge at the top, that's from my tape where I taped a bit of film into the camera because I'm too cheap to sacrifice a complete roll for a test image).
Now, another important point here is that these film scans were made with an old Epson 3200 flatbed scanner, which cost a couple of hundred bucks. There is no doubt at all that with a more professional scan (send it out if you have a beauty which begs to be printed big) you will be getting even better results than shown here.
Now, this time I'll start with the overview image of the test setup.
Did you notice that this is exactly the same angle of view in the scene that I used in my "real world" use of the 24mm lens from above.Why? well
because of the bigger format film the 6x9 to get a wider angle it needs a longer focal length lens. In this case its 105mm.
So in some ways this old camera is designed to take best advantage of real world photographic and optical issues to make the most from what it has.
Using the same method above I tested the lens on this camera and found that it had a much lower result than the EF 24mm in the lens test.
Looking at the result (below) perhaps you can pick its somewhere just after
20 lp/mm that the lines merge into mush.
So in test setup the Bessa scored 20 while the 10D scored over 50. This makes the Bessa look bad and the 24mm on the 10D look good ... but only if you forget to look at the scene and focus on the test result numbers.
 When comparing scene for scene the older camera actually makes a sharper image for the same scene than the camera with the lens which tests better.
In a usable scene the
Bessa ended up with 20 lp/mm available in the scene VS only 10 lp/mm for the 10D.So what small formats gain in terms of specifications, they can also loose in terms of what you can get in your image.
Thus you'll end up with features that are much finer in this image than in the 10D's image.
How interesting, a 60 year old camera with an ordinary lens is doing better in some ways than a modern DSLR.
Why? Because what the Bessa lacks in sophistication and accuracy it makes up with in generous lashings of image area.
Hopefully I've shown that by using the lens test charts for reference that taking images of real things shows up the issues of buying gear based on lens test charts and there is more to it than just simple numbers. I have an image which has the same "
angle of view" using a lens which '
tests to much lower resolution'
but in the real world makes an picture which is much more detailed than another camera system. Here's the over view of each again to show you the relative sizes.

So if you're thinking that you'll spend a thousand bucks on a 'better' lens for your DSLR to make sharper landscape images, perhaps you might now consider adding new tools to your methods of making images not just spend more money on nifty lenses for your DSLR.
This represents only the beginning of the scale in MF gear, and with great cameras and systems out there for literally give away prices its really hard to go wrong.
But if you go for a higher quality MF camera (to make higher quality images) you'll need a higer quality scanner in your work flow. I don't personally feel like making that sort of investment, so I went to another alternative again. Large format.
Size matters when it comes to images as I've just shown with the comparison between a 6x9cm (in reality 56mm x 87mm) image negative and a smaller 22 x 15mm. I prefer larger formats again for my landscape photographs. Using the smallest of Large format 4x5 (which has an image area of 92 x 118 mm) I can get even larger capture, beter control over my image focus and still make use of cheap scanners to get great images.
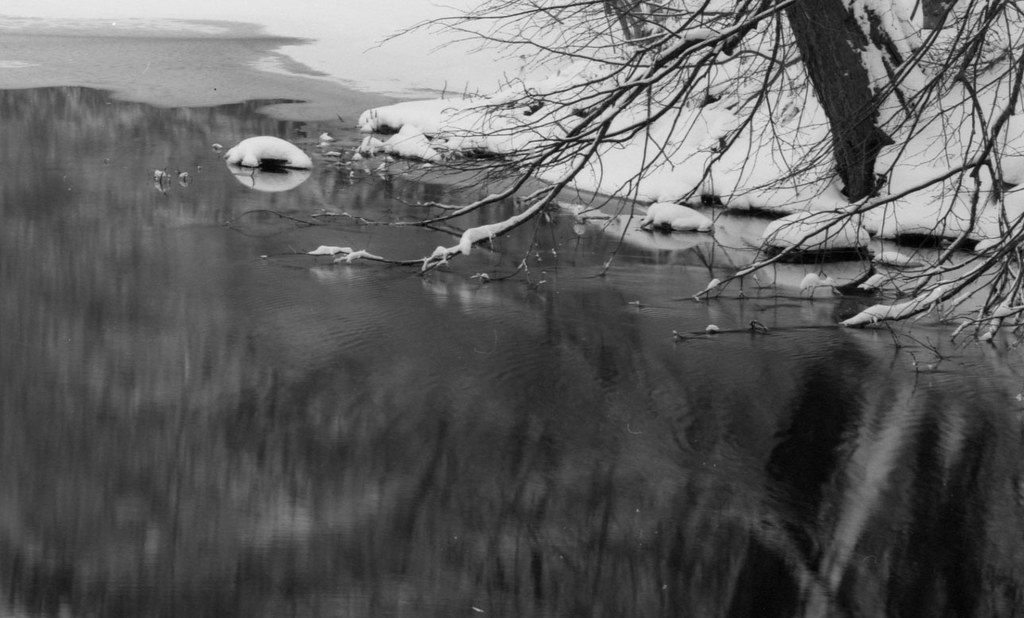
Here is a sample of the same scene with my 4x5 camera mounted on the tripod.

Because its using a 90mm lens (quite close to the 105mm in the Bessa) its about the same distance from the wall. The angle of view though is significantly broader, showing in landscape the same height that the others showed in portrait orientation. No looking at the detail, obtained from the lens its nearly the same (although being a 90mm it was a little closer to the target than the 105mm lens, creating a little bigger image of the chart).

this is almost the same result in sharpness but with a system which captures more than double the area of view than the digital. For example this picture

has detail like this:

click for full detailand as its 14 000 pixels wide (while a DSLR will give you about 5000) will make nice detailed prints well over a meter wide if you want it.
I hope from this long (and perhaps difficult) analysis of the subject you can see that the bottom line is that if you want to make bigger more detailed prints of your favourite scenery, then rather than going to all expense of newer and 'better' lenses you will end up making much sharper prints if you use the right tools for the job.


