Sunday 17 March 2024

Checking Timing Chain Tension on my SR500

Sometimes things go as they should, and sometimes they don't; when they don't it can be an opportunity to learn more.

I recently did an oil change and it seemed a good opportunity to check my SR500's timing chain tension. Its actually incredibly simple to do and quite accessible right there on the right hand side of the bike.


I usually call it Cam chain and my old manual does too.


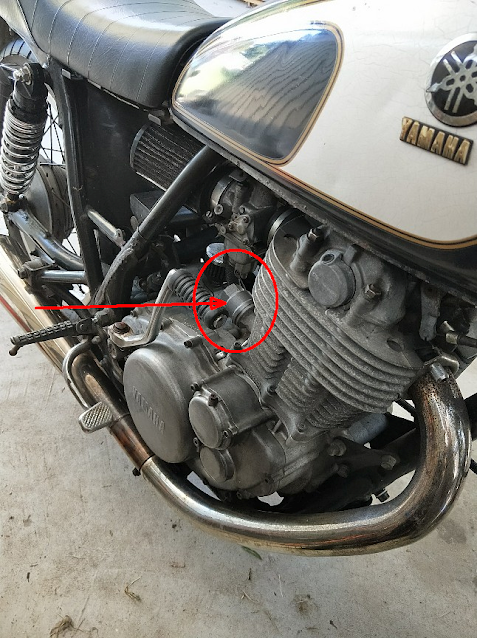
So normally one just undoes the (27mm, and the standard toolkit has exactly the right spanner for this task - yeah \o/ ) cover cap (the thing visible here)


and access the locknut beneath:


However in my case when I removed the cap I found this:


which was a bit perplexing ... please note rag and small amount of oil on rag. You need to take this into account when you remove this cap to reduce clean up.

However a quick look at the cap revealed the issue:


yep, the locknut had come 'loose' from the body and simply unscrewed with the cap ... (facepalm).

It undid with just my finger.


Note carefully that O-Ring that's in the cap ... it can fall out unnoticed and must be in there when the cap is put back on ... 

So, with the adjuster bare (no need to do this yourself) its a good time to talk about what we are doing.


Our goal here is to adjust that so that the inner pin is flush with the outter surface of the adnuster nut so, you need to use a 10mm spanner (also in the kit) and (probably) screw it in.

The process of determining this I used is to turn the motor over (with the ignition turned off and the decompression lever pulled in) using the kick starter by hand while looking at that (apparently a screw) in the center. You want to turn the motor over looking at it in various positions (perhaps starting from Top Dead Center, for which I just used the white mark visible through the window) as well as other places.


Here you can see its actually lower than the outer part of the nut (and I watched it during the turn over). So in my case I adjusted that in.

Screw the nut in untill the surfaces are flush (which is actually a cast piece of a longer component that looks like this):


its perhaps not clear in that where the adjuster is, but careful thinking about it will reveal it all. This is from an SR400 manual btw.

Perhaps turn it over again observing that it moves in and out a little. So then with that done just put it all back together, tighten to specified torques (or just firm but don't try to strip threads) and you're done.

Below is the advice I got from a friend before doing this (*thanks Stu)

Dead simple... all I do is 

* put the engine in TDC on compression

* remove the spark plug

* take it a bit past the T mark then roll it back to the T mark again

* undo the tensioner cap (angle the cap down as you remove it to catch the oil, stick a rag under the area anyway)

* loosen the big lock nut a bit so you can adjust the 10mm centre nut

* carefully screw the centre adjuster in 'till the slotted plunger comes almost level with the end of the adjuster (it's not a screw and don't try to force the adjuster with the 10mm)

* then rotate the flywheel back and forward a bit to ensure the centre plunger moves in and out slightly

* screw the lock nut back up then holding the adjuster with a 10mm spanner lightly, tighten the big lock nut.

* Change the O ring if you feel so inclined, tighten the cap a bit then all done! 


I hope this demystifies the process for any "wrenching beginners".

Best of luck with what seems harder (before you've done it) than it is.
Thursday 25 January 2024

Cheap-o regulator rectifier

Given how hard it is to get a regulator rectifier for an old bike (I'm probably going to be waiting 6 more weeks), I thought I'd add a little more to my analysis yesterday (see here) of the failure.

The problem was clearly thermal run-away and (not yet) that of the thermal paste (which isn't used anything like properly). So lets start with what the regulator rectifier looked like on extraction from the bike.


The bulge and the spatters of metal (yes, metal) indicate high temperatures (to melt the metal).

So I cut the arse of it off and chiselled it out.


Which shows that there was still some thermal paste, but also that there was not a good physical connection to the metal of the heat sink (because its quite rough looking, ideally it should be polished smooth. So that's manufacturing failure #1

Next we flip that black box over and see that its easy to split (its already fractured)


and we can see the guts ... of course the board is burned down to glass fibers in places. Not only is the heat escape pathway interesting, but what the fcuk are these little chunks of white rock doing in here?


you can see that the not only are the components toast, but we can see the legs of the coponents are totally gone too


This would explain the tiny spatters of molten metal above.

Lastly the thing stinks, probably due to the boiling of the organic solvents used in the (copiously applied) thermal paste.

On this point I'm going to say that cheap thermal paste that uses organic solvents, when applied like a kids use of toothpaste is a recipe for disaster longer term. This is because any significant heat (say, over 50C) is likely to see the loss of this material over time; weakening the effectiveness of the transfer of heat from components to outer case.

So if I was you, as well as making sure it stays cooler (as I examined in the previous post)  I'd be replacing these things pre-preemptively after every few tens of thousand hours (roughly equal to kilometers) or per few years on bikes that don't get used much. Especially if you use your bike on hot days (like Australia, California or other hot dry places).

HTH

Tuesday 23 January 2024

T-Max cheapo regulator rectifier

So, it happened again...

My nose identified the smell of burning insulation and electrolyte, and I noted some smoke emerging from "down there".

I quickly pulled off the road (smoke being spread by the fan) shut off the ignition, pulled the tool kit and disconnected the battery.


This left me on the side of the road, so I pushed it down a lane a little ways (to keep it from attracting the wrong kind of attention), hitch hiked home (I was on the way home), got my truck and came back with a new part and tools.

It requires a bit of jiggery to organise me getting back both vehicles.

Readers of my blog will know of my previous issue (documented here) and my conjecture of would it survive the hottest days ... I'm pretty sure I know the answer now ;-)

As I wrote back then when I fitted the fan unit:

I was riding around and thinking about how close that graph got to 50C and thought that since the air temperature right now is like 20C (middle of the day) and that in summer its going to be nearly 50C (coming directly off the road) that will drive that temperature up closer to limits again. So I decided to look for power and attach a small case fan to assist cooling.

So as I suspected on at +34C day it didn't get sufficient cooling.

I decided that I needed to do new testing (because it was still bloody hot) and so I thought test it with

  • cover on (fan cooled only)
  • cover off (fan still there)

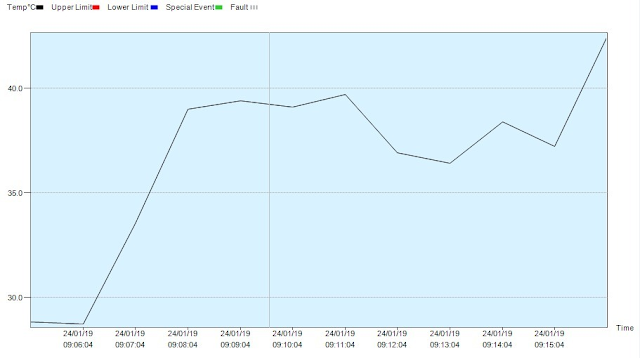
To test I embedded a sensor between fins to avoid air cooling of the sensor (and get the temperature of the heatsink) like this:


*(Note: the new cheapo part is no longer black, which is stupid)

The "cover off  ride looks like this


with good exposure to air for the cooling. The temperature plot (which included a length of highway at 100km/h)


which is quite reasonable. You'll note that temperature rose as soon as I returned into 60km/h town region and stopped recording when I pulled into my yard.

I then slipped the cover on 


note the breather which is a vent (see the earlier post) that leads to the center of the fan (and hopefully blows fresh road air in).


and went back out, getting this reading

you'll note that it got to 60 pretty soon and flattened (I was keeping an eye on the meter readout) and rose briefly when I was back in town (presumably due to lower air flows.

This temperature is very close to thermal runaway temperatures and IMO far too warm for a cheap piece of shit like this. This site on that subject makes that clear.

Semiconductor parts are most often specified for use in the “commercial” 0 to 70°C and, to a lesser extent, in the “industrial” -40 to 85°C operating temperature range. These operating temperature ratings generally satisfy the demands of the dominant semiconductor customers in the computer, telecommunications, and consumer electronic industries.

So I've ordered a Yamaha part to test. I want to know if the part that costs $300 is worth its money. Perhaps it may run cooler?

I'll post more when it comes to hand. For now its not being ridden.

Addendum

So, as promised, I took the T-Max into Warwick (37km) on a warm (but not scorching) 29 ~ 30C day (just a few days after this was first written). The results were very interesting. First the full trip


We start off with the surface of the heatsink being 25C, and I let it sit for a little while before starting off. I did the same when I got back. I rode into town, parked at a hardware shop at about 9:40. The temperature of the heat sink started to rise after the air flow stopped (I presume as the hotter parts inside the unit transferred their heat out and it was radiated away).

I then rode to another shop (quite close) which resulted in a quick air cooling and then a smaller rise. I was there until about 10:15, where I started up and rode home.

Lastly, after getting home I let it sit for a bit before shutting off the data recorder.

The trip in. Please note that in this graph I removed temperatures below 20 which does tend to change the actual scale of the graph, it also makes it a bit easier to see. I topped it out at 60C because I feel that's the danger zone.


The trip home.


Again we see that as soon as it is generating heat (by rectifying the AC from the alternator into DC and regulating that and dumping what the battery doesn't require as heat) its also moving, and when its moving slower things heat up faster. You can see when I come into town, slowing down and getting less air cooling.

So next I'd need to test this in traffic ...

I'll keep you posted

Monday 22 January 2024

Heart Valve Choices - an update of related information

Some years back (ten years back) I wrote this blog post on heart valve choices in the hope of adding a small voice into a large and noisy discussion room.

In that post I mention a video presentation by Dr Schaff of the Mayo, which for various reasons I believe fell off the Mayo Website for no reason other than administrative.

I recently found this updated presentation of his on YouTube and see that his views have remained the same (facts often don't change) and his inclusion of TAVI is a welcome addition.


 So here is his presentation:


It doesn't surprise me that the Mayo is using the YouTube platform, because administratively it is far easier to off load storage and server loads onto YouTube than bear it yourself. Many Universities are also doing the same thing.

I strongly recommend that if you're in the market for a valve and under 70 years of age you watch that and think carefully not only about what he says, but how many surgeons at his conference who are unaware of the actual data. For example stroke risks:


Worth noting the graphical presentation "steps" suggests that less data exists for Bioprosthetic when you look at the last "step". I would submit that this is likely due to bioprosthesis being on average removed by that duration of time.

All too often I hear "surgeons know better" ... the reality is "maybe they do" combined with "it depends on the specific question".

Anyway, with any discussion of mechanical valves we must understand the other issues that come with that (and will as you'll see in the presentation may well come with bioprosthesis anyway)

One of the topics introduced there is Anti-Coagulation Therapy (AKA Blood Thinners) and the misconceptions of patients about this. I've written blog posts about that for example here, as well as an entire series on INR related issues, which of course includes that post.

As well as deciding about the valve we need to decide about what we think we will want for ourselves in 10 or 15 years time ... do you just want to be still managing a medication (you'll have more of them by then anyway) or staring down your next surgery?

Lastly (and not unimportantly) I recommend this discussion too:

https://www.medscape.com/viewarticle/838221

It covers some interesting topics. You may have trouble with that page (depending) because the audio is not rendering properly on Chrome on Windows (but is ok on Linux and Android phone). You should see a media player like this:


or perhaps a link advising you to update your Flash plugins (omg). If it doesn't work then you may be able to download the MP3 file directly using this link https://bi.medscape.com/pi/editorial/studio/audio/2015/core/838221.mp3 (which I took from the HTML I got).

I hope you find this helpful in your analysis of what's best for you in the long term.