Thursday 31 January 2019

really wide lenses (sort of a Bambi vs Godzilla redux)

premise

I feel that the Micro43 system (m43) is the low hanging fruit of camera equipment, it provides a level of compactness which is more or less unchanged by further dropping down sensor size, like the Nikon 1 Series which didn't really provide more compact cameras nor lenses. The lens range of the system is huge and indeed the availability of legacy 35mm lenses is presently far in excess of what the market can soak up (literally tons of good 35mm lenses can be bought and adapted) and adds to the system too.

The sensor isn't too small to afford reasonable focal plane control (shallow DoF), and indeed is almost the same as the very popular APS format (which indeed Canon released its first DSLR in way back in 2000 with the EOS D30 camera.

Its ability to do High ISO is of course limited compared to larger formats like Full Frame and or Medium Format Digital, and while latest m43 sensors will indeed go almost as high in ISO, you will be losing in colour fidelity and general bit depth (hello blowouts and posterisation).

I'm no longer on the path of having the latest and greatest (principially because I think we're already close to the crest of the diminishing returns crest) and so when I picked up the A7 it was a $500 experiment (rather than a $2000 experiment just 6 years ago) to allow me to see and confirm if there was something of value in this for me.


One of the things I enjoy having in my camera outfit is a very wide lens. Myself I've been inclined to this for decades, however anything wider than 24mm has often been outside my budget.

Micro43 brought along the equivalent of a 22mm lens (in the guise of the GWC-1 adapter for the Panasonic 14mm f2.5 lens) , which has been both my widest lens (lets ignore my Olympus 21f3.5 for the moment, not least because I sold it years back and I've only tried it on a 5D mk1) and a mainstay of my wide angle photography. Its enabled me to get some shots I enjoy in places, like this one in the Czech Republic in a dimly lit subway under maintenance.


Certainly no phone would have done that (either in angle of view or high ISO performance.

So given that I'm testing out the limits (and how I sit with the results) of my new (to me) Sony A7 I felt the need to find an equal for that angle of view.

Having read and seen good things about the FD 20mm f2.8 I decided to buy one. Sadly the prices have gone up since the A7 came out. This is probably because a 20 is within what one calls "normal" on m43 and almost nothing else can manage its shorter (for 35mm) flange distance.

Appearance

This is what one (mine) looks like on a A7


which may not be what you were hoping to see, but actually isn't too far away from what modern 20mm lenses (and wider) are looking like today.

Another angle makes it clearer that this is not a compact lens:


The amount of "stand off" taken up by the adapter also makes clear how much "space" was taken up by the mirror box on the FD cameras, or indeed any SLR or D-SLR camera.

However it does make for a nice firm grip of the lens with the left hand while holding the controls of the camera with the right.

In comparison the above mentioned Panasonic m43 with the GWC-1 and 14mm lens compares like this:
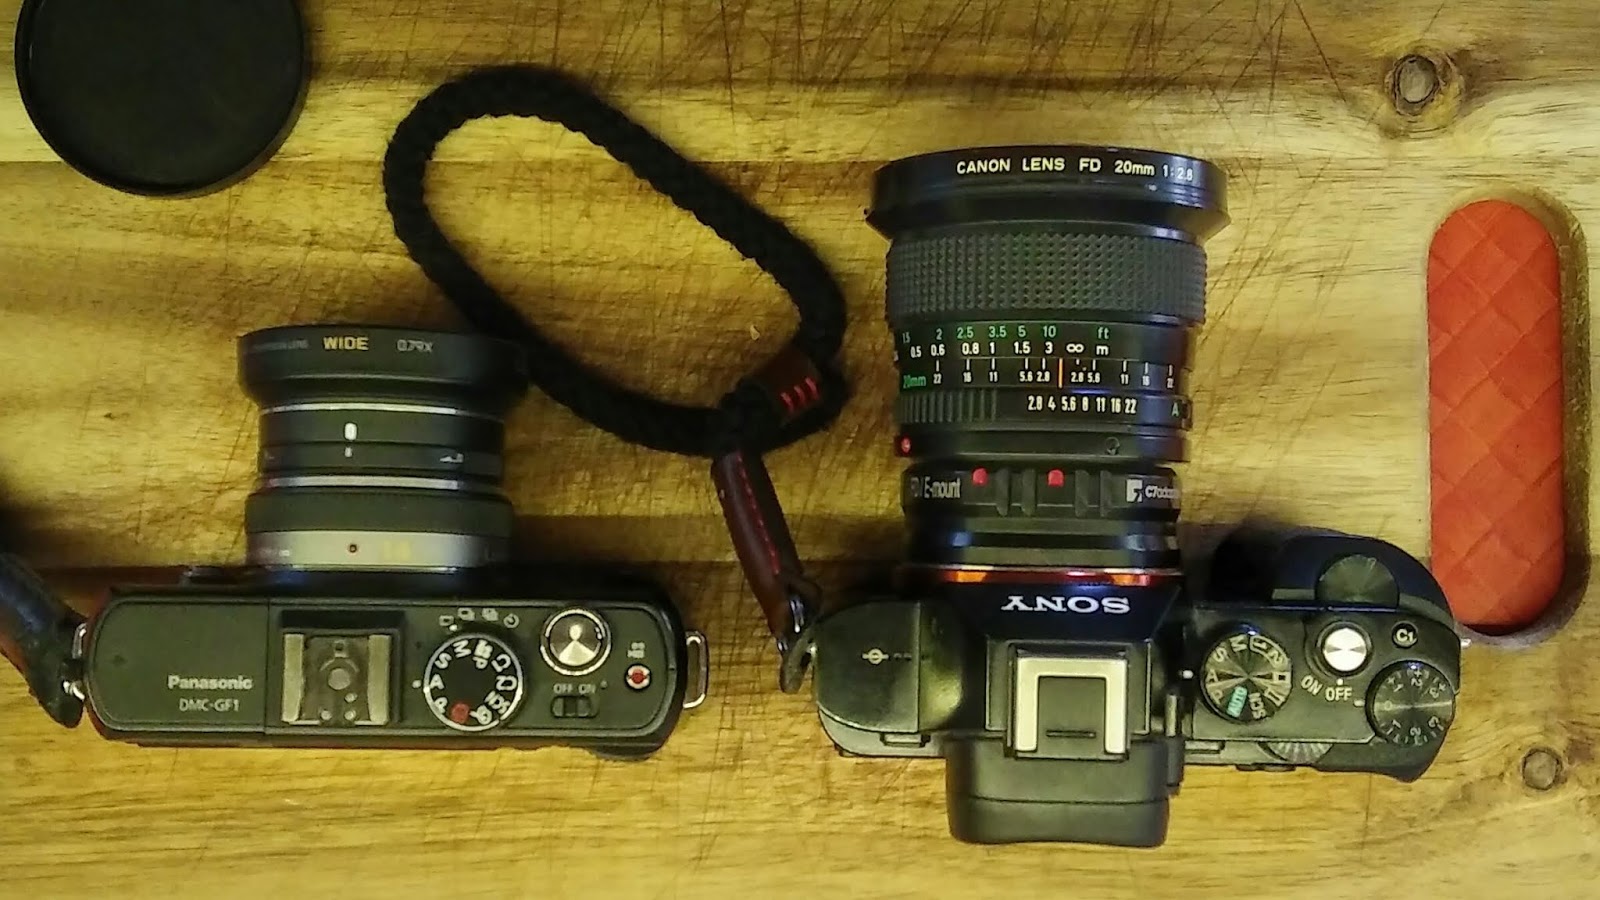

and


The A7 is indeed a bloody compact camera (as indeed is m43), however its a fact that the lenses are needed and make the entire system thus different.

A key difference also being that the GWC-1 comes off (it essentially screws onto the filter thread) and leaves the very compact 28mm equivalent 14mm lens  ... which is pretty nice for general picture taking (although about the same angle of view as most modern phones). If you want to know more about the Panasonic 14mm f2.5 and the GWC-1 I recommend my blog post over here as a starter.

aside:

 I'd rather have my camera nicked or broken in the field when out touring internationally than my phone, so think about that when saying "I do everything with my iPhone"...

image quality

Well for a starter the A7 produces a 6000 x 4000 pixel image over the 4000 x 3000 that the m43 camera has, and so that's going to perhaps give it an advantage. However I'd argue that the optical system of the FD20f2.8 vs the combination of the P14f2.5 &GWC-1 (note, for simplicity I'm just going to call the combination of P14 & GWC-1 the GWC-1 from now on in this post) is such that the m43 system is limited by the optical resolution not the amount of pixels ... but lets have a look.

First its important to understand that in modern cameras and lenses lens corrections are built into the JPG files and stored in metadata on the RAW files. With a legacy lens like the FD20 there is no such thing available, it must be chosen and applied in post processing ... so to even up the playing field I always photograph in RAW and then develop my file with DCRAW.

So  lets have a look at the FD20 on the A7 . This shot represents the scene taken for all these tests


now the GWC-1:


... which is a camera JPG not a RAW sourced image. Its worth showing an overview of the GWC-1 as sourced from RAW file, as you'll see that the Panasonic corrections for the 14mm are not insignificant (and of course make a difference to what the GWC-1 produces.


So you get a bit more image width now, nearly as wide as the FD20, but with substantially more barrel distortion ... if you correct in software in post it will look closer to the JPG sourced, and of course you'll (as always) loose some of the width.

I think its worth pointing out that Panasonic designed the GWC-1 specifically with the 14mm f2.5 in mind (well and a PZ 14-42 as well), so its quite likely that they knew what corrections would occur and worked to fit in with that.

The FD20 is a little bit wider and needs less attention as its a nicely corrected rectilinear lens right out of the box (which isn't surprising because it was made for the days of film when there just wasn't an easy way to correct for this stuff - and buyers thought it important back then.

You'll probably have spotted some vignetting visible in both (the Panasonic corrects this in JPG a little, but not fully as there is no electronic coupling between GWC-1 and P14mm so it can't know its there to correct it. So lets look at vignetting

FD20


So strong at f2.8 and clearing up well by 5.6 but not observably better at f8 and (not shown) f11 is barely cleared up at all

GWC-1


where I didn't go past f5.6 because the lens system is already at it sharpest at f4 and starts to go down hill a bit due to diffraction around f8

You can see that the GWC-1 also has more barrel distortion, which depending on the subject may need some correction in post, the FD20 is much better out of the box.
Image details
As expected the FD is poor on the edges but not bad in the center from wide open, and gets better all over as you stop down. Again like vignetting I didn't see much in the step from f8 to f11

The following are 100% pixel crops from the TIFF files developed by DCRAW, what is interesting is how much smaller the same features are between the A7 and the m43 camera (yes, that 6000 pixel vs 4000 pixel makes a difference), so make sure you open these images full screen to observe that.

FD20 Corner


and by f8 the text of the ARSE postcard is visible (and the print of the plastic food container too).


GWC-1 (raw) corner


FD20 Center


The center however clears up so that even by f4 you've got quite good details on the black torch, the tooth picks and the swiss army knife.

GWC-1 center


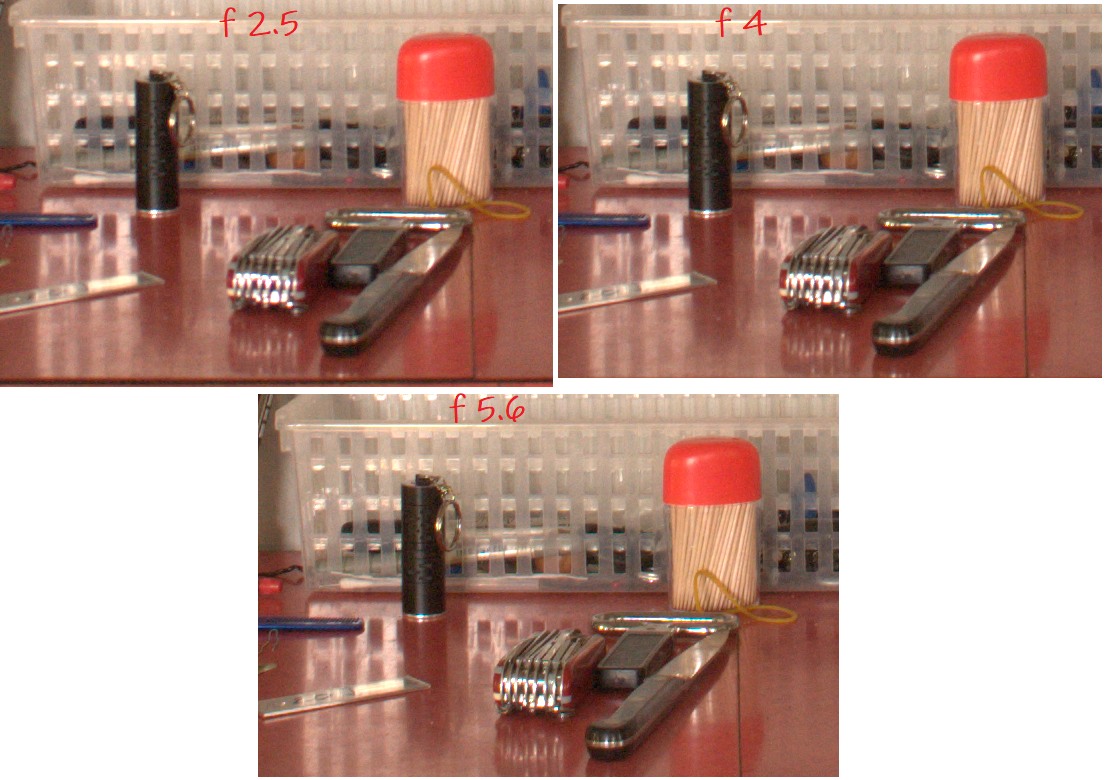
and even at f5.6 (about the sharpest its ever going to get) its neither as large nor as sharp as the FD20 image at f4.

At this point I think it would be of benefit to anyone still curious to go and look at some other A7 lens comparisons and compare these both to my results and to other lenses. I happen to think the (excellent) blog of Phillip Reeve has some great tests which I strongly suggest you look at. Even if you're not a "Full Frame" person and instead are reading this because of the m43 content. I recommend reading his posts about


Consider the prices of those lenses and then that I paid

  • $350 (including shipping) for this FD20f2.8 
  • $150 for my GWC-1 (and I already owned the 14f2.5)


Discussion

So what does this mean? Again as I've mentioned I don't feel that this means "I'm going to dump my m43 outfit" (as is often said on internet fora) , what it does instead is highlight to me that my choices for a light weight camera which would also sit as an equal against my EOS APS camera (a 20D back then) has proven viable.

It shows me that the compact and light weight m43 system is far more than adequate, but virtually indistinguishable from my A7 in all but the largest of prints. For anything that will be web delivered (although 4K may change that a bit) the A7 is un-necessary.

I prefer to carry on holidays and day trips the Panasonic GF-1 and its small lenses, but when I want to go out and take an image I've planned and I know I'll want either bigger prints or to take advantage of higher ISO or to take advantage of more shallow DoF that Full Frame gives, then I'm glad I've got the A7

hope that helps someone else

 ... something else ...

Ouhh, and about the title, nearly 10 years ago I compared my Panasonic G1 (the very first m43 camera) to a Canon 5D MkII which I dubbed Bambi vs Godzilla ... so this is a nod to that article. I wrote that because I wanted to also examine what was the limits of sensors, as I knew that per square centimeter the G1 had a denser packed sensor than the 5D did. Indeed scaling up the density of the G1's m43 sensor I predicted that a Full Frame of the same density of 42 megapixels was possible. The A7 is only 24 megapixels, but indeed the Nikon D850 is  right there at 45 megapixels ... a standout camera even today.

Monday 28 January 2019

solar roof top shading influence

I've wondered for a little while how much influence shading from Solar Panels will have on my roof (getting hot) in Summer. Then I realised that I had a small one already on the shed and perhaps that may be indicative ...


Expecting that it being so small that heat conduction (metals a good conductor) may not make it as obvious (spreading in from the outside). So I took my thermal camera and wandered down to have a look (in more or less midday sun).

Sorry about the blurry shot, but the phone wouldn't focus on the thermal camera (instead choosing the roof) ...


but blow me down if it didn't make itself clear with its heat signature! (note the visiblity of the black cable feeding down just right of the thermal camera). So I "froze" the screen for a better shot of the thermal camera (which isn't a recording type) to allow another photo with clearer readings.


Well the roof under middle of the panel is about 47°C while the rest of the roof is nearly 63°C

That's pretty good!

This means when I build my "workshop" (of similar colour bond steel) putting solar on the roof will not only give me energy but make it cooler inside as well.

A side effect of this has been to show how effective the gap I created between roof and walls being filled in with Shade Cloth is ... for that section is essentially quite cool (and allows in slow breezes and lets the heat from the roof out too.

win win

Friday 25 January 2019

still gnawing on that

Some criticism of my "method" led me to go out and reshoot a test between the Pansonic 25f1.7 on my GH1 and the FD50f1.4 on my A7

Taken on its own the Panasonic yeilds good results:


and allows a very nice rendering of concentration on a subject with sufficient DoF control to make the background a visible background while creating the effect of focus on the subject.

To me that is precisely what a "shallow normal" is for ... normal shooting distances (not 30cm away shots of you SuperMarioBros pencil decoration model on your keyboard in the office and dribbling about shallow DoF ... my phone does that). Distances where (say) your friend could have been standing beside that fence post and you want the background to be observable as a background, but attention to your friend.

In this role the little Panasonic is a champion, indeed it or the Panasonic 20mm f1.7 are excellent choices but I digress.

It however becomes apparent when you compare it to larger formats (even with 1970's lenses like the FD50f1.4) that sharpness is not up to it. It first strikes you when you are attempting to use manual focus (in the above that was on the wire at the top of the post) magnification and it just doesn't look "sharp". Its like that old saying about Volvo not wanting you to drive a BMW in case you don't come back to Volvo.

So while for general picture taking I find the m43 perfectly suited, when I am specifically going out to shoot a landscape and both wanting and needing that extra detail, the Sony A7 just allows me to get that.

Method

Now all the following shots were on a tripod (of course I needed to change the camera, so alignment is not perfect). All shots were developed from RAW using DCRAW to equalize the parameters and avoid sharpening in-camera (or post processing) effects (which Adobe does by default if you don't watch out).

Results

For instance lets look at what the Panasonic 25mm got, and lets give it the beneift of being stopped down a bit (f2) to put it at its optimum sharpness.


it is in fact almost indistinguishable from the f1.7 shot (and a small amount of thought would confirm that 2/3rds of a stop won't really impact on DoF control but will on cleaning up a lens)

So in keeping with my 50% pixel view of an image reveals close to what you see with a fine print at maximum size:

So this is the central portion scaled to 50%


Now ... lets have a look at what we could get from the A7 to be "fair" I've scaled it down to the same width as the GH1 image first for the overview (which blogger will also scale a tiny bit more)


and now a central segment


They are fairly close, however my nod goes to the A7 as being a smidge sharper (and there has been no software sharpening done).

For any print except "at the maximum" this isn't even going to factor for anything more than the most carefully inspected print. I would comfortably say "99% of people just won't pick any difference even side to side.

Ok, but I've hamstrung the A7 by scaling it back to what the GH1 could yeild, and its important to keep in mind that we're talking about a big print here: 70 x 46 cm

But should one want for some reason to go out and plan a photograph that will be printed bigger then what difference does the 6000x4000 pixels (vs 4144 x 2768 of the GH1) make?


so a bit more again. Are you able to see the bit of lichen on the left side near the top of the post in the m43 shot? Not really, and the fine details in the lichen on the fence are missing too.

Perhaps with a better lens (than a 1977 model) I may do better, but perhaps not by much. Thus for the $50 I paid for the FD50f1.4 (and they sell for about $150 now, which is still less than a new AF lens by nearly a factor of ten times) its hard to get better value.

Discussion

So is this worth it to you? To me its totally worth it (I paid less for the used A7 than I would for a later model perhaps better m43 camera), bang for buck I get something which isn't far from the results I could get with my 4x5 camera. Sure, that's better (typically good for 10,000 x 8000 quality scanned pixels) but I'm having a hard time getting colour negative anymore and processing other than my own black and white is hard to come by, plus that camera works out at $15 per image and this is ... well digital.

I have not touched on the other advantages the A7 brings, such as

  • good access to high quality legacy 35mm lenses (and used as they were designed, not halving the apparent contrast by the x2 crop)
  • better high ISO results
  • better bit depth at any given ISO
I know that someone will probably say "oh, but you could shoot the m43 camera at f1.7 and not at f4 ... well that's true ... but I could also shoot the FD50f1.4 at f1.7 and get a lovely result too ... so in summary here is that image for your consideration


as always I recommend viewing this on a good PC with a good screen and loading the images (center click on a windows machine) and viewing as big as Blogger will deliver.

I always enjoy being out in the forest and hanging around (and walking to this place) makes testing as much fun as anything else ... besides one of these is going on my wall ;-)

Tuesday 22 January 2019

Shallow Normal (bigger is actually better)

pretty much as soon as I got into digital cameras (like 18 years ago) I loved them for their ability to make quick pics and be able to send them via email to my friends (I was in Japan and my friends in Australia) or put them on my blog. Great stuff and (sadly) I haven't exposed processed film since 2014 and really since 2009 in developing my own.

While digital cameras have featured increasingly in my photography it has not always been with a view that they are universally "better". One thing missing (which I've blogged about a lot) is the lack of a normal lens which gives a pleasing rendering and a shallow depth of field. This was eventually satisfied for me with the Panasonic 20f1.7 and later the more commonly thought of "normal" the 25f1.7. It was pretty much 80% of my desired needs for focal plane control.

Naturally as soon as I got my A7 and put my FD50mm f1.4 on it (and took some shots) I was sold. This combination was (as expected) everything that 35mm film with a 50mm was able to give me and the benefits of digital too.

This was clarified the other day with a few shots sitting around in a bit of forest I know (and like) near where I live. I took two shots sitting on a tarp  on the ground (because ... ants) of my bike, one with the Panasonic 25mm f1.7 on my GH1 and the other with my Sony A7 and the nFD 50 f1.4

To me both these images have sufficient focal plane control, however they are both different to look at. I knew that the 50 would be better on the FullFrame than the 25 on the m43 camera, but its always good to see these things. To equalise things (such as lens profiles)  I developed these RAW files into a TIFF with DCRAW and cropped the GH1 into 3:2 format. I found also that I had to use the Panasonic at f2.5 to get away from that "wide open contrast softness" effect, (see this post for images) but more on that contrast difference in a moment

Panasonic 25mm @ f1.8


then ...

FD 50 f1.4 @ f2


Background isolation on the m43 unit is acceptable (and better than any or most zooms), but its my view that larger formats are where mid range angles of view shine and the A7 and FD50 renders a very nice image with much more natural seeming background with a more film like graduation of dynamics than the smaller sensors can.

Both were at 400 ISO (so that's why the A7 image is a wee bit darker f2 vs f1.8 is about 1/3rd of a stop)

A recent discussion about a presentation on YouTube centering around the idea that "people can't tell the difference in prints between m43 and Full Frame" left me wondering if any of the participants had actually seriously looked at this. There are many factors involved and especially with use of Aperture selection and Wide Angle lenses one can take Depth of Field out of the equation, but other components like contrast as well as resolution make a difference. And by resolution I don't mean 1000:1 contrast ratio line pair charts, I mean photographs of actual subjects.

People often talk of wanting to print large (while poo-hooing pixel peeping). My personal experience is that a 50% view on a good screen (100% meaning 1 screen pixel = 1 file pixel) is about as good as you'll get for a comparison online of a large print inspected close. So lets look at what we see on magnification:

Panasonic 25


now I suggest you "right click" that above image and open it in a new tab to see it unscaled by browser / blogger.

FD50


To me the FD holds up the best. Now it may surprise you to see how little cropping was done to take the overview (which started life as 4000 pixels wide) down to 2000 image pixels (no scaling) to see what one would see on a print from the 4000 file; but that's one of the facts of life.

Now the A7 gives 6000 pixels and so to keep "feature size" the same I chose to scale the A7 first back to 4000 then down to 2000. If I'd kept it at its native size it'd be like this:


highlighting a couple of things:

  1. how much larger a print you can make with the A7 without pushing it (1 meter x 68cm) vs the GH1 (68 x 45cm) with both printed to 150dpi because myself I've found that works fine without resizing for large prints
  2. how much better the picture stands up (both in pixels and in tonal range, look at the blowouts on the tree)
Looking at 100% pixels make is clear the advantage the A7 has over the GH1


and ... the same area 


Also, having recently compared the GH-1 to the latest G80 I'm not convinced that the GH-1 is significantly weaker, meaning that a G80 would still not render as well as the A7 has (and the used A7 cost an amount less than a used G80)

Contrast and clarity

One of the points in favor of the micro43 system is that people argue that many lenses don't have to be used "stopped down" to achieve adequate image quality. I would argue that this is not in fact borne out in practice. For instance the review here on the 25 suggests:
In a word: exceptional. The Lumix 25mm ƒ/1.7 provides sharp images straight out of the gate at ƒ/1.7, and while stopping down technically provides statistically sharper images, you'd have to peep pretty closely to see any kind of practical difference.

Yet this is not what I've observed, if you look again at the f1.8 segment (which is essentially the same as f1.7) is lacking strongly in contrast and sharpness. Ignore completely that there are any DoF differences because when you look at the above 2 segments DoF is simply not an issue; look at the footpeg or the word "YAMAHA" on the cover. As much as I want to say "theres no obvious difference" there indeed is.

I didn't present the images shot with the Panasonic at f2.5 because lighting changed between my first set (pairs of images with GH1 and A7) and my second set, however I think its clear that the m43 system will essentially have significant shallowness of DoF at f2.5 nor any "speed advantage" conferred by using a wider aperture. The FD50 on the other hand could be stopped down to f5.6 and its image clarity would simply continue to improve (over the f2 presented)

Dicsussion

So before anyone says "you biased it" ... well sorry, I didn't. I have no reason to bias this because I'm not trying to convince anyone. I'm just presenting my own exploration of gear I already own (as I always do).

This does not mean I'm some forum tosser about to write "I'm dumping my m43 gear" because it makes a great light weight kit for travel / general picture taking and unless one is pushing the limits one just won't notice most of this.

However when I do want to go out and (with something specific in mind) make a high quality capture of something which I approach with care then I'm glad to have the A7 in my arsenal ... cos I just haven't been using the 4x5 lately (and colour negative sheet film is getting hard to get processed these days, not to mention expensive).

In the above I have attempted to show that there are distinct differences between the formats (m43 vs FF) which a photographer can make use of to produce a print (even A4 sized) which can be identified as different by any astute observer.

Hope that helps someone

Friday 18 January 2019

(My car is as hot as an oven...) Taken Literally

I'm one who was brought up on Science and who has a number of years of study in that area (culminating in a research Masters). So its unsurprising that I take literally the motto of the Royal Society of "Nullius in verba".

Think for yourself and verify

Sadly in modern society Education has failed and the Division Engines of Social Media have made it easier for Zombies of Moronity (article on them here) to just foam at the mouth with whatever emotional response they may have to something they like or don't like. Its important to consider the "Pied Piper" principle here in leading fools with what they like or what happens to be consistent with their world view.

This is however the basic recipe for "how a fool and their money are easily parted", and the antithesis of how all the technology in our daily lives (you know, like how you're reading this post) operates and was created.

So when I saw on FarceBook the following post I thought "that doesn't seem right" ...


Particularly the words "proof " and the description of "parked in the shade" by Mildura Cafe ...

Being who I am rather than bleat about "that's bullshit" or "ouh it does feel like an oven in my car" (which are all meaningless), I thought I'd set up my own "experiment" to see if  I can replicate it myself.

Method

So taking their description as instructions I decided that I doubted it would work so rather than waste time I went straight for "do it in full sunlight"

I altered the experiment a little by not using an open baking tray (as per the picture above) but in a glass lidded casserole dish. My logic was two fold:

  • I didn't want my car to be smelling like steak for weeks
  • evaporation will actually cool the steak so the sealed casserole dish would be better at keeping in the heat of the oven (which is why we use them)
Here is the meat in my casserole dish


with a little dash of oil in the bottom so it didn't stick.


So I parked my car in full sunlight on a fukken hot day (we're in the middle of a heat wave at the moment) and left it there for an hour before I put the meat in at 11am (as per their method). I didn't think to photograph it till after I'd put the meat in there, but here it is and you can see its "full sunlight" not shade


When I placed the dish on the passenger seat I thought I'd measured the temperature, so I closed the door (to keep in the heat) and dashed back for my thermometer ...


already warming up ...

At 1:30 I thought I'd just check my cooking, so I went out and had a quick peek in the oven. It was warm (hot enough to have killed anyone in the car by then), but not hot enough denature the proteins (which is what cooking does quick primer here).


a puddle of liquid has started to appear in the dish, but its not cooking and is still red to the sight... so I thought I'd sit it on the (metal) dash of the Pajero for an hour or so to just give it that bit more solar energy


Shot through the windscreen. The car is facing North, and so as this is the southern hemisphere you can infer the time from the shadow angles to be around 13:45pm in this shot.

An hour later I knew the passenger seat would be getting better sun (you can see it in the earlier picture already) so I moved it quickly back to there (getting full sun through the window).

I then went back to my other jobs and prepared the tipod in the kitchen to make the "fresh out of the oven" video which is below.


This clarifies what the steak looked like and the texture and condition. As you can see the steak was essentially slow cooked to a rare stage. Indeed I finished it off by thin slicing it and then quick frying it in the pan just to sear the meat. I served it with dinner with greens (rather like a Snark) crushed peanuts and a glass of Shiraz ... who says research is not its own reward ;-)

Discusison

Now its important to note that the original intention of the Farcebook post was to remind people that you should not leave children or animals in the car in summer. I accept there was some theatrics in this post to add some whimsey. However what drew me to do this experiment was the amount of conflict generated in the comments (make sure you read that Division Engine post above) and the emotional and evidence-less squeals of both the Yah and the Nay respondents.

Fucking no-one even thought to try it. Born to be sheep. Worse, that although my first reply to a caller of bullshit was "why not try it yourself". Later when I posted my finding and photographs, even with the above evidence was told it was bullshit. Nice to be called a liar by morons, it somehow validates me. Let me quote from Epictetus (philosopher of the month for me it seems) how I see this:

  • If anyone tells you that a certain person speaks ill of you, do not make excuses about what is said of you but answer, "He was ignorant of my other faults, else he would not have mentioned these alone."
  • It is not he who reviles or strikes you who insults you, but your opinion that these things are insulting 

So I implore you (probably not needed for anyone who reads my blog much) to not take things at face value, to seek evidence if you feel its wrongor even if you feel its right but "maybe not".

Before you make judements.

Wednesday 9 January 2019

Young Kookaburra

I've had a bunch of Kookaburras move in to the area lately, this one looks like its recently out of the nest


a higher magnification crop of the above gives a clearer picture of the feathers and the soft downy feathers on the chest and still in the head.


I like these guys ... great entertainment (especially when they're robbing food from unaware city people or tourists...)

sloppy Canon nFD24mm f2.8

This lens is one of the best Manual Focus legacy lenses that you can get for use on a Mirrorless camera. On the Sony A7 its more attractive because 24mm is quite wide and affords very useful shallow depth of field control on a full frame.


Its a great lens and well regarded optically for a "legacy lens" (which has no AF nor any electronic reporting of anything to the camera for recording in the EXIF field of the image). If you can live with that then its been a great low priced lens for ages.

However everything dies and in attempting to photograph stars the other night I stumbled on a problem which makes this lens near unusable for that role.

The problem is that the bushings which hold one of the groups are collapsing with age, meaning it moves around inside. This is bad because even a small amount of movement is a big deal for shorter focal length lenses. This manifests itself when the camera is tilted back from "horizontal" (you know, like when one photographs stars) and flops back again when pointed back down.

I've made this quick video on youtube to demonstrate this:


(if you're on a mobile view, go here https://youtu.be/71Hxj--1m94)

So as long as one is aware of this the lens is still entirely usable, but just watch out when looking up at buildings or the sky, because this shift will be enough to render critical focus absent on infinity (which isn't far away with a 24mm) and even stopping down won't be sufficient to bring back that detail when using a camera with such image detail as an A7 provides

A detailed pull down of the lens showing what needs to be fixed and where it is will perhaps help too. I found this great link on DPReview forums here.

I believe that eventually almost all the lenses will fall prey to this problem because its a plastics issue.

So, now you know


Tuesday 8 January 2019

fixing a stuck aperture - win or bin

I bought a Canon FD100mm f2.8 a while back and it worked fine for a time then I observed it would not stop down reliably. It was clear there was oil on the aperture blades and so I reluctantly decided that the only option was to either bin it or fix it ... once I'd decided that it could only be win or bin I decided to give it a go.

WARNING: this is fiddly job and requires some competence with tools


This post serves to add a few things to this great post I found on photo.net thanks to gnashings. He also references this post which while about the FD50f1.4 is also helpful as the designs are very similar.

There are variants, but on my model the front "dress trim" is not unscrewed, its levered up ... which was perplexing at first and took some bravery. Essentially that last step before the lens is actually metal and holds the front element into a "group". The next step after that is the beginnings of the pastic. You can hear / feel it is different when you touch it with a small metal screw driver.


so I inserted a small thin screw driver into that gap where the red arrow points, and with a clean icecream stick to provide a fulcrum point (allowing me to leaver against the lens and protect it as wood is softer than glass) I could lever that up and get in another slightly larger screw driver in and work around that levering it off.

Unlike that above post by gnashings I had no hole through which to poke a screw driver ...

This revealed the three screws that hold on that metal front (to the plastic).


you can see traces of the glue in there (and my ice cream stick).

With the fascia removed you can now take out the front element which just sits in the plastic group mount. You can also see one of the screws that you'll need to remove to get the focus ring off, and these also allow you to later rotate that grip to tune infinity focus .


I placed a clean tissue over the front then up-ended it (lens element facing down) so that it could fall out into my hand but not get grease all over it


you can now see the iris diaphragm (which in this shot is now cleaned).

Notice that the lens is on an adapter, this proved handy (I'd say crucial but because I haven't tried it without I can't be sure) to move the levers and have the lens mount "rotated". Recall that the lens rotates within the mount when mounting an FD (check it if you're unclear).

I decided to go in through the front which is a very tedious process ... I don't recommend it as matching up

  • the moving group inside the helicoid
  • the two iris coupling levers
  • and getting focus correct
took me half a day. However I did get it and all it took was perseverence (although that bin kept looking tempting)

Notes:

I should have photographed it, but as my hands were covered in grease I got carried away working and didn't, however the focusing ring (once those screws are removed) is held in by a lug on the side which while allowing it to move, prevents it from coming off. One has to keep rotating it till you find a keyway cut into the chassis of the lens. When you rotate it to that point it will slide up and away from that. As when those screws are removed it rotates freely and does not connect with the lens focus helicoid.

Take careful (and I mean that) note for where the outer helicoid is in relation to the body before you unscrew it as one needs to to when accessing from the front. By this I mean perhaps marking it with a score and observing the number of threads visible in the recess in the outer body (this will be clear when you see it). You will need to return it to more or less this exact position and you'll need (no matter what) to be tuning focus later if you want that focusing ring to ever line up with what the camera sees.

I had trouble screwing the lens back together, as if something was fouling. I discovered that actuating the open and close of the adapter seemed to release that friction and it then moved down with turning the focus part of the helicoid.

Have some small powerful magnets handy for screws.

Not having gone in through the back I can only say read his (the one linked above) post (and indeed the other comments) carefully.

Conclusion

My lens is now functioning perfectly so its win win not the bin.

Saturday 5 January 2019

My local walking track.

It's nice to have this a few km from home...


Tuesday 1 January 2019

First Day of the Year

... so I decided to take the motorbike off to some different countryside in the granite area not far from here, about 130Km.

The view from the top of one of the rocky outcrops (called Castle Rock) was as inspiring as always


and on the walk up I managed to coincide with the blossom of the ground orchid Blotched Hyacinth Orchid.


Sorry about the heavy handed processing to make the stem show more clearly, but I only had my phone on me ... A closer view of the blossom.


(also with the phone camera)

Lovely way to start the year.

I hope this orbit of the sun is good for you all (and me too)