Showing posts with label lifeHack. Show all posts

Friday, 1 April 2022

Adapting a leather NATO into a nice leather watch strap

I've come to find in my journey of watches that I prefer a plain simple strap, having over the last few years experimented quite a bit with many combinations.

I have a number of straps now (meaning a single piece as opposed to the "pair of straps" which are two separate parts) which makes it not only easy to change out (and thus I frequently do) but helps to keep the back of your watch that bit cleaner from skin grease, sweat and dirt.


The NATO itself as it comes makes even less sense in leather than it does in nylon because the keeper is even more pointless, adds yet more bulk and makes threading extra length even more of a mess than nylon. However it makes it easy to make a nice strap for a low price which suits your watch and makes your watch wearing experience more comfortable as well as deepen the usefulness and fashion coordination that your watch has. You may have noticed that I wear the strap on the watch buckle down, for this reason and it makes it nicer on desk work too keeping all the strap hardware off the desktop.


Back in my early watch wearing history changing a band (or indeed a bracelet) was something which required tools, tools which were much harder to get. Thus one frequently didn't.

Back to the making a leather strap from a NATO, this also means that strap changes can be simple, convenient. 

So apart from cutting off the keeper (see here), and of course trimming the band to a nice length (because you aren't really going to need that extra length for when you wear your watch outside your tactical gear or wetsuit that fits neatly in the keepers) you need to grind some of the extra thickness out from where you'll want the watch to sit.

I encourage you to think about this and perhaps buy a nylon NATO and experiment, because once you've done this its going to be pretty permanent as you'll see in this video:


So that's it ... not real hard and leaves you with a method to get a selection of straps which will suit the watch and perhaps colour match more with your clothes.


Happy Watch Wearing

Wednesday, 13 January 2021

Making NATO work better for me (and maybe you)

I've had a couple of watches with a NATO strap now and while I would like to like it, I'm afraid that I just don't like the unnecessary thickness under the watch. This is more pronounced with a slim watch on a slim wrist. 


Now its worth mentioning that the very design of the NATO places two thicknesses of strap under your wrist:


In reality one is completely enough and the other as a keeper is only really needed if you have either a military watch with fixed and large spring bars 

or if the band too small for the watch (say, you've got an 18mm on 20mm lug width) and there is concern of the watch slipping off when you're taking it off. If you get the right size for your lug width then it won't slip.

Remove the Appendix

The solution often suggested on the internet is to cut off the (vestigial) keeper. This surgery looked painless enough, so I did it.


which has now made only a single pass of fabric under the watch and still holds the watch firmly.

My next concern was that the cut (and heat sealed carefully with my soldering iron) would be a slight skin irritant (because its rough), but this has proven not to be an issue because the spring bars keep it away from the skin.


As it happens I like to wear my straps "buckle down" or "Grand Seiko" (GS) style, because it is easier to control where the watch sits, and keeps both the tongue and the buckle facing me. I find its easier to fit, as well it keeps outside of the watch looking smoother (and snags on less things).

The watch can also then sit on my desk easier too


... although now with this band I feel I no longer need to take the watch off when using a computer at my desk.

If you do this yourself I recommend that you use a sharp blade (such as a box cutter with a fresh blade)  and 

  1. clamp the strap down by the end (away from the buckle)
  2. pull the keeper back and keep tension on it (folding it back against the stitch point)
  3. cutting just above the last row of stitching removing the keeper strap
  4. seal with a hot tip (I don't recommend flame)
Sharp scissors also work if you are careful too.

A quick and dirty video


So now it looks like this, clean on the back:


and the clutter of the strap on the inside (rather than both sides as before) ... where its less likely to catch on things.


and note that the watch is now sitting much nicer.

There is still of course one layer of fabric between me and the watch, and since this is a work watch (yard and other sweaty work) that may just help to keep the watch (my SNK805, which isn't highly waterproof) cleaner and less gunk infested.

 voilla ... win win

PS: this is actually almost a Bond pattern strap now, with the removal of the keeper and the almost correct Bond pattern (oh and no Bond wore a NATO until the 21st century).

Sunday, 26 April 2020

GoPro Hero 3+ mic wind muff

Wind noise on a GoPro is a PITA and I've had quite an amount of success with a few small mods on mine to cut down noise.

This weekend I decided to try to improve it both in function and aesthetic (because it was looking rather Frankenstein earlier). My solution is to put a tiny bit of foam over the small mic hole and in conjunction with that some bluetac to seal the places where the wind can get in under the black frame. Here's what it looks like now


The astute will notice I broke the frame on my last insert back in ... sigh

You can see that the foam is held down with a small amount of double sided tape, and a small bulge under the frame is created by the blue tac;  visible at the front (the previous solution was putting it all the way along the front).

Basically you make a small "sausage" with the blue-tac (like a 1mm diameter) and form a circle which will be larger than the frame hole (and of course not block the mic holes) and then put it into the frame and sandwich it down.


You can see there is a little gap in the top of the frame, but that'll subside over time as it squeezes down. (and you can see the crack of the broken frame ... sigh)

Oh, the bubble spirit level is pretty handy too ... that was like $5 for 10 of them on ebay. I'm still finding uses for them ...

So the materials list is:


  • a few mm of double sided tape (had that in the tool cupboard beside the Duct and Gaffa tape anyway, so no money spent)
  • some sponge from kitchen sponges (again, had that on hand under the kitchen sink, again n money spent)
  • some blue-tac (in the desk drawer another $Zero spend)
  • some time (nobody pays me on the weekends)

The pudding

So the proof of the pudding is in the ... well listening


not bad and not expensive.

Lastly, thanks to Jacob for this GoPro ... you're a legend!

And, I just discovered this is post #1000

#milestone

Sunday, 7 July 2019

Charger sparks

Some question recently about charging and chargers and when and how to plug your charger in to your scooter prompted me to write this. The short answer is »

  plug your charger into the wall first.

In case that's not obvious, plug the charger into the wall, then into the scooter.

Why?

This is a closeup of the XT60 plug my scooter has for charging. You can see the evidence of powerful sparks arcing across between the charger and the battery in the burns and pitting happening on my plug:


And


So "why is it so".

Its simple really, its potential difference (you know what we measure when we measure voltage).
If no difference exists then no current (electricity) flows, if a big potential difference exists then a big current flows, even momentarily this does damage like above. 
Heck this is what spot welding does (and how it works). 

Where is the potential difference? Well its between your battery and the unpowered charger. If your battery is (say) 46V (very discharged down from its normal 52V) then if the charger is off its got a potential of 0V so there is a 46V potential difference to equalise. Plug it in and POP.

This pitting will cause premature death of your charging connection plug (which in my case the terminals are gold plated for better contact, so I'm destroying that for a starter).

Why has it happened to me? Well some times I forget that I've unplugged the charger (or I've moved it between places and haven't turned it on at the wall).

How do avoid this damage?


Many batteries on scooters are permanently simply hard wired to the charging port, and much of the smarts of charging is in the Battery Management System (BMS). If you attempt to plug the charger in when its turned off the charger plug will be at zero volts, so there will be a potential (probably 47V) difference between the plug (and the powered down charger circuit it leads to) and to the battery terminal. 

This will cause exactly the damage you see above as the electrons briefly surge across to equalize the voltage.

By simply turning on your charger first you'll have it sitting at about 54~55V and even if your battery is quite run down (45V) then at most you'll have a 10V potential difference and thus very little current flow.

Alternatively if you didn't turn your charger on first then you'll have 0V at the charger end and 45V at the battery and you'll hear the characteristic "TICK" of a spark jumping while it equalizes the potential (electrical pressure) difference.

Lastly don't "take my word for this", go get a volt meter (and if you have an electric scooter you should already have one, they cost like $10) and measure the voltage across the terminals (absolutely  take care to NOT short them out, one probe must only touch one terminal). Measure your battery, and measure your charger. Polarity does not matter if you have a digital multimeter.

HTH


Saturday, 29 June 2019

being visible at night

While I love the look of the Mercane, its not exactly good for being seen by drivers when being used at night. As well that headlight is more of a running light. allowing others to see it from the front more than lighting the way for me to see.

So I decided some reflective tape on the "stem" was in order


just looks red, but when you shine a light at it (like my camera flash) it really stands out ..


impressive ... outside in the dark you can't see the scooter, but that red reflects your light like a beacon (say if someone is driving a car and you're in their headlights).


Fantastic. (even matches the Ducati logos ;-)

Like CASE said: "Safety First Cooper"


Sunday, 2 June 2019

(minor yet effective) fireplace improvements

It has appeared in the background of some of my blog posts but, particularly in winter, my small wood burning heater features at the center of life inside at night.

Like all things, almost nothing is designed for Australian conditions (even much of the commercial stuff here which is often just slavishly copied from Northern Hemisphere conditions). One such thing is my wood heater.

Its a fairly ordinary heater for its type (and already seen a bit of use too) and its about 60cm square with an inside compartment about 40cm deep behind the door.


So while not big, is certainly big enough for the room its in (and my adjoining bedroom).

It has an added "benefit" that it has a small electric fan that sucks air (you can see the grill at the bottom and the switch and lead on the right) from the floor and circulates it through the back of the heater and comes out the vent at the top. This can really help warm the room faster, but its best not left on long or it will strip heat out of the furnace too fast and result in incomplete burns with Australian hardwoods (design issue #1).

Actually Australian hardwoods like Eucalypts (or known locally as gum trees) are harder and heavier woods than the common northern hemisphere woods (like pine, birch or spruce) and require much hotter temperatures to get going. As a result they burn into coals more readily and long after the large flames have gone there remains intense heat coming from the mass of coals.

Unless the furnace sheds the heat too fast, like the fan tends to do. If you use the fan too long you'll rob the system of energy needed to sustain combustion, and you'll have heaps of unburnt charcoal left in the morning (and the temperatures will fall sooner).

Its also actually difficult to start hardwood burning in these furnaces and requires (more) tending (than I'd like) to get the fire going. Not least of the issue is that it does require more air flow than softwoods require to get going and stay going.

I've noted also in my fire stoking this last winter (southern hemisphere, means its winter here now folks) that the coals burn and crush under the weight and choke the air flow and thus the heat coming from above (which is the wood).

Having seen a few hearths in my time I've noted various attempts at making a fireplace cradles to hold the burning wood and coals and achieve better air flow (ash falling away).  While in some ways in a fireplace they are also designed to increase radiation, in a furnace like mine its un-needed.

I've also seen gates held up above the floor of the furnace, but they are also make it a pain in the arse to clean the furnace out. My furnace is easy to scrape out with a small shovel.

So I came up with this idea, some simple lengths of 50mm box section which contains the coals, allows air to pass beneath the log and through the coals and no matter what allows some air to get to the back of the furnace (and the hot air exits the top from the front too).


In this photo above you can see that I've cleaned the floor, left the larger unburnt coals (and actually now with this system there really are less coals in the morning and more ash - meaning better completion of transfer of energy from the wood into my house).

The one on the right looks odd at first glance because it has a 45° cut in it and I'm going to weld on a short section to prevent logs rolling off the cradle (and snuffing out). This will still leave the bottom open to carry air through.

This also makes it easier to start with a mixture of woods too. I'll start from the bottom:

  1. coals from the previous night, with wood splinters and some small off cuts sprinkled atop the coals (from checkering the slats I put on the house (earlier blog post) (waste not want not).
  2. two small chunks of fire starter (hexamine), each is about ¼ of a piece as it really starts quickly
  3. a layer of pine (scrap 4x2) cut into small sticks and to act as a pyre and get the coals going too
  4. cross angled shorter pieces of 4x2 hardwood (gum) scrap wood (I got this from a re-roofing done locally for free) which will then fall (burning) onto the coals when the pine is gone
  5. a chunk of hardwood of medium size to get the ball rolling.

This will go for about an hour with what you see and bring my room up to 24°C when outside is 8 or so.

So if you're an Australian (or Kiwi) using Gum you may feel free to try this design out and see what works for you.

Oh, and the steel was sourced free from a local guy making cattle races.

Win Win

Thursday, 22 November 2018

dealing with heat

Its not just people who get hot, gear gets hot too.

Just the other day we had over 35C in my area (and my house insides too) and I observed that my phone had not charged much when I had put it on the charger (I know how fast it usually charges).

A bit of investigation revealed that the internal temperature (reported by an App that reads the temperature off the sensors inside the phone) showed that it was very close to 50C inside the phone, so I whacked it onto a "cold pack" until I could come up with a better solution.


This wasn't an ideal solution as while it chilled the phone it took it too cold and moisture condensed on the phone (known to technically apt as a "bad idea") and so I sought a proper solution at my earliest convenience. Indeed I expect that as battery damage occurs when temps are over 50C and would logically block or seriously slow charging (if you're an American reading this and don't know what 50C means then I expect the rest is technically over your head too, so don't worry).

From battery university:


Solution: get rid of heat

This is a heat sink.


its made out of aluminium to enable it to rapidly conduct heat (from the source) and disappate it via the fins (which being black also allow for good radiation too).

So with my phone sat on this it was only a few degrees above "ambient" air temp.


which is great.

Somehow it happens that I didn't blog about my "home made phone stand" (from old wood) which I also made a few of for office colleagues:


I sit it like this when not charging:


but as the charging port is on the side, I turn it sideways (notifications harder to read that way as orientation sensor does not do everything everywhere) when charging. As it happens my "home made stand" also works to allow heat dissipation through the screen in this orientation..


I've always disliked phone covers (which will act to also trap in the heat) and so this only works well because the phone is in good thermal contact (it has an aluminium back even) with the heat sink.

Sorta looks funky too dunnit.

Saturday, 30 September 2017

(DIY) coffee banger - updated

well, having moved house twice since 2012 when I wrote about my coffee banger last I felt the need for a new one in my new place. As per my last post (here) I still don't see the point in paying $30 for what is essentially a waste holder (holding it before it gets transferred to the bin).

So let me introduce my Mk2 coffee banger:


I was inspired by some connections of roof gutter drainage pipes that were for connecting and angling the pipes.

This is essentially two pieces of 90mm PVC-U, one a 22.5 elbow bend and the other a "cap".


Pressed onto the bottom, the cap makes a good removable base, which is handy because often after a few days the coffee in the bottom of the banger is a bit hard to clean out. This design just allows the bottom to come off with a twist (its a tight seal, nearly, but not watertight), yet the rim on the cap keeps the damp grounds from leaking out.

I used my dremel to cut some (rough) grooves to hold my traditional "stick" in place, with some assistance from a bit of hot melt glue which will no doubt come off easy as the stick (inevitably) needs replacement.


The bend makes an almost ideal angle for striking the banger stick with the coffee handle and the "rim" catches the splashes from small amounts of water left in the handle.

So, in summary, its:

  • durable
  • cheap (less than $5)
  • easy to make
  • easy to clean
win win!

Sunday, 24 July 2016

Oppo F1 - a quick "mod"


Just a quick post on a "physical mod" that I've done on my phone.

I don't like cases for a number of reasons, but there have been a few small issues on my Oppo that I don't really like; it slides off things easilly, swype on my desk is tricky (because it slides), its often hard to pick up, when its flat on a table I can't hear the ringer from places around the house (because the speaker slot is muffled ...

So I've added some small self adhesive "clear plastic pads" to the bottom. I bought them from Bunnings (smallest ones they have) and then trimmed them down carefully shaving them with a "box cutter" so they are about 2mm thick.


While this is not for the DIY Klutzes its easy to do and has the following benefits:


  • as the ringer is on the back of the phone and the alert on the front. Now I can have it face up and still hear the ringer (which being there on the back was being muffled even on a table)
  • the stand off height means I can now get my fingers onto the phone more easily and pick it up without a slip drop caused by it being so slender
  • the pads to not feel anything in the pocket, so the phone's dimensions are unchanged in feel (sure it won't fit through a metal slot, but really..)
  • some extra protection from scratching (such as sand or grit) on surfaces is now provided both for the back (who cares) and the camera lens (important)
  • the phone now is less "slippery" on surfaces (like the arm of the couch) and doesn't slide off when the vibration / ring occurs

My NokiaE72 had a "camera bump" which WangerReviewers would go on about, but which had the effect of both lifting the rear speaker off the table (allowing it to really increase volume) and protected both the back and the camera outter filter.

So, there you go

Sunday, 22 November 2015

comfort and the little things

I use a bluetooth headset when driving (or even just so I can hands free round the house). Frankly I'm stunned at the amount of total wankers out there driving while holding their phone. Some try all manner of "cunning methods" to (attempt to) hide this fact (that they are juggling a phone, a steering wheel and perhaps gears). Then they whinge like stuck piglets when they are caught and fined. Probably they don't give a shit till they kill someone.

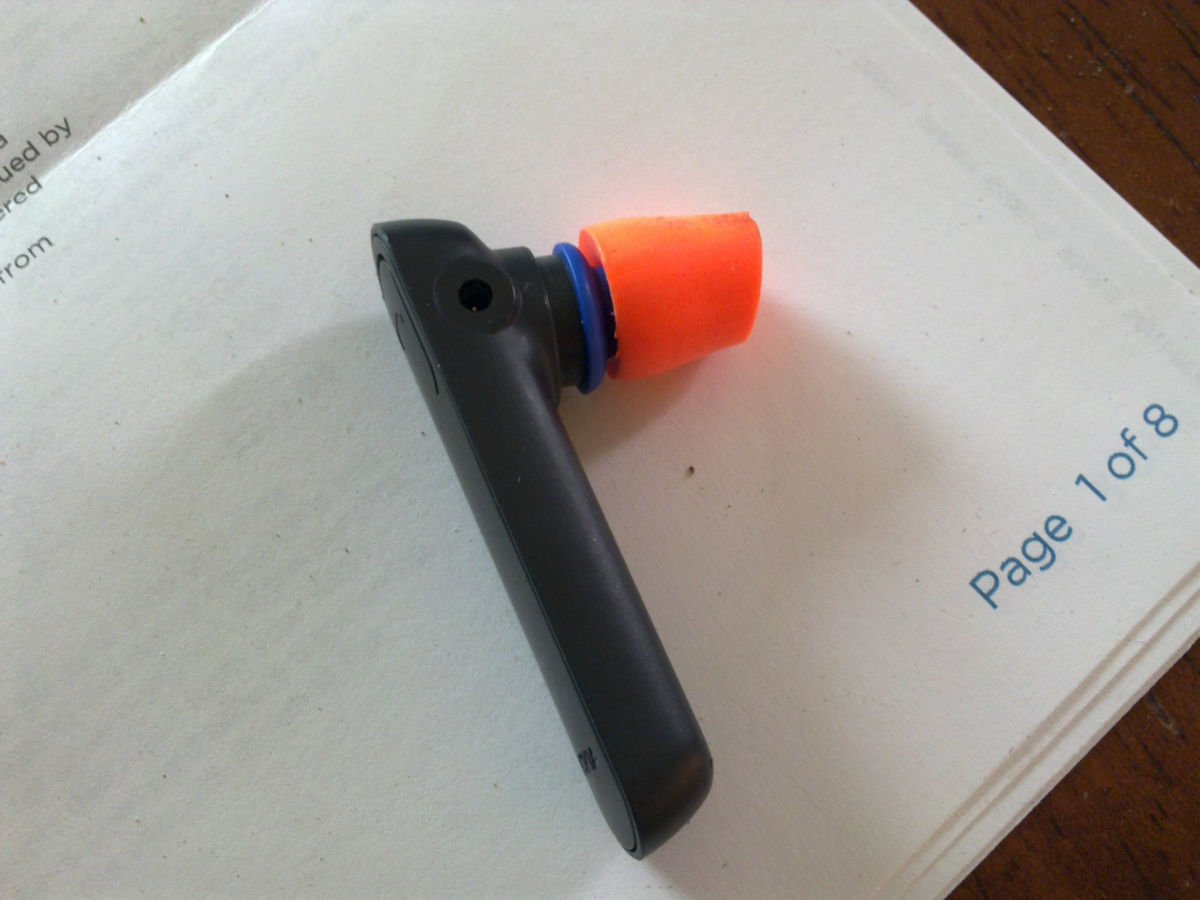
The problem I have with the Bluetooth headsets is that often they don't fit comfortably or even at all. I've had the most success with the smallest "in ear" type but frequently the silicon "comfort pads" are simply uncomfortable. Today I'd like to present my solution to this problem, which (in my usual manner) is both DIY and cheap.


Essentially this is an ordinary foam earplug used for noise reduction (cost about 5c unless you buy them individually where its probably about a buck), which I have adapted to fit onto the spigot of the ear piece.

When fitted into my ear its not only more comfortable than the original silicon, but it holds better in place and  blocks some ambient sound, making it a peach to hear the other person above the car noise (I don't drive a luxury modern car I have an old 4WD).

To get the foam over the sound spigot part of the earpiece, I "drill" a hole in the center as well as shorten it down.


To "drill" the hole I heated up a rather fat nail (while holding it with pliers) and then just pushed it gently through the foam earpiece (with the foam melting as it passes through), cutting a channel for sound and fitment onto the device. The proverbial "hot knife through butter".


You can see the heat stains left on the nail from the last time I heated it up.

To make the entire process easier (as the little foam earplugs are soft by nature), I whack the earplug in the freezer for half an hour before hand. That stiffens it up and makes it easier to hold (without compressing it) and easy to get a nice clean hole through the center.

I also cut it with a sharp knife (a box cutter actually) to be shorter first, then drill it second.

I use a small butane flame (like people use to make brulet or soldering) to heat the nail, and of course hold the head in the pliers (so's I don't burn my fingers).

Voilla


.. you now have a simple, replaceable, comfortable head set which stays in place well and blocks out car noise from that ear making hearing easier :-)
Go Wild

Sunday, 24 May 2015

GWC-1 - adding a filter thread

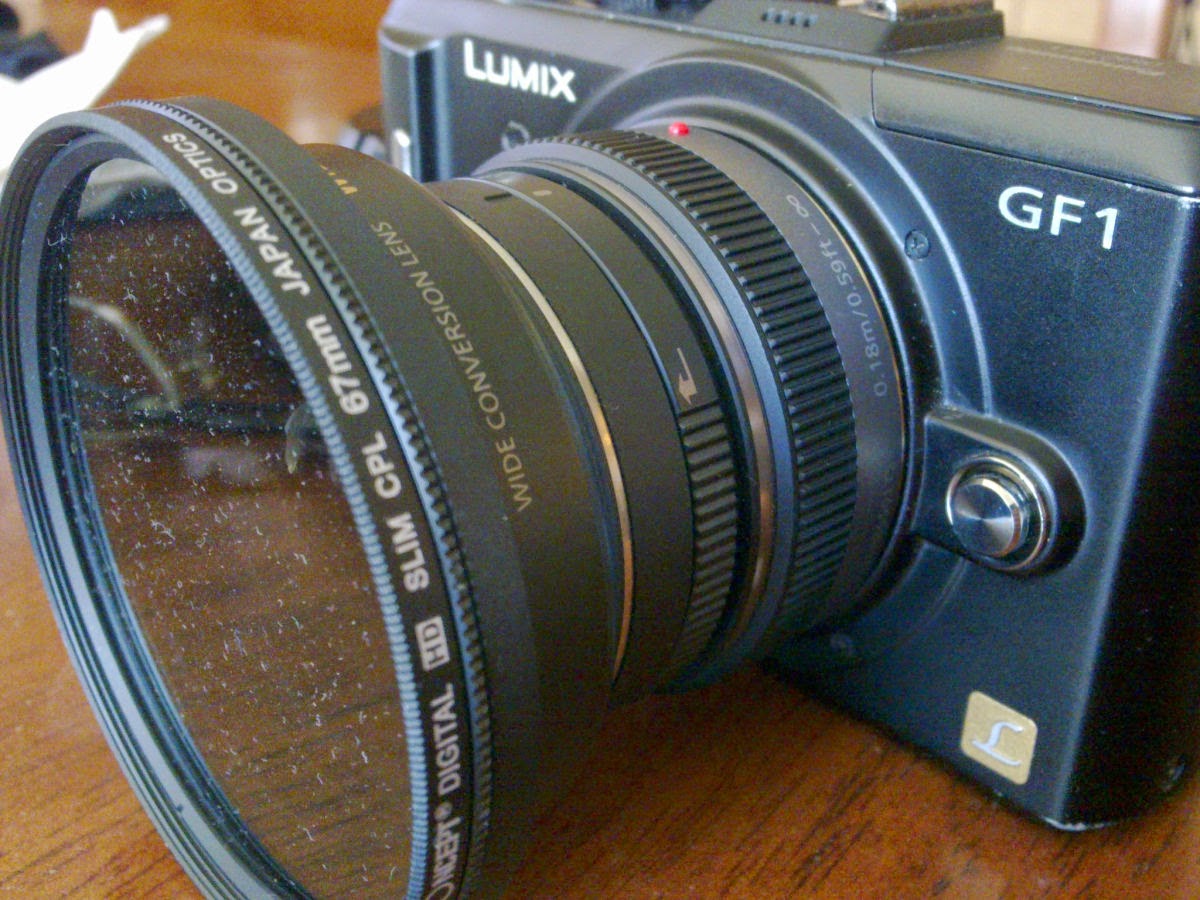
one of the criticisms of the Panasonic GWC-1 0.79x wide angle adapter is that it does not have a filter thread. On a recent discussion a fellow mentioned that he had mounted a thread on the inside of his by starting with a 55mm filter and sanding down the outside to press it into the GWC-1.

Fan-fukken-tastic idea if you aske me ... So I thought I'd give it a whack.


As you can see below, the front of the lens inner surface is smooth ... no filter thread ...


While the procedure is not for those with 10 thumbs, it certainly does not require a Master tradesman.

Please excuse the lack of process shots as while I intended to document the process, I got carried away with it and ... well soon enough it was finished and done.

method

You start with a 55mm filter,  of any kind and any cheapie on ebay will do.

Step 1:
with your dremel or small grinding wheel, you carefully work around the outside of the filter wearing it down evenly and periodically testing for fit. Basically you want it to be very snug so that it will hold itself in by fit alone (no cement or glue needed). Do not remove the glass of the filter yet, it will add support so you don't distort or bend your filter (soon to be just a metal thread). Be neat.

Step 2:
when this is accomplished you can now remove the glass from the filter (I used a small hammer with the filter on a bit of wood and tapped it lightly to smash it gently). Wearing leather gloves and using a pair of pliers carefully remove the glass shards. The retaining ring which held the glass in now, simply unscrews.

Step 3:
It will be obvious now that there is a thread at the back of the filter which is designed to screw into a 55mm threaded surface ... we don't need that, so again with your dremel tool (and again wearing gloves) carefully cut off the thread with the 'metal grinding cutting disc' ... be patient and just work your way around. When this comes off you can then just sand the back with some 240 grit paper on a flat surface (I use a large book).

Last step:
The filter is now ready to mount, so using the 67mm stepup ring screwed onto the front (as a holder so you don't bend it) carefully twist it onto the front of your GWC-1 as far as it will go by hand. This should be most of the way. Now remove the stepup ring so you can access the front edge of the filter, which will be almost flush with the front. Then using a bit of hard wood (such as say the handle of your hammer) holding the lens in one hand and the hammer handle in the other tap it in working your way round so that its then snuggled in tightly against the edge of the inside of the GWC-1

It will look like this:


You can see that next to none of the ex-filter(now thread) protrudes ... we want exactly this.

So now you can screw on the step-up up ring normally and then screw on the 67mm filter.


looks perfectly suited ... while you will need to remove the filter and stepup ring to replace your GWC-1 lens cap, and yes, the lens cap just goes on as it did before because you have not actually altered your GWC-1 in any way.

So here is the entire kit (man my house is dusty)...


Discussion

Now, I'd picked the 67mm because previous testing showed me that (with a step up ring) that was the smallest size which did not cause obstruction of the image (you know, vignetting).

There is a weee teeny bit but it is only visible if you shoot RAW and convert without any correction for distortion.


but when you shoot JPG you never see that as the reshaping applied to correct lens distortions streches them out of visible range.


perfect

Voilla ...

So with a small amount of elbow grease, you can have a GWC-1 with a filter thread