Showing posts with label scan tips. Show all posts

Thursday, 11 April 2013

tuning focus on an Epson Perfection scanner

For people who like to tune their flatbed scanners with some 'adjustment' one of the things people most commonly do is adjust the height of their film holders to get the film in the place where its focused.

This is because Epson Perfection scanners are not really calibrated in the factory (well come on, they only cost $700). So for those seeking the best out of their scanner dollar (and lets face it, you can't buy the Nikons anymore) we try to make the tools we have just that bit sharper than they are 'out of the box'

I thought I'd share with you the little shortcut I use to find the sweet spot. Its a stack of coins. In this case its the 5c coin.

Sticking them on the glass so that they hang over each other one can see pretty quickly where the focus point is.


Obviously coin 1 is on the glass ...


Its at coin 4 through to 5 that things appear their sharpest. So, now by measuring the coin thickness you can quickly set up your Better Scanning holders to get the best out of your film scans.

How much better?

Well about like this:


and this is a 100% crop of a 1200dpi scan of a slide which I wasn't really that happy with (crummy lens). Chalk and Cheese isn't it ...

Hmmm ... speaking of which, its time for some cheese to go with my red wine I think...

Happy Adjusting

Saturday, 14 January 2012

Bulk slide scanning job

Well I completed the scanning of the slides from 2000 to 2003 yesterday.

For those interested in this sort of task I scanned 675 images in about 2.5 days. Working by loading a tray and walking away, I can't say I sat there all the time but often I didn't get to do much in the middle. Sometimes I went out for a few hours (shopping or just doing something else). So determining the amount of time I spent is a bit tricky. I can't say I did "full time" work as I did some other things at the same time. So lets say I did about 6 hours over the 2.5 days = about 15 hours. This works out to about 45 slides per hour.

So for those planning such an adventure (and I keep reading about people scanning the 1500 slides of Grand-dads on the net) factor in about 22 hours of work for doing that. Assuming you dedicate 4 hours per day (per evening?) or a week. So go without TV for a week an you'll have the job done.

This suddenly seems less daunting.


So, to my setup

I used my Epson flatbed for this and followed my normal bulk scanning procedure, except in this instance I did not manually set each exposure. I simply set the auto exposure on. Importantly I also did NOT use the thumbnail generator as that just takes too long. Then I used irfanView to be the controller.

Why?

Well irfanView is a basic image processing tool, its not really the sort of sophisticated image editing tool that something like Photoshop is. Its lightweight (like I mean its only 2Meg as an install file and only takes about 10Meg on my Hdd including all plugins ) fast to start and has some great features for bulk scanning that are not as easy in Photoshop (well not that I know of).

As irfanView is free its even more worth using it.

For the benefit of those who may not be familiar with this here is what I did for this bulk slide exercise. Basically it goes like this.

  1. You start irfanview, and start the scan dialog,
  2. make the choices for the file names for this batch, then
  3. the batch repetition of put slides onto the tray, preview, scan

so lets look at the details.

1) Start up Irfanview and select the right TWAIN device


2) start up the batch scan dialog, which then looks like this


Its got a few interesting points here which are worth pointing out:
  1. you can choose Single (for scanning one thing) or more useful in this context
  2. you can choose Multiple images to allow you to just keep feeding images into that scanner.
Pick the location you want the files to be placed, set up your JPG options (like the compresion settings {I pick the best file quality}) and work out what you want to name it.

The output file name is interesting as it allows you to pick a prefix to the file names, then pick what number it will start at (well I thought 1 was a good start number, but you may need another number for other reasons).

Once you pick the right stuff on this box and click OK you get into this sort of view (you may need to do a print preview to get the bit on the right.


[HINT: click that little sphere with 2 red arrows after you have selected all your images in the step below, that will apply auto exposure to each image you have selected. This may seem confusing now, but read this through then re read this ... sometimes things just have to be done after you've done it once already]

See on the print preview there is that little arrow pointing down, make sure you chose Normal on that and not Thumbnail. Thumbnail is rather like training wheels and will eat time every time you do this. Trust me.

So then select one image (click and drag) to create a selection area. Make the area just a little into the black of the slide, enough to allow for a little movement each time you load in new slides.


This will now be there and serve as a fast template for each scan run you do. From here you don't need to change the selection because any small movement of the slides (like less than a mm) will be accounted for by the frames you've chosen. So, this method will allow you to
  • load in 8 slides,
  • click scan
  • repeat the preview
  • click scan again
  • load in another 8 slides and keep going till you've finished the box
You won't need to wait for the system to generate thumbnails, or any other aspects. Just reload the slides, click preview (quick) and click scan.

IrfanView will take each scan data, save it to files starting with the prefix you gave it, increment the number and allow you to continue this till you're sick of it.

Now, my normal practice is to use a prefix for each box of slides. This requires I click on close (bottom of the preview / scan dialog box) and then re start the above procedure from "acquire/Batch scanning" in irfanView again.


As you saw, my settings were to scan at 1200dpi. This is quite enough for www use and as an archive of what the hell you have. For instance this image came out (including the black border) at 1830x1330 pixels.


and still after cropping down to just the image came to 1580x1077 pixels (enough for a small print) and had had this sort of detail at 100%


from there you can pull out your Nikon or send out to a specialist for better scans if you think the picture is worth it ... like this one (which I scanned on my Nikon LS-4000 later).


and 100% crop (right click to enlarge into a full tab to see 100%)


so don't spend too much time on the chaff and put the effort into the wheat later.

If I'd tried this exersize with the Nikon I'd still be feeding it.

See Ya

Saturday, 29 October 2011

Scanning as neg or scanning as pos

This topic comes up again and again, with people not seeming to actually do anything to verify their work. So I'll put up this post to clarify differences I see when I scan negative on my Epson scanner with the supplied Epson software

I usually scan negative as positive and invert, the reasons are mainly that I get better control and I prefer the results I get. If you don't like to scan this way then by all means don't. If you think that you may gain something from this work flow then what follows are my reasons and some evidence.

Keep in mind that no matter what, the goal here is to produce a result that gets you a satisfactory image from your negative. If you can reliably and consistently get satisfactory results using a method then aside from learning about alternatives for "just in case" then by all means stick to the method you prefer.

Having said that I will say that over the years of scanning I have many times come back to stuff and thought "gosh, I know I can do better with that now". So if you happen to be reading this thinking about scanning your life's work of negatives once and for all just keep in mind that scaning can be a journey of learning.

You may also find the following useful links:


Firstly Methods


I thought I'd start with a slightly over exposed negative. This will exacerbate the problems associated with trying to get shadow details, especially if one follows expose for the shadows and let the highlights fall where they may. I began by setting my Epson 4870 scanner in professional mode and scanned in a variety of ways. I notice (as previously observed in this post that (among other things) scan times varied.

Below is a table of my operations and results, note the changes in scan times in different operations:

Neg as Pos
scan 1 33:95 default adjustments
scan 2 34:00 auto exposure
scan 3 45.61 manual setting, blue hard right

Neg as Neg
scan 4 42:33 auto exposure
scan 5 42:49 manual adjustment of levels

You will find the images named accordingly.

I am not certain as to why there is a scan time difference but I find that the only explanation that makes sense is that the scanner is making alterations in exposure time. Its interesting to note that the scanning of Negative as Negative results in nearly as long an extension of exposure. Previously I have noted that some extension of capture can be found into the darker areas using epson scanners by altering the scan time in the above manner. How much is not a lot, but if you want it, you may just be able to pull a little more out (again also previously discussed).

So now, lets look at some images. Please note these are hosted on Flickr, so feel free to open them in another tab for closer examination if you require.

Firstly lets work with linear data

So scanning neg as pos the first three operations give the following results. Please also note that its important to assign the correct colour profile to your scan after capture. I have mine set to EPSON ColorMatch RGB ...

Again, I prefer to set things myself because I think "never send a machine to to a humans job" (unless you want an insensitive result).
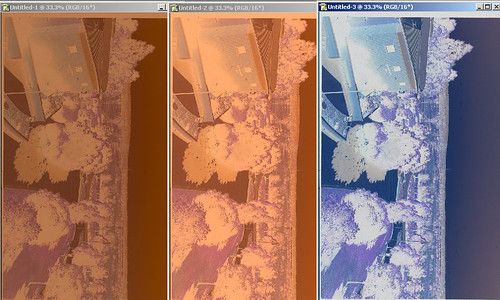

scan-fig3

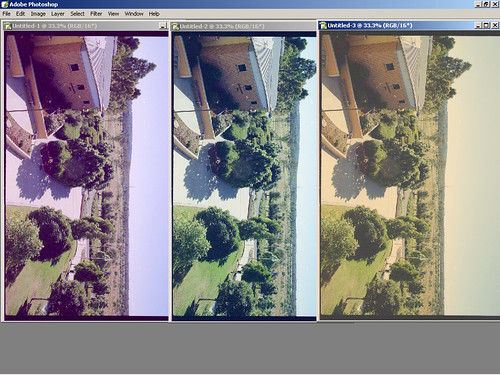
We can see perhaps there is different contrast ... so now, inverting the image

scan-fig4

Definitely there is different contrast. Clearly we get different shadow details here ... as well as different contrast. And naturally there is different colours as I have not perfectly tweaked each image to match the other yet.

Looking into details in a area of high contrast we see this:
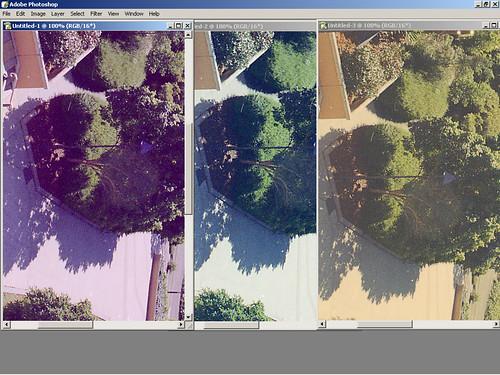
scan-fig5

Dense and inky shadows on the two images done "default" and "Auto" but much better shadow details on the image 3. I happen to think the middle image is about right on colour.
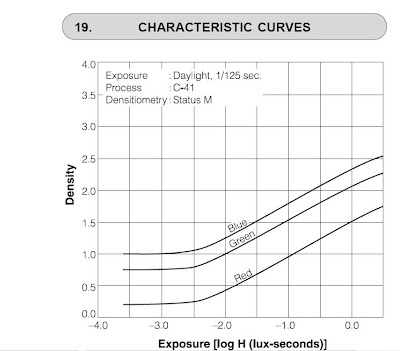

By setting the capture area of the scan (the black and white points) we can capture the density range that negative has. As I have mentioned before negative does not have an even or a linear response. There are some good reasons for this and its not a mistake or a design failing.

The R G and B layers are at different density for a given exposure AND have a different range of density.

So its important to tweak that as soon as you can.

Because each film will have different response characteristics I think its essential to apply curves YOURSELF. One can use the "neg pos" software that has already pre-programmed in various films, but the last time I examined that, it resulted in a much noiser blue channel. I believe that this is not related to the software, but to the way that the scanner driver is handled and the changes that alteration can make.

Of course the linear scan is a little lacking in contrast, and so tweaking it (I only bothered with scan 3 on the right) we get a more 'natural' looking image of the scene.
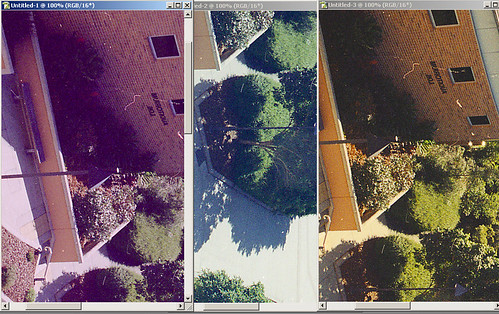
scan-fig6

So we get a little better shadow details in the image ... but then that may not be noticeable or needed. It is however there if you did need it rather than not being there.

In my opinion this method allowed for better and more accurate setting of black point and seems to have resulted in a better output. I believe that this is related to there being more information in the "heel" of the image (dark is dense on negative) particularly in the green and definately in the blue.

Lets now look at the results of scanning negative on the negative settings


Firstly lets look at what we see in the scanner driver .. we see that the default settings leave red in the middle, and a curve being applied already
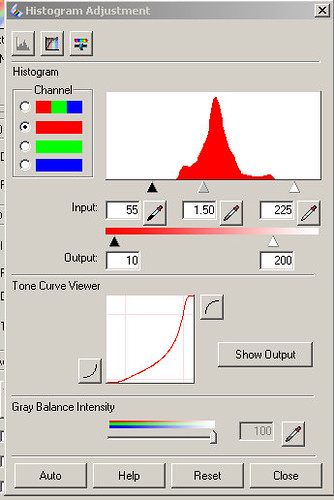

scan-fig1

but apply a CURVE to the data which does not occur when you scan negative using the positive setting.

The more you adjust the black and white points, the steeper that curve is ... and please note that its not a linear curve. The blue now appears more moved over to the right than it did when you were viewing it as a positive.
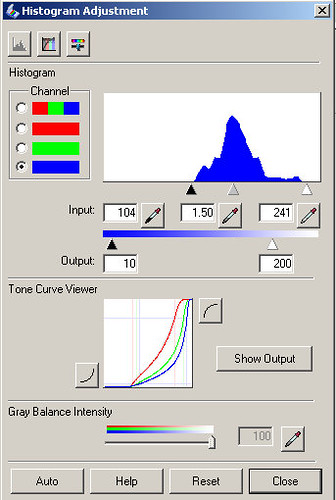
scan-fig2

and you'll also see that the curve bellies out more ... I guess that it could be "up to you" to decide if more or less processing in the scanner driver is better or not.

Without a doubt in my mind if you are not editing this in 16 bits, do as much in the scanner as you can.

Now lets over lay these two scans on top of the other 3
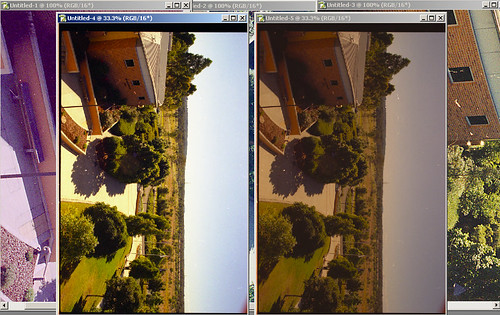
scan-fig7

Now, looking at this I think its clear that Scan 4 (which was auto exposure) actually looks less contrasty than the Scan 5 (which I set manually) but BOTH are more contrasty and darker than the linear scan.

Perhaps you can tweak this in photoshop, but pulling the curve back out will result in loss of information due to the integer nature of the data. You can not do log maths on integters in an orthogonal way and not expect data loss.

This supports my experience that scanning negative as negative applies way to much correction to the image and throws away data which you don't want to happen. Its even worse when you look into the shadows as below.
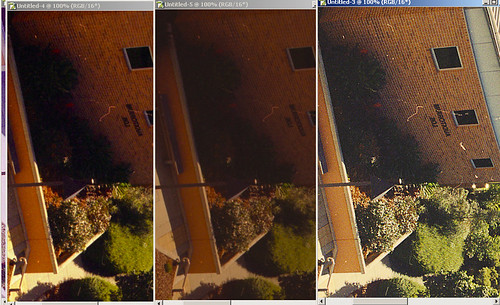
scan-fig8

Both Scan 4 and Scan 5 are much much murkier than Scan 3 (which follows my recommended negative scanning method).

Finally
I am only reporting what I find, if you want "the truth" go to church and the preacher will tell you what to believe.

If you ask questions about my findings I'm happy to reply. I do get a little bored with the simple re-iteration of the initial question, implying I'm wrong while not providing any of your own evidence and general not reading of the posts I link to. Questions about those posts are happily answered as I am not a professional writer I may make my posts with assumptions not properly clarified.

Tuesday, 2 February 2010

black and white neg scanning

I've noticed that I have not seemed to cover how I scan and process black and white negatives, so I thought I'd cover that quickly here.

First, capture is important, perhaps the most important step. I've placed the negative on the glass of the scanner just so we can get a clearer picture of what is what and where in levels.

The first step in this is always scan in 16 bit ... you can use greyscale or colour but you'll find registration issues between R G and B on the Epson scanners (as shown here) and noise issues btween B and R channels meaning you'll likely discard them. Essentially the greyscale option is actually the green channel anyway.

An important concept in dealing with negatives is called base fog, this is just jargon words for the fact that a negative is not totally clear.

I've picked a neg made with my 180mm lens to work with. So, lets stick it on the scanner and get into it. In the figure below I've set the range of the scanner to be its full range, and you can see the edges of the 4x5 sheet clearly.


I've selected around the edges to leave a little of the 'clear' glass. I've used the term clear because the scanner is so sensitive that the imperfections in the glass are what is causing that spike over there on the hard right of the histogram. I've deliberately left this here, so you can see clearly the film base and the base fog that emerges later. The base fog of the negative starts to show in the first bump (reading from right to left) and this is pretty much how a neg would look to you sat on a light table.

So, I've now set the "clipping points" on this ready for a scan. Take a look carefully at the numbers and the position of the sliders for black and white points.


Did you notice over on the black level that it would seem I've left a section where there seems to be no data? Well this is because I know that there is likely to be something there that the machine thinks is noise but I know is not. This is part of why I say never send a machine to do a humans job ... the machine lacks sensitivity and experience.

You may also ask why is the black speck of the sun not totally dark. The answer to that as far as I have been able to decide is that even a fully exposed bit of black and white film is not so black that the scanner can't penetrate it ... thus the sun is really exposed and as fully dark as the film can make it. More exposure would not make it any darker.

Note also that I that I did not actually go all the way into the peak of the film base on the right either ... there's a reason for that too, which I'll get to in a minute.

Ok, lets scan it and then have a look in a more capable tool such as photoshop. Lets also invert it and start looking at it as if it was a positive. The peak I've high lighted below in red now (which was on the right) is now on the left (because I've inverted it), so the film base now appears as a fog on the black background of the scanner glass ... this is how it should be at this point

In this figure you can see that the area on the right which has no data, this is the gap between the brightest amount on the film (before inversion was the densest part) and is not actually fully white ... so I have some room to now adjust that.

Photoshop has some very handy tools for doing this with care, when you adjust levels if you hold down the "Alt" key as you move the slider it shows you the clipping levels by washing the image out to fully black and white. You can even see where dust specks are in this, its one of the most important tools at your disposal for setting these levels. Note: I do this in layers so that I can re-adjust if I need to, when I'm closer I may flatten the image ... I may not.


Here you can see a few things in this negative. One is that my black border is not uniformly black or white, in that it has some amount of indistinctness. This is caused in part by the fact that the base fog is not totally deterministic, it is not precisely one specific level. This is important and it forms the reason why so many scanners software processing of negative works badly. It chops this off and takes with it some shadow details, so now you know why I like to do this myself.

Also I seem to have some problem with some of my film holders, and during exposure some of the light seems to bounce around inside the edges of the holder and reflects of the frame (even though they're black) and exposes film where there should be no exposure. This effect diminishes as you get away from the edge of the holder. This will not be an issue with scanning roll film, and is only an issue for me with 2 or 3 of my film holders.


So now with my levels set you can see the image starting to take form on the screen. You can see that the disk of the sun in the clouds (something you'd likely not be able to do with slides or digital) and you can just see the base fog of the edge of the (supposedly) unexposed film.

So now lets apply some curves to adjust the contrast of this.


I've applied a curve here which lengthens the whites and tucks up the blacks a little bit. The image is now really almost perfect. To check that I have not lost totally everything in the shadows lets have a look in detail at the husks of grass under the snow.


I've added a selection and shown the histogram to assist, but you can see that they are quite dark, but still not totally at base fog. To compare this, I'll show you the "metering" shot I took with my digital (which I use to establish my exposures).
As you can see (if you click the image you can get a larger view) there is much the same levels there in the shadows, yet there is no way you can even see the disk of the sun or the surrounding clouds in there. This is because I use my digital to pick a setting which is essentially a reading for the shadows. I know that the high lights will fall within the massive range of the negative with its natural compression of high light.

So, there you go ... that's how I handle my negative.

From here one goes about applying some little bit of love to the processing, and its not too hard to turn it into something like this:

which is of course another negative from the same day. It was exposed and processed identically to the one above, I just happened to prefer this angle so I put extra work into it.

a quick play with the image which we've just been working through gives me:

this

or this


but I still prefer the image composition from my 90mm lens and the lighting (I didn't expect the sun to come out) so I didn't really put much thought into this particular neg ...

Now, if you are a traditional printer then I don't recommend you do this without taking into account altered development to cater for the fact that traditional printing can not cope with the full range of density which a negative can record. Myself I see this as a limitation of the traditional methods as they fail to capitalize on the full potential of the Negative.

You might find these quick notes interesting too:


Naturally, as always, feedback and comments are welcome

Sunday, 25 October 2009

Film - is it still cost effective?

Folks

nearly ten years ago I wrote in a 'digital thoughts' page (before there were such things as blogs) that I thought that 35mm (and of course lager formats too) gave users better value for money than did digital SLR and greater flexiblity than any "prosumer" digicams.

This article was aimed at typical "hobby" photographers who were interested in making images for their enjoyment, did not have tight press and client deadlines and enjoyed their craft. Now firstly I'd like to point out that 35mm isn't the only format of film to consider, especially in this day and age where 120 film cameras (Medium Format) have truly plummeted in price and are very attractively priced and can give even more fantastic results.

Anyway, last week I took this image while just walking around with the 35mm camera:


This was scanned on my LS-4000 from Fuji Sensia slide film with my EOS 630 (god knows how many meters of film its seen over the years of service since I bought it in 1990) with an OM series 21mm f3.5 lens mounted with a $15 adaptor. There was no application of fancy metering I just let the camera do what it wanted to (set on aperture priority). Yet importantly there isn't the slightest hint of nasty washouts inherent in digital and the whole thing just looks lovely. Heck, this is even slide film which is in theory harder to to expose properly.

Scanned it produces 5500 x 3500 pixels and looks as good as this at 100% (as with almost all my blog images click on this to view it fully)


There would be no problems making a 50cm wide enlargement from this image that looked great. So now we have that we can get great images as good as a top (expensive) digital camera with less problems in ugly image blowout caused by sensor washout.

I've just bought a Panasonic G1 which is a 12megapixel camera (4000 x 3000 pixels) which is a 4/3rds sized sensor quite capable of making images right up there with the top professional cameras. Many serious photographers will tell you is quite a good camera. While it is not strictly a SLR (having no reflex mirror) it has many of the features that a SLR has and operates more or less the same.

Back then (2001) I felt that for the same money outlaid a hobbyist could get much better value for money out of 35mm than they could out of a DSLR. I argued that a 35mm SLR for the 'good shots' and a compact digicam was the best balance between low cost high quality for the "good stuff" and a compact digital for convenient snapshots.

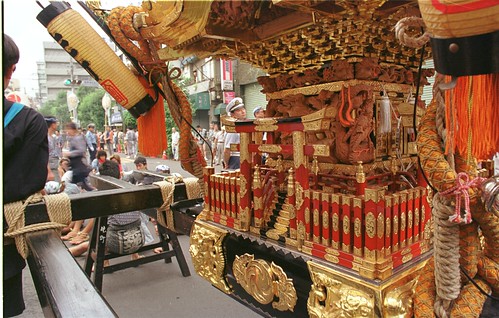
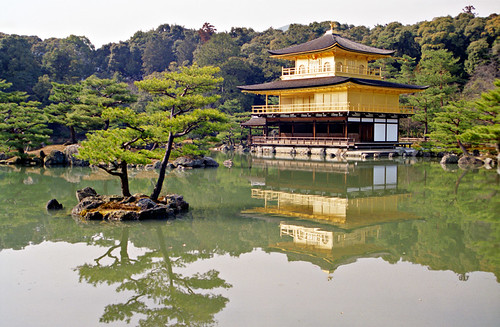
I'm glad that I did as I took images like these which I could never have taken on any digital at that time.

omikoshi

kinkakuji

and as I've had better access to scanners, the same images scan better than when I took them.

Clearly scanning takes some time, but you know, a little discipline in the shooting side yields more keepers per roll than the average 4gig card. Shooting film is not only forgiving bur

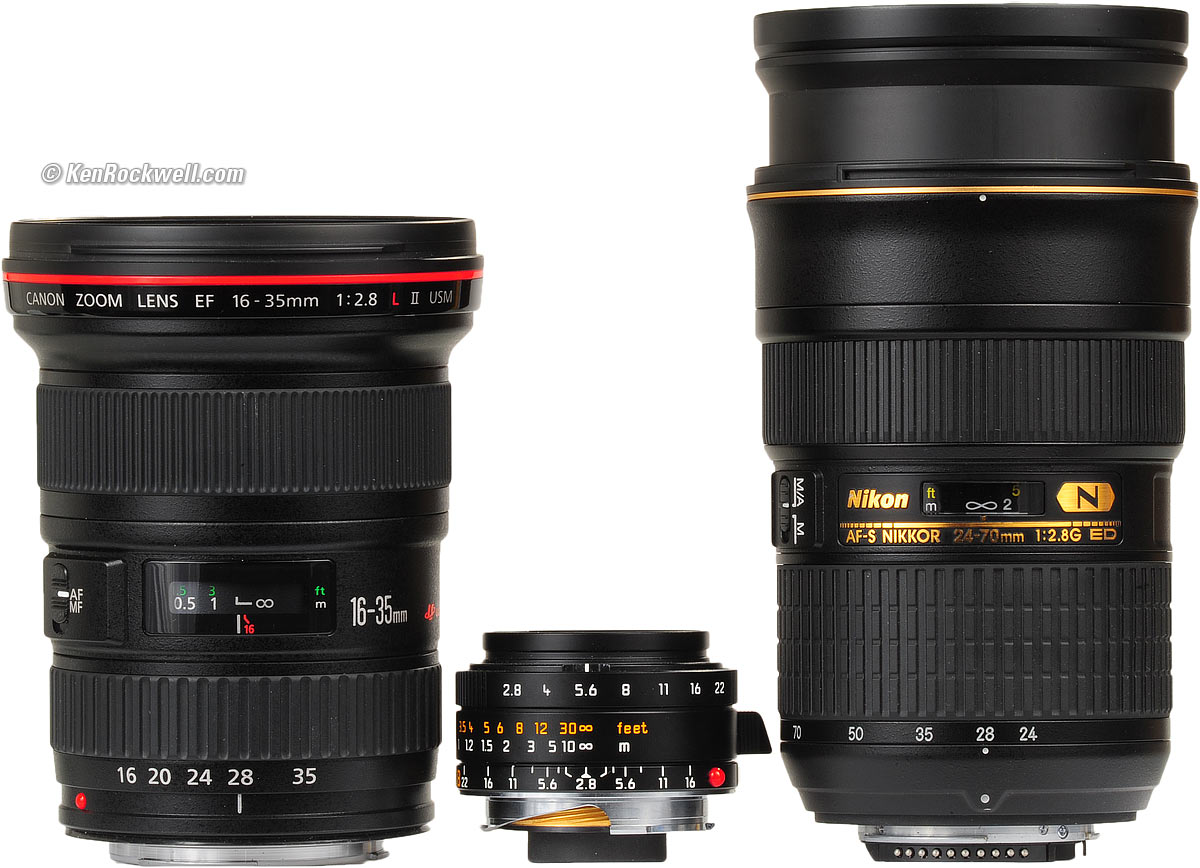
Back in 2001 the top digital cameras (excluding the outright stratospheric) were about US$2000 for stuff like the Canon EOS D60 which was a 6Mp APS sized sensor camera. While this smaller sensor means my telephoto is more telephoto, this has important implications on getting wide angle lenses. Compare Ken Rockwell's discussion on wide angle lenses between digital cameras here:

?


The Olympus 21mm wide angle lens used above cost me less than US$200 and is smaller than the 28mm above. That's the tiny one in the middle

But its not only the lenses which are getting bigger (and dearer) its the cameras too.

Its easy to forget how we've become used to these DSLR's being fat monstrosities and have forgotten just how compact cameras like OM-10's and such really are. My OM-10 camera is about the same size as my G1 is. So looking at the comparison between G1 and EOS 10D here you can see here the size difference.

Then there is feature set. Once upon a time photographers considered features to be useful things, like:
- 5 frames per second motordrive
- eye controlled focus point selection
- big bright viewfinder focusing screen

not so much stuff like "portrait mode" or any other of the spin out of 'creative scene' processing (for people who want their images processed for them).

35mm cameras haven't really changed so much since 1980, essentially they are the box that holds the film, lenses are what really makes the biggest difference.

Since 2001 I've changed my Digital camera a few times.
Nikon Coolpix 950
Nikon Coolpix 990
Nikon Coolpix 5000
Canon 10D
Canon 20D

Assuming that I've lost $500 on each camera body change (not to mention the lenses which I've needed to buy to cope with the change in Field of View created by the smaller sensors) that's $2500 in losses, while in that time I've essentially kept my 2 EOS 630's ... If I apply that to buying film (say, negative which I use the most) and getting it processed that's about 250 rolls of film.

Now, look in the mirror and tell me honestly that you've averaged 31 rolls of film a year?

Yet during that time only the images since the Coolpix 5000 can match 35mm and it wasn't till the 10D that I had the sort of versatility in telephoto that I do with 35mm film.

Looking back on my old article from 2001 it seems that:

Bang for buck, any 35mm SLR camera (even a $200 second hand one) with even a basic pair of zooms (say 28-105 and 100-300) will give you much greater quality image making versatility than any digital short of a digital SLR (and then you'll still need those lenses anyway ;-) You'll have many nicer handling features, and I feel that they're easier to control than a high end digital.

but its even cheaper as I bought my OM-10 for US$40 just the other day, and I occasionally buy cheap OM lenses to dual purpose on my G1 and the OM canon (well, and my EOS 630 film body too :-)

So if you're feeling like you should move to digital but you're not sure ... ask yourself how much you take pictures ... cos if its not real often, then stick with 35mm, get your film processed and scanned into CD (such as by the great Noritsu system which gives 6Megapixel images), never have to worry about "honey, we forgot to charge the battery" or "shit, the media card is full" and still get great images which you can have made into great prints!

Its sure been nice to have a snapshot digital camera, but then why not? I used a small "trip 35" when I still had a SLR.

After all ... digital photography isn't just about a digital camera, scanning makes access to digital editing and printing just as possible :-)

Sunday, 11 October 2009

quick negative scan tutorial

Hi since I've discussed this a few times on different forums I thought I should put together something on what the steps are on using a scanner to make optimal scans of negatives.

In this case I'm going to use an LS-4000 scanner, but I use exactly this technique with Epson flatbed scanners too.

To make this 'tutorial' as generic as possible I'll skip the detailed bits on the scanner operation, but I've covered those aspects in other posts on this blog here and here.

No matter what the driver, leave the system believing that it is scanning a positive, not a negative. Then, carefully tweak the red green and blue channels by bringing the sliders (particularly on the light end) closer to the main humps of the datain the histogram ... but don't set the level too close to the data ... you'll clip details if you're not careful. If in doubt test and inspect for high light clipping.

?

Ok ... now you've scanned it into your editor ... I use photoshop, so I'm sorry you'll have to 'translate' this to what ever makes the right stuff for your editor.

start - its now in your editor

my scanner is set to produce its data in a colour profile of Bruce RGB, so your next step is to assign that profile (unless your scanner is set in its configuration to produce data of another profile check your scanner configuration). Now if your editor does not handle colour management then I guess you'll have to find a way to have your scanner put data out in sRGB ... but I'd really advise you to get a better editor.


You'll see an immediate change on the way stuff looks straight away ...


so now we do the next step, which is invert


starting to look right now isn't it ... so much for all that "orange mask" stuff ...

So now we need to sort out the levels more carefully. I deliberately left 'breathing room' before so that we can see more carefully where our levels are in a system which is more amenable to it.


notice how I've moved the levels closer to the humps of the histogram. If you can, hold down the Ctl key which will let you know where clipping is occurring visually. When you get to clipping, back off a little ... because we'll get it closer in the next step with curves.


here I apply a little curve adjustment ... I normally need to pull up the light and pull down the dark areas ... this helps a little to reduce noise, as this represents the indistinct areas near the film base and the areas where the film is approaching saturation (totally black).


So now we have the image within ball park. From here you can "go wild and do your worst"


I've also done a little local area contrast fix here too


Anyway, assuming this was helpful, you might find these quick notes interesting too:


sorry its not compiled into a single resource, that's my next project
Hope that helps

:-)


PS ... to answer the question below (if I've understood it right) I need to cater for the fact that unlike slide the R G and B levels of density recorded in Negative film is not even ... below is a sample of the 'curve' for a typical negative film.


please have a further read on my other page here.


PPS

to answer the question below in more detail I thought I would try this. Consider a point on the graph (not a range) the values for this colour below are 808040 in RGB values This is of course a pure tone and has not "variation" or range.

Now if you were to represent this on negative film the values would not simply be negative, they would also be scaled according to that graph above.

Similarly if I was to take a plain grey tone and photograph it with negative film I will not be able to read values 808080 or even simply inverted values as the response of the film to the light will give different density readings for each of R G and B ... this is unlike positive film (slide film) which does give such (eventually)

Thursday, 7 May 2009

bulk scanning with Epson flatbed

I was recently asked by a commenter to my blog to explore this question. I thought it was intuitive but its apparently not. Epson it seems (like many other IT companies) has taken the path of having numbskulls and under educated people take over support jobs (and perhaps even pushing out people there who actually know. I've worked in IT for about 15 years so I've seen it first hand elsewhere).

Anyway, to the point

How do you batch scan film and have the same setting applied to all

I do this by the following methods

Firstly you must put Epson scan into an appropriate mode, Professional. Lets look at the main pannel where I've marked some important places

The next step is done in configuration, so click that.

we need to choose appropriate colour handling from the three options available.

The first option of Colour Control (gosh these poor Japanese keep following Amerikan Speling) will automatically duff your stuff and you'll have to make educated guesses as to which profile you'll assign to your image in photoshop. Note that I said assign ... not convert ... important point.

So I have my target set to ColorMatch RGB in this instance as I find it works well enough for gamut contained in Negatives ... and wider gamuts may just introduce noise.

I am a little superstitious so I often close the dialog box at this point and then bring it up ... you know ... just in case.

Next we need to do a preview of the image do not use thumbnails that's again where the computer will decide for you ... and wherever possible, don't send a robot to to a humans job. Preview the whole plattern and manually select a rectangle on that.


and then adjust each of the colour channels (red green and blue)

Notice that I've left a little space either side of the histogram in the red above and even in the blue here. This is important as often there is some shadow details or high light details which are not shown in the histogram but which you can identify are clipped later.

With respect to the blue, its important also to shove it right over there to the left. I have found that this alters the scan time to make it longer. I believe that this activating some sort of exposure compensation and is giving a longer exposure to the channel. My results discussed elsewhere in this blog support this theory.

Now we have a general setting which will more or less be adequate for all negatives (well all the ones I've got here fit within this range).

So now you can do the next important step and click save settings. Stupidly it seems you can't name it, but that's ok for me as I only have two, one for negatives and the other for slides.

Now, next time you open up (and every time after that) if you select Setting 1 (or 2 ;-) after you've done your preview and it will put a marquee back right were you put it and reset the settings in the histogram to what you've just painstakingly set up.

Great!

Next important section, how do we make more on this platen?

You use the copy selected tool that appears in the preview window (as in the diagram to left).

Click it and another marquee will appear with exactly those settings. So move it to cover the other image you want to scan from the strip.

Repeat this for as many as you want on the preview area.

Now, Ctl + click each image (which you want scanned) and click scan and all those images will be scanned into your application.

Click Scan and job done!

Now as I use Photoshop I have a customised Action set up which does:
  • assign profile (to Epson ColorMatch RGB in my case)
  • invert
which I then play on the items. I'm now 90% of the way done on this batch scan. I often try Auto Color first and if that looks good I just leave it, but if that fails I fiddle with levels for R G and B then curves manually (and perhaps tweak the HUE).

Destination settings (like 48 bit or 1200dpi) are changed globally so will be applied to all not each. I guess this makes sence, but I can understand some may wish to have one scanned at 1200 and another at 4200dpi (I don't work this way).

works for me ... let me know if it works for you!
You may also find the following useful links: