I usually scan negative as positive and invert, the reasons are mainly that I get better control and I prefer the results I get. If you don't like to scan this way then by all means don't. If you think that you may gain something from this work flow then what follows are my reasons and some evidence.
Keep in mind that no matter what, the goal here is to produce a result that gets you a satisfactory image from your negative. If you can reliably and consistently get satisfactory results using a method then aside from learning about alternatives for "just in case" then by all means stick to the method you prefer.
Having said that I will say that over the years of scanning I have many times come back to stuff and thought "gosh, I know I can do better with that now". So if you happen to be reading this thinking about scanning your life's work of negatives once and for all just keep in mind that scaning can be a journey of learning.
You may also find the following useful links:
- quick neg scan tutorial
- using the Epson for bulk scanning of 35mm colour neg (and getting your desired settings applied across all evenly)
- registration problems on Epson scanners and why you shouldn't go too far in trying to adjust this or that because when you improve focus you may disturb registration
- using your scanner to understand film density.
- driving your scanner software differently to effect some changes in scanner side exposure on Epsons (meaning better noise characteristics in the dense areas of your negs).
- don't forget colour management on your Epson (its not where you might think it is)
- Black and White neg scanning
Firstly Methods
I thought I'd start with a slightly over exposed negative. This will exacerbate the problems associated with trying to get shadow details, especially if one follows expose for the shadows and let the highlights fall where they may. I began by setting my Epson 4870 scanner in professional mode and scanned in a variety of ways. I notice (as previously observed in this post that (among other things) scan times varied.
Below is a table of my operations and results, note the changes in scan times in different operations:
Neg as Pos
scan 1 33:95 default adjustments
scan 2 34:00 auto exposure
scan 3 45.61 manual setting, blue hard right
Neg as Neg
scan 4 42:33 auto exposure
scan 5 42:49 manual adjustment of levels
You will find the images named accordingly.
I am not certain as to why there is a scan time difference but I find that the only explanation that makes sense is that the scanner is making alterations in exposure time. Its interesting to note that the scanning of Negative as Negative results in nearly as long an extension of exposure. Previously I have noted that some extension of capture can be found into the darker areas using epson scanners by altering the scan time in the above manner. How much is not a lot, but if you want it, you may just be able to pull a little more out (again also previously discussed).
So now, lets look at some images. Please note these are hosted on Flickr, so feel free to open them in another tab for closer examination if you require.
Firstly lets work with linear data
So scanning neg as pos the first three operations give the following results. Please also note that its important to assign the correct colour profile to your scan after capture. I have mine set to EPSON ColorMatch RGB ...
Again, I prefer to set things myself because I think "never send a machine to to a humans job" (unless you want an insensitive result).
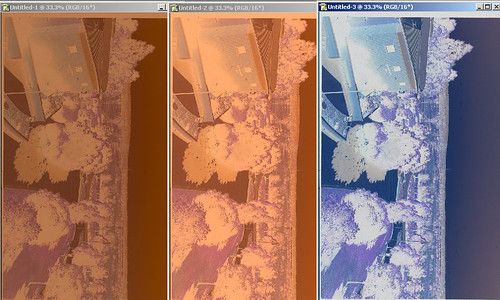
We can see perhaps there is different contrast ... so now, inverting the image
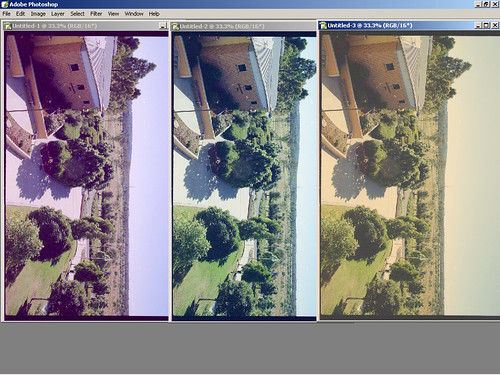
Definitely there is different contrast. Clearly we get different shadow details here ... as well as different contrast. And naturally there is different colours as I have not perfectly tweaked each image to match the other yet.
Looking into details in a area of high contrast we see this:
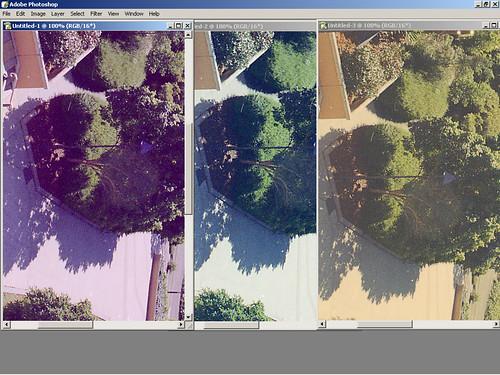
Dense and inky shadows on the two images done "default" and "Auto" but much better shadow details on the image 3. I happen to think the middle image is about right on colour.
 By setting the capture area of the scan (the black and white points) we can capture the density range that negative has. As I have mentioned before negative does not have an even or a linear response. There are some good reasons for this and its not a mistake or a design failing.
The R G and B layers are at different density for a given exposure AND have a different range of density.
So its important to tweak that as soon as you can.
Because each film will have different response characteristics I think its essential to apply curves YOURSELF. One can use the "neg pos" software that has already pre-programmed in various films, but the last time I examined that, it resulted in a much noiser blue channel. I believe that this is not related to the software, but to the way that the scanner driver is handled and the changes that alteration can make.
Of course the linear scan is a little lacking in contrast, and so tweaking it (I only bothered with scan 3 on the right) we get a more 'natural' looking image of the scene.
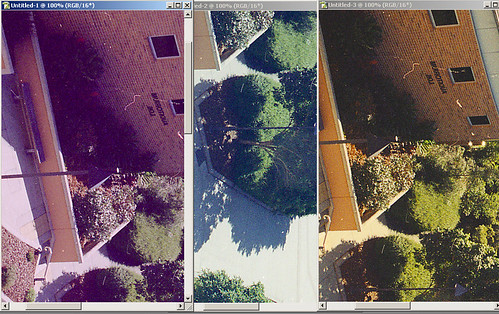
So we get a little better shadow details in the image ... but then that may not be noticeable or needed. It is however there if you did need it rather than not being there.
In my opinion this method allowed for better and more accurate setting of black point and seems to have resulted in a better output. I believe that this is related to there being more information in the "heel" of the image (dark is dense on negative) particularly in the green and definately in the blue.
Lets now look at the results of scanning negative on the negative settings
Firstly lets look at what we see in the scanner driver .. we see that the default settings leave red in the middle, and a curve being applied already
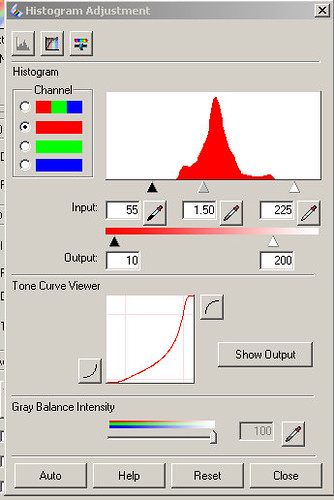
but apply a CURVE to the data which does not occur when you scan negative using the positive setting.
The more you adjust the black and white points, the steeper that curve is ... and please note that its not a linear curve. The blue now appears more moved over to the right than it did when you were viewing it as a positive.
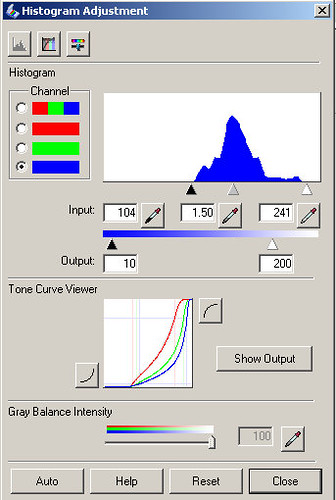
and you'll also see that the curve bellies out more ... I guess that it could be "up to you" to decide if more or less processing in the scanner driver is better or not.
Without a doubt in my mind if you are not editing this in 16 bits, do as much in the scanner as you can.
Now lets over lay these two scans on top of the other 3
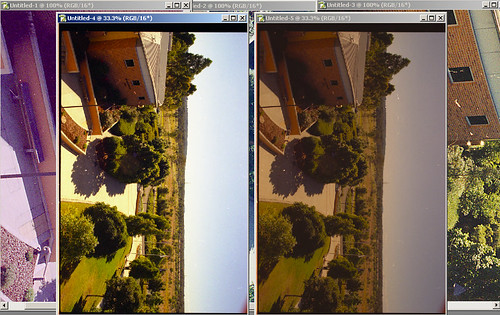
Now, looking at this I think its clear that Scan 4 (which was auto exposure) actually looks less contrasty than the Scan 5 (which I set manually) but BOTH are more contrasty and darker than the linear scan.
Perhaps you can tweak this in photoshop, but pulling the curve back out will result in loss of information due to the integer nature of the data. You can not do log maths on integters in an orthogonal way and not expect data loss.
This supports my experience that scanning negative as negative applies way to much correction to the image and throws away data which you don't want to happen. Its even worse when you look into the shadows as below.
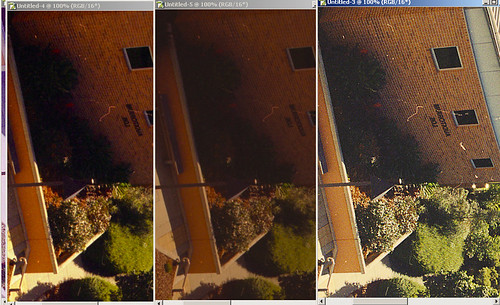
Both Scan 4 and Scan 5 are much much murkier than Scan 3 (which follows my recommended negative scanning method).
Finally
I am only reporting what I find, if you want "the truth" go to church and the preacher will tell you what to believe.
If you ask questions about my findings I'm happy to reply. I do get a little bored with the simple re-iteration of the initial question, implying I'm wrong while not providing any of your own evidence and general not reading of the posts I link to. Questions about those posts are happily answered as I am not a professional writer I may make my posts with assumptions not properly clarified.


4 comments:
I appreciate this is something you posted a long time ago, but I wondered if I could ask a question please?
In my tinkering with Epson Scan and Photoshop, I have been unable to establish that the curve tool affects either (i) the speed/mechanism of the scan (e.g. exposure time), or (ii) the manner in which that stream is quantised.
If either were the case, it would make sense to apply the curve within Epson Scan. This is so, respectively: (i) the hardware can expose/slow the scan for optimal results, or (ii) so that non-integer levels are quantised optimally. If neither of these things is taking place, then the curve is equivalent to applying an effect in Photoshop after the fact, and once the data is already in.
Do you have any resources which document if/how Epson Scan affects the scan or quantisation? It would be good to have a clear sense of what's happening under the lid before I embark on a big scanning project.
Many thanks for any info you can offer. Well done on your blog, it's excellent.
for various reasons its been a few years since using my Epsons, however I found that the curve tool makes ZERO difference in the scan (indeed I suggest you leave it linear) BUT the adjustment of the levels in Epson is critical.
Some reading:
https://cjeastwd.blogspot.com/2009/04/epson-4990-response-testing.html
https://cjeastwd.blogspot.com/2008/10/epson-3200-more-optimal-scans.html
I experimented with covering the part of the scanner which does the first sample (its where the "slot at the top" of the holder is) and do not advise doing that.
anyway, try that with levels (especially extending the dark end) and time your scans, I believe you'll find it scans slower (even each step) and its clearly giving it more exposure time.
Many thanks for getting back to me. I'm mostly scanning printed photos for my project: I've just tried replicating your test (i.e. full linear scan vs. plumbing the shadows vs. the highlights) and timed the speed of each scan. So far, I've found each have taken the same time.
I appreciate it's been some time since you last dealt with Epson Scan and its quirks, but based on your general expertise in scanning, do you think it's likely these issues would only factor in the scanning of film negatives? Does it make sense technically that the scanner would increase exposure time for film based on the histogram settings but not need to do the same for prints, documents and the like?
( As someone who isn't all that proficient in this stuff, it would be a big relief to know that my flat scans haven't been destroying 'data' all this time... When I look at the mass of photos I've already scanned, the prospect of starting afresh about makes me want to burst into tears! ;-p )
Ahh, well here's why
>I'm mostly scanning printed photos for my project:
this only works for scanning Negatives (and slides) ... not prints.
> So far, I've found each have taken the same time.
because if you're not scanning negatives it uses a different part of the software
Post a Comment