I've wondered for a little while how much influence shading from Solar Panels will have on my roof (getting hot) in Summer. Then I realised that I had a small one already on the shed and perhaps that may be indicative ...
Expecting that it being so small that heat conduction (metals a good conductor) may not make it as obvious (spreading in from the outside). So I took my thermal camera and wandered down to have a look (in more or less midday sun).
Sorry about the blurry shot, but the phone wouldn't focus on the thermal camera (instead choosing the roof) ...
but blow me down if it didn't make itself clear with its heat signature! (note the visiblity of the black cable feeding down just right of the thermal camera). So I "froze" the screen for a better shot of the thermal camera (which isn't a recording type) to allow another photo with clearer readings.
Well the roof under middle of the panel is about 47°C while the rest of the roof is nearly 63°C
That's pretty good!
This means when I build my "workshop" (of similar colour bond steel) putting solar on the roof will not only give me energy but make it cooler inside as well.
A side effect of this has been to show how effective the gap I created between roof and walls being filled in with Shade Cloth is ... for that section is essentially quite cool (and allows in slow breezes and lets the heat from the roof out too.
win win
Showing posts with label home improvement. Show all posts
Monday, 28 January 2019
Friday, 3 August 2018
pumped (by pumps)
Just thought I'd put up an image of the pumps I use in my floor heating system, I guess people imagine all sorts of things, but they're quite compact (and low price).
I buy them on eBay for like $15 each and this allows me to have simplicity on getting consistent predictable flows in my water circuit design.
This batch have been iterative improvement over the previous ones, with the impeller shaft being (what appears to be) Stainless Steel, not a bit of plastic (which broke in a few of my pumps last time).
Given the magnets showed signs of rusting I've used LANOX liberally inside (disassembled the pump which is pretty simple, just 4 screws) to ensure that its well coated with lanoline (which should resist washing off).
I'll add more as I go
I buy them on eBay for like $15 each and this allows me to have simplicity on getting consistent predictable flows in my water circuit design.
This batch have been iterative improvement over the previous ones, with the impeller shaft being (what appears to be) Stainless Steel, not a bit of plastic (which broke in a few of my pumps last time).
Given the magnets showed signs of rusting I've used LANOX liberally inside (disassembled the pump which is pretty simple, just 4 screws) to ensure that its well coated with lanoline (which should resist washing off).
I'll add more as I go
Tuesday, 24 July 2018
Exploring the IR thermometer
An IR thermometer (or indeed a thermal imaging camera if you have the funds) is a useful tool for anyone wanting to understand heating, insulation and heat losses around their home. You can learn a lot from them, but you need to understand some of the important facts, like how they work and they are not magic.
There is an illusion that the eBay cheapies aren't worth having, but depending on your needs they are most certainly worth having.
The primary limitation of the cheaper ones (like $10 ~ 20 range) is that they only provide readings of temperatures within a certain range, in the case of the two I own that range is -50C to +380C
Not enough for a blast frunace operator or someone checking temperatures of exhaust systems of diesel tractors (near the manifold), but totally fine for my uses (checking the floor and measuring food temperatures when cooking).
So today I decided to do a comparison using a thin walled plastic cup with hot water in it that would enable me to use a known high quality thermometer to measure its temperature and compare that to my IR thermometer. Interestingly I found them to be within a degree C (over repeated measurements) of the actual thermometer (which is a high grade one intended for laboratory use with the usable range restricted to that of liquid water).
The plastic cup is essentially a source of heat, and heat is actually part of the same spectra of stuff that is light. (see this link: https://en.wikipedia.org/wiki/Infrared). It is that "light" that the IR thermometer is reading and measuring.
However while the aluminium foil is a good reflector and conductor of heat, its not a good radiator. This is because of a property called emissivity.
(read this link: https://en.wikipedia.org/wiki/Emissivity).
The above video makes it clear why reflective and shinny surfaces are problematic for reading what can be thought of as "light" from the surface. The issue is are you seeing the source or a reflection from a surface.
As it turns out glass blocks thermal IR but the glass (being a good conductor itself) will show its own temperature. You just need to be aware of hot things reflected in it on your side of the glass, like a furnace).
So armed with that information I hope you can feel more confident in how to use an IR thermometer some of the pitfalls, and what to avoid you can go grab one and start gathering useful data.
There is an illusion that the eBay cheapies aren't worth having, but depending on your needs they are most certainly worth having.
The primary limitation of the cheaper ones (like $10 ~ 20 range) is that they only provide readings of temperatures within a certain range, in the case of the two I own that range is -50C to +380C
Not enough for a blast frunace operator or someone checking temperatures of exhaust systems of diesel tractors (near the manifold), but totally fine for my uses (checking the floor and measuring food temperatures when cooking).
So today I decided to do a comparison using a thin walled plastic cup with hot water in it that would enable me to use a known high quality thermometer to measure its temperature and compare that to my IR thermometer. Interestingly I found them to be within a degree C (over repeated measurements) of the actual thermometer (which is a high grade one intended for laboratory use with the usable range restricted to that of liquid water).
The plastic cup is essentially a source of heat, and heat is actually part of the same spectra of stuff that is light. (see this link: https://en.wikipedia.org/wiki/Infrared). It is that "light" that the IR thermometer is reading and measuring.
However while the aluminium foil is a good reflector and conductor of heat, its not a good radiator. This is because of a property called emissivity.
(read this link: https://en.wikipedia.org/wiki/Emissivity).
The above video makes it clear why reflective and shinny surfaces are problematic for reading what can be thought of as "light" from the surface. The issue is are you seeing the source or a reflection from a surface.
As it turns out glass blocks thermal IR but the glass (being a good conductor itself) will show its own temperature. You just need to be aware of hot things reflected in it on your side of the glass, like a furnace).
So armed with that information I hope you can feel more confident in how to use an IR thermometer some of the pitfalls, and what to avoid you can go grab one and start gathering useful data.
Monday, 23 July 2018
Solar Floor Heating (again) (part 1)
Well its been a while since I moved in here, and the first winter was almost over when I bought the place. I busied myself with other more pressing issues (like a car space, fixing some plumbing) and after some time needed to go back to Finland (which is chronicled here as well).
So I've managed to stop procrastinating (a bit late) and have started the project to make the house both warmer and less of an energy hog.
As in my previous project I'm installing first "under floor" heating and some insulation under the floor to do what I can to bring up the interior temperature duing the day by transporting in what heat is available outside. This is best done by allowing solar to heat water (in pipes) and move it under the floor. See this post for a series on that project on my old house.
So basically this time I'm going to show a bit more of what I'm doing in installing the pipes, because that was missed last time (because I was fucking busy doing it and forgot to photograph it, this time I'm taking my time a bit more)
This is a typical "raised on stumps" Queenslander, built in the 1920's, so my underf-loors are easy to access (with a bit of head bashing involved. This is a shot of the place from the back yard (from when I inspected it before buying).
The house is on a sloping block, so the back is higher off the ground than the front. So its relatively easy to get in under it and work on the floors, which of course look like this:
This is from under the "house proper" looking back the opposite way to the above shot. Here you can see that there "back filled veranda" has a different arrangement of floor joists to the rest of the house ... which isn't exactly regular anyway.
This makes planning the run of pipes interesting, but not impossible (assuming I wanted to heat that area, which I do because that's my kitchen / dining area). Looking back "up hill" to the street we see the area of the "house proper" (as I call it) with a black water pipe being visble leading to the bathroom on the left (as viewed in this picture).
Of course the bathroom has had some water damage over the years:
it looks visually worse than it really is, and some of the bad stuff has been cut away and replaced, or supported. This is the beauty of hardwood houses, you can see exactly what's what and repair is simple and mostly inexpensive (compared to a concrete slab house).
This is a sample of how I run the pipes:
with them "held" against the floor at first just by a cable tie and a staple like this:
Its fast to install, ample to support the small weight and only for install purposes because soon I'm going to be fitting in polystyrene so that it fits under the pipes (thus sandwiching it to the floor) between the joists. This will then be "capped off" with standard sarking (usually used on walls and rooves). This will air seal the pipes and their insulation (but allow humidity to transpire out) giving better transfer into the floor, and reduce losses in the evening and when windy.
Last time I didn't bother running the pipes "through" the joists, but instead looped them around by going "under", however this time because its so much colder in the evenings and windier here I'm doing it this way.
Similarly to last time I divide the floor into two halves, and each half has its own pair of circuits of water flow. This gives two pipes between joists (which my earlier experiment revealed to be sufficient) and results in shorter runs for the small pumps to push the water through.
As you can see (if you look carefully) I run the flow of each circuit in the opposite direction, so that as each direction starts warmer and sheds its heat the other does the same in the opposite direction ensuring more even temperature.
The pipes from each circuit are gathered together and run towards the junction box where water from the floor meets the water from the solar collectors.
Here you can see that some are going through the joists (which are actually looping back as part of another circuit) and some over the joists (going straight to the junction box).
This is where the project rests at the moment ... I'll continue adding posts as progress occurs find-able under the tags of "solar" and "home improvement". That gives me a record of what I'm doing for me too. After all blog comes from log and this log is also for my own reference too ...
So I've managed to stop procrastinating (a bit late) and have started the project to make the house both warmer and less of an energy hog.
As in my previous project I'm installing first "under floor" heating and some insulation under the floor to do what I can to bring up the interior temperature duing the day by transporting in what heat is available outside. This is best done by allowing solar to heat water (in pipes) and move it under the floor. See this post for a series on that project on my old house.
So basically this time I'm going to show a bit more of what I'm doing in installing the pipes, because that was missed last time (because I was fucking busy doing it and forgot to photograph it, this time I'm taking my time a bit more)
This is a typical "raised on stumps" Queenslander, built in the 1920's, so my underf-loors are easy to access (with a bit of head bashing involved. This is a shot of the place from the back yard (from when I inspected it before buying).
The house is on a sloping block, so the back is higher off the ground than the front. So its relatively easy to get in under it and work on the floors, which of course look like this:
This is from under the "house proper" looking back the opposite way to the above shot. Here you can see that there "back filled veranda" has a different arrangement of floor joists to the rest of the house ... which isn't exactly regular anyway.
This makes planning the run of pipes interesting, but not impossible (assuming I wanted to heat that area, which I do because that's my kitchen / dining area). Looking back "up hill" to the street we see the area of the "house proper" (as I call it) with a black water pipe being visble leading to the bathroom on the left (as viewed in this picture).
Of course the bathroom has had some water damage over the years:
it looks visually worse than it really is, and some of the bad stuff has been cut away and replaced, or supported. This is the beauty of hardwood houses, you can see exactly what's what and repair is simple and mostly inexpensive (compared to a concrete slab house).
This is a sample of how I run the pipes:
with them "held" against the floor at first just by a cable tie and a staple like this:
Its fast to install, ample to support the small weight and only for install purposes because soon I'm going to be fitting in polystyrene so that it fits under the pipes (thus sandwiching it to the floor) between the joists. This will then be "capped off" with standard sarking (usually used on walls and rooves). This will air seal the pipes and their insulation (but allow humidity to transpire out) giving better transfer into the floor, and reduce losses in the evening and when windy.
Last time I didn't bother running the pipes "through" the joists, but instead looped them around by going "under", however this time because its so much colder in the evenings and windier here I'm doing it this way.
Similarly to last time I divide the floor into two halves, and each half has its own pair of circuits of water flow. This gives two pipes between joists (which my earlier experiment revealed to be sufficient) and results in shorter runs for the small pumps to push the water through.
As you can see (if you look carefully) I run the flow of each circuit in the opposite direction, so that as each direction starts warmer and sheds its heat the other does the same in the opposite direction ensuring more even temperature.
The pipes from each circuit are gathered together and run towards the junction box where water from the floor meets the water from the solar collectors.
Here you can see that some are going through the joists (which are actually looping back as part of another circuit) and some over the joists (going straight to the junction box).
This is where the project rests at the moment ... I'll continue adding posts as progress occurs find-able under the tags of "solar" and "home improvement". That gives me a record of what I'm doing for me too. After all blog comes from log and this log is also for my own reference too ...
Tuesday, 4 October 2016
stepping off the home plate
Well this house on this street has been many things to me
It was where I was born, went to school, came back during University, where I lived after my parents passed away, where I did my masters degree and where I settled with my wife.
The house has seen many changes since my parents bought it in about 1958, starting life as a chamferboard house:
... and ultimately being rebuilt into the one above over years of iterative development.
Throughout my life I've been involved with this, helping dad as I could (depending on my age)
to ultimately doing renovations on it myself as an adult.
as my wife and I turned it into a home we wanted to live in, as well as making some steps towards making it our home.
I have no doubt that Anitas influence helped me to shape this place away from what my parents built and into something which was us. It was good to have the opportunity to build a home together even if it was short. Since her passing I have completed many of the works we started together, the downstairs bathroom and the kitchen are now newly renovated.
I have learned many life skills here, developed my relationships with my wife and my friends and developed myself too. Kiitos kulta.
I have left here and come back again many times in my life, and now today I leave for the final time, as I have sold the house.
It was not a decision I took lightly, but ultimately no matter what this place represents to me it is (without those people) just a place.
Over the last few months I have systematically stripped it of all the things which were reminders and items of significance. Some have been discarded and others have been kept. I've tried to be pragmatic about much of it.
So I now step off the "home plate" for the last time ... and head for the other side of the planet to see where the journey of life takes me next.
It was where I was born, went to school, came back during University, where I lived after my parents passed away, where I did my masters degree and where I settled with my wife.
The house has seen many changes since my parents bought it in about 1958, starting life as a chamferboard house:
... and ultimately being rebuilt into the one above over years of iterative development.
Throughout my life I've been involved with this, helping dad as I could (depending on my age)
to ultimately doing renovations on it myself as an adult.
as my wife and I turned it into a home we wanted to live in, as well as making some steps towards making it our home.
I have no doubt that Anitas influence helped me to shape this place away from what my parents built and into something which was us. It was good to have the opportunity to build a home together even if it was short. Since her passing I have completed many of the works we started together, the downstairs bathroom and the kitchen are now newly renovated.
I have learned many life skills here, developed my relationships with my wife and my friends and developed myself too. Kiitos kulta.
I have left here and come back again many times in my life, and now today I leave for the final time, as I have sold the house.
It was not a decision I took lightly, but ultimately no matter what this place represents to me it is (without those people) just a place.
Over the last few months I have systematically stripped it of all the things which were reminders and items of significance. Some have been discarded and others have been kept. I've tried to be pragmatic about much of it.
So I now step off the "home plate" for the last time ... and head for the other side of the planet to see where the journey of life takes me next.
Friday, 22 June 2012
The gas heating of the floor last nights data
Good morning :-)
this is the plot of no heating

and this is that for heated till bed time

you can see a distinct change in rate of temp loss in the period soon after I shut down heat

so an outcome of ~17.3ºC as an outcome instead of 15.4ºC assuming the same over night temps.
Quick back of the envelope calcs on the gas:
An Air Con system would use of about 6kWh so would be about 15 hours or not as much (based on the AC system that Monica and Bob have on the corner)
this is the plot of no heating

and this is that for heated till bed time

you can see a distinct change in rate of temp loss in the period soon after I shut down heat

so an outcome of ~17.3ºC as an outcome instead of 15.4ºC assuming the same over night temps.
Quick back of the envelope calcs on the gas:
- based on gas early usage estimates a 9kg will last 11 days (using till 10pm)
- adding full night probably reduces this to 5 days
- $20 for a 9Kg cylinder means about $20 a week.
An Air Con system would use of about 6kWh so would be about 15 hours or not as much (based on the AC system that Monica and Bob have on the corner)
Tuesday, 19 June 2012
floor heating - the gas section part 1
This is a continuation of the posts on my floor heating project to heat our home for the least amount of money in the winter.
The Solar component is intended to stop the house feeling like a fridge all through the day (as it tends to do) and bring up the temperature for the duration of the day. This means that we have a higher starting point for the evening cool down. Back when I wrote this previous post I was already wanting to add in gas to heat the water when the sun goes down. Because in my view gas provides the most effective way to store and purchase energy for heating. I can then take advantage of the same water pipes to transfer the energy (from gas instead of solar) into the heating of the floor.
I expected that this would at the very least slow down the losses of the temperature in the house, and hoped that it may actually heat the house. So with my first couple of days of this system going here is my data findings.
The graph at left here shows the ambient outside temperature plot and the inside temperature plot this evening as my gas water heater keeps the water warm that's circulating through the same water pipes which the daytime solar collectors use.
Essentially the losses boil down to a 1 degree loss over 4 hours, however the losses may change more as the outside temperature has dropped from 20°C to 10°C which will probably increase the thermal pressure (meaning the rate of loss will likely increase).
Either way this is a good result for the house as now the floor is comfortable in light sox and there is no feeling of needing to put on a jumper or sit under a blanket while in the house (after all, 20°C isn't really cold)
The system is still under development and needs a number of stages completing. At the moment what I need to do is:
The Solar component is intended to stop the house feeling like a fridge all through the day (as it tends to do) and bring up the temperature for the duration of the day. This means that we have a higher starting point for the evening cool down. Back when I wrote this previous post I was already wanting to add in gas to heat the water when the sun goes down. Because in my view gas provides the most effective way to store and purchase energy for heating. I can then take advantage of the same water pipes to transfer the energy (from gas instead of solar) into the heating of the floor.
I expected that this would at the very least slow down the losses of the temperature in the house, and hoped that it may actually heat the house. So with my first couple of days of this system going here is my data findings.
The graph at left here shows the ambient outside temperature plot and the inside temperature plot this evening as my gas water heater keeps the water warm that's circulating through the same water pipes which the daytime solar collectors use.
Essentially the losses boil down to a 1 degree loss over 4 hours, however the losses may change more as the outside temperature has dropped from 20°C to 10°C which will probably increase the thermal pressure (meaning the rate of loss will likely increase).
Either way this is a good result for the house as now the floor is comfortable in light sox and there is no feeling of needing to put on a jumper or sit under a blanket while in the house (after all, 20°C isn't really cold)
The system is still under development and needs a number of stages completing. At the moment what I need to do is:
- construct the electrical controller for the pumps
- construct a better junction box
- organize a better location for the water junction box (that'll be under the house and out of the way)
- work out the optimal timing for the gas heating for economy vs comfort
Wednesday, 24 August 2011
solar floor heating - rainy windy and overcast results
The last week has been windy, rainy and overcast, so I didn't expect that the solar system would be making any significant impacts.
But a quick trip outside in the day reveals the quiet bzzt bzzt bzzt of the motor pulsing a tiny circulation of water through the floor pipes. More so when there is a break in the clouds and it springs into action immediately.
This is a good sign as this means that at least some thermal mass (of water) is being circulated and doing something to make the floor warmer.
My temperature readings over the last 24 hours (in the blue) indicate that we've kept our inside max temp at the same level of the outside max temp which is great IMHO. Previously if we had a max daytime temp of (say) 20°C during the day the house would never get warmed up that much and would be at more like 16 or 17°C peak and with the inside often being just a few degrees (like 2 or 3) warmer than the minimum (see the magenta line).
I'm quite pleased with these results in the light of the energy input requirements (like freely environmental available) and the floor insulation not only helps bring this into the house but also keep it there.
I'll be very interested to see how this goes when I add in the component of gas heating in the night. I'm guessing that it will bring up my bottom and keep it from falling so low. Mmmmm nice even temps.
NOTE: as I write this at 7pm local time the outside temp has dipped to 16.4°C and the inside is remaining steady at the 20.0°C down from the 20.8°C its was at lunch time.
But a quick trip outside in the day reveals the quiet bzzt bzzt bzzt of the motor pulsing a tiny circulation of water through the floor pipes. More so when there is a break in the clouds and it springs into action immediately.
This is a good sign as this means that at least some thermal mass (of water) is being circulated and doing something to make the floor warmer.
My temperature readings over the last 24 hours (in the blue) indicate that we've kept our inside max temp at the same level of the outside max temp which is great IMHO. Previously if we had a max daytime temp of (say) 20°C during the day the house would never get warmed up that much and would be at more like 16 or 17°C peak and with the inside often being just a few degrees (like 2 or 3) warmer than the minimum (see the magenta line).
I'm quite pleased with these results in the light of the energy input requirements (like freely environmental available) and the floor insulation not only helps bring this into the house but also keep it there.
I'll be very interested to see how this goes when I add in the component of gas heating in the night. I'm guessing that it will bring up my bottom and keep it from falling so low. Mmmmm nice even temps.
NOTE: as I write this at 7pm local time the outside temp has dipped to 16.4°C and the inside is remaining steady at the 20.0°C down from the 20.8°C its was at lunch time.
Sunday, 21 August 2011
solar floor heating - why solar will only be part of it
I've been quite happy with my solar floor heating home improvement project, but I am under no illusions that it is a complete solution in itself (see all related posts for the complete project rundown).
Why not?
Firstly it doesn't work well at night ;-)
Secondly on days like today for instance, it started out raining, with the rain moving in late in the evening. This allowed the temperature to drop (no cloud cover keeping the place warm over night) and then little or no effective solar energy to heat the water or drive the pump. The graph below was obtained from the BOM site just this morning and sums up nicely why an auxiliary power supply is needed on some days.
So you can see from the graph that not only is it cooler its also more humid and (dangerously from the perspective of mold and fungus as I have already blogged about) the dew point is VERY close to the ambient temperature. This is reflected in the relative humidity (which is sitting at about 87% outside as I write this).
By heating the interior of the house at this time we get some significant benefits (apart from being warm) by effectively lowering the relative humidity inside the house and thus preventing everything becoming sticky and damp. Also as the sun comes out now and then and starts to heat up the air outside we don't have the problem of the interior of the house being cooler than air outside and thus causing some condensation of moisture happening as the warmer moist are comes inside the house and touches cooler things.
That green line of dew point means that water will start to condense out of the air when things are at (in the case above) 13 or so degrees C. That's why glasses with cold water in them start to look frosty and why polished wood starts to feel tacky.
Insulation also works best when its got some thermal mass to insulate. An empty thermos bottle won't stay warm long with no water in it (try heating the interior with a hair dryer and see for your self). Since our house has no thermal mass heated up to a higher temperature for the walls, floor and ceiling to insulate it will loose heat quickly at night and over time the next day without the addition of heat.
So by modifying my design to have the common pool:
I can now incorporate something like a gas heating system to heat the water and a small auxiliary power supply for the solar pump (on the floor circuit) to heat the water in the common pool, and then move that warm water around the floor pipes; without wasting that heat in the solar heat collector section.
In my view gas provides the most effective way to store and purchase energy for heating. It gives excellent efficiency and burns very cleanly (no nasty toxins such as sulphur). However I don't want to burn gas inside my house, as it will produce micro-soot; CO2 as well as potentially leak gas in the house.
This is of course not news to Canadians who have been burning their furnaces in a way that keeps house air separated from combustion and puts combustion gasses back outside where they belong. Even open fire places have a chimney right?
My solution to this is to get a small low flow gas hot water systems such as this one. These are designed for caravans and other low flow outdoor situations. They are rated at about 6Liters per minute which is a bit more than I'll need. I can turn the water temperature (meaning gas consumption rate) down as I need only have the water at about 35°C
By using a water heater like this I then get to keep my combustion outside and not mix it with my internal house air.
I can run it of a 9Kg cylinder and pump the water through it to the common water bus with a low power 12v pump.
My intention is to set this up on a timer which will turn it on at about 6pm, run it for busts (say 20min on 20min off) till about 10pm then turn it on again at about 5am to start heating the floor.
This in turn will make my solar system more effective as the water will already be warm in the morning when it starts up giving it a head start on warming it up.
Of course this adds to the complexity and cost of the system, these systems sell for about AU$200 and I'll probably need another $100 for the pump, timer and circuitry.
I'm estimating that the gas use will be something like 18Kg of gas for the winter months (or about $50 today).
We get to have polished wooden floors that are slightly warm underfoot and that heat the house. Just like the large surface area radiators are not too hot to burn you (unlike smaller bar radiators) the floor heating has an even larger surface area and so keeps the house warm too.
Polished floors are cleaner than carpet (got any pets? Cat hair and carpet ... mmmm my favorite for allergy, oh and do you see carpet in many hospital rooms?) and feel lovely under foot when not cold. So now that we're heating them there is even less reason to cover them up with festy filthy carpet.
Low cost, low energy and effective ... not bad I'd say
Why not?
Firstly it doesn't work well at night ;-)
Secondly on days like today for instance, it started out raining, with the rain moving in late in the evening. This allowed the temperature to drop (no cloud cover keeping the place warm over night) and then little or no effective solar energy to heat the water or drive the pump. The graph below was obtained from the BOM site just this morning and sums up nicely why an auxiliary power supply is needed on some days.
So you can see from the graph that not only is it cooler its also more humid and (dangerously from the perspective of mold and fungus as I have already blogged about) the dew point is VERY close to the ambient temperature. This is reflected in the relative humidity (which is sitting at about 87% outside as I write this).
By heating the interior of the house at this time we get some significant benefits (apart from being warm) by effectively lowering the relative humidity inside the house and thus preventing everything becoming sticky and damp. Also as the sun comes out now and then and starts to heat up the air outside we don't have the problem of the interior of the house being cooler than air outside and thus causing some condensation of moisture happening as the warmer moist are comes inside the house and touches cooler things.
That green line of dew point means that water will start to condense out of the air when things are at (in the case above) 13 or so degrees C. That's why glasses with cold water in them start to look frosty and why polished wood starts to feel tacky.
Insulation also works best when its got some thermal mass to insulate. An empty thermos bottle won't stay warm long with no water in it (try heating the interior with a hair dryer and see for your self). Since our house has no thermal mass heated up to a higher temperature for the walls, floor and ceiling to insulate it will loose heat quickly at night and over time the next day without the addition of heat.
So by modifying my design to have the common pool:
I can now incorporate something like a gas heating system to heat the water and a small auxiliary power supply for the solar pump (on the floor circuit) to heat the water in the common pool, and then move that warm water around the floor pipes; without wasting that heat in the solar heat collector section.
In my view gas provides the most effective way to store and purchase energy for heating. It gives excellent efficiency and burns very cleanly (no nasty toxins such as sulphur). However I don't want to burn gas inside my house, as it will produce micro-soot; CO2 as well as potentially leak gas in the house.
This is of course not news to Canadians who have been burning their furnaces in a way that keeps house air separated from combustion and puts combustion gasses back outside where they belong. Even open fire places have a chimney right?
My solution to this is to get a small low flow gas hot water systems such as this one. These are designed for caravans and other low flow outdoor situations. They are rated at about 6Liters per minute which is a bit more than I'll need. I can turn the water temperature (meaning gas consumption rate) down as I need only have the water at about 35°C
By using a water heater like this I then get to keep my combustion outside and not mix it with my internal house air.
I can run it of a 9Kg cylinder and pump the water through it to the common water bus with a low power 12v pump.
My intention is to set this up on a timer which will turn it on at about 6pm, run it for busts (say 20min on 20min off) till about 10pm then turn it on again at about 5am to start heating the floor.
This in turn will make my solar system more effective as the water will already be warm in the morning when it starts up giving it a head start on warming it up.
Of course this adds to the complexity and cost of the system, these systems sell for about AU$200 and I'll probably need another $100 for the pump, timer and circuitry.
I'm estimating that the gas use will be something like 18Kg of gas for the winter months (or about $50 today).
We get to have polished wooden floors that are slightly warm underfoot and that heat the house. Just like the large surface area radiators are not too hot to burn you (unlike smaller bar radiators) the floor heating has an even larger surface area and so keeps the house warm too.
Polished floors are cleaner than carpet (got any pets? Cat hair and carpet ... mmmm my favorite for allergy, oh and do you see carpet in many hospital rooms?) and feel lovely under foot when not cold. So now that we're heating them there is even less reason to cover them up with festy filthy carpet.
Low cost, low energy and effective ... not bad I'd say
Saturday, 20 August 2011
solar floor heating - part 3
developments
I've had a time to complete a bit more of my ideas and have a few findings in my Solar Floor heating project which I thought I'd take the time to document and pass on (to anyone who finds this and attempts to replicate my work for their own benefits).
I've completed my next phase of prototype for heat collector. Essentially this is a length of poly pipe wound around onto a wire mesh backing with a sheet of PET plastic to cover it. The first one was just one length of poly pipe (Bunnings sells them in 20 meter lengths) wound around a wire mesh to hold it in a coil and face the sun ...
The version I wanted to complete next takes this concept further by putting more pipe per square meter and adding a covering of clear wind proof insulation material to act as a "glass house" to reduce (eliminate?) losses of gathered heat due to wind convection cooling the pipes (while the sun is heating them).

The collector is about 1 meter by 1 meter and the pipe is wound tightly around with care taken to not kink or fold the pipe which would restrict the water flow.

This collector now contains 60 meters (or $12 worth) of poly pipe and with the PET sheet ($15) is now far more effective at gathering water than my older one (which only had 40 meters of pipe too).
problems (and solutions?)
It seems that this experiment is not without problems which need consideration to find solutions. The first is:
Bubbles
But as my inlet bucket and outlet bucket are the same point (as you can see in the above video) the water will simply remain in the pipe.
That would seem pointless if it wasn't for the fact that 1) my pipe is what is gathering the heat and 2) I have the pump to move it around.
I was finding however that after a week or so the flow would be markedly reduced. Flushing the system (with a more powerful pump called the garden hose) revealed that bubbles were coming out and it was this air in the system which was causing my system to fail.
I am still not entirely certain what the problem is, but I suspect that it is gasses such as chlorine (used in the reticulated water system) coming out of solution in water (as say the temperature changes) and then gathering in a location ...
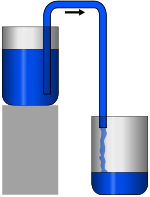
I am not sure where the bubbles are forming, in my floor circuit or in my heating circuit. As I have also been wondering how to provide alternative heating systems to this (like to heat it at night too) I thought that an elegant solution was to employ a "bus" solution or "common pool" which would mean that:
1) heating siphon was separate from floor
2) heat could be added by a third (separate) circuit which simply heated the water in the common pool.
Just roughly this looks like the figure below where I have my old single circuit on the left and my new multiple circuit system on the right.

This allows me to
- work out if bubbles are in one side or the other
- add a night time heating of the water (say by gas or off peak electricity)
- not waste my heated water by putting it through the solar heating panel (which would just act as heat loss out into the night air and give me no return)
I'll keep you posted on this as I only completed this section yesterday.
Lastly
I thought I'd provide a little more details about the pump. As I mentioned I bought if from Jaycar and it cost $49.95 Its the 7v model which moves about 140L / hour of water (in full sunlight).

I thought that this was a 'good number' (upon experimentation) to start with and the more expensive 12V model (twice the price) moved 200L / hour which I thought may be too fast for heat gathering.
As it turns out I think that the 140 would be too fast, but as it also turns out there is enough resistance pumping the water around that it works out to be about half that in practice.
For reference:
- Part 1 and
- Part 2 with some extra details at
- some measurement here and
- here about the gas heating of the water in the junction tank and
- here about windy rainy days observations
Sunday, 31 July 2011
solar floor heating - Part 2
Things are still moving in this area, but sadly with life getting in the way of tasks its a little slower than I'd desire since Part 1. Naturally (as with all things efficient) a balance of input and protection is required: so part of the solar floor heating is to not loose that warmth. So I'm installing some basic insulation between the joists of the floor boards of my house; to reduce the heat losses and increase the heat transfer to the floor.
This can be a filthy job with shit falling in your face and whatever dirt and shit that lives under the house in your nostrils while you work. (for those who've never gone there think about every local cat which explores, pisses and drags food down there as well as whatever building materials the tradies dumped while doing their work).
So its important to protect yourself while working.
This mask is rated to organic vapours and works so well I couldn't even smell the festering rotting cane toad that I found in the laundry back in the wet season which had died and been half consumed by rats ... but trust me it stank.
Its important to take precautions especially when doing home reno as health effects from exposure to building dusts is an increasing issue in Australia (as more people do their own). And as you can see in this quick video shit was falling down right onto my face:
So it is well to cover eyes (with my swimming goggles) and breathing intakes (mouth and nose) for safety.
Today the interior of the house actually got 3 degrees above outside temperatures without any other inputs. I'm pretty happy with that as normally it lags behind during the day (that roof insulation preventing the sun from heating the house in summer works the same way in winter). So with the temp overnight being something like 11 (this graph is for the sea way which is actually a bit warmer than we are here just a couple of K inland) the house is often only 3 or 4 deg above the outside minimum and then the same amount below the outside maximum.
Rather annoying really, but so common in Queensland where houses are often colder inside than the outside is soon after sun rises. People sit around alternatly saying "how cold it is" and "how dear the electricity is for heating".
With only 1/2 my downstairs floor area fitted with heating (and I can't fit the insulation till I've fitted the pipes) its all looking quite promising.
We're also attempting a poor mans double glaze with fitting of 1mm clear PET plastic sheets over the windows. You can barely notice them and as heaps of heat is lost via windows (glass being a good conductor not an insulator) we should have a warmer house again.
This can be a filthy job with shit falling in your face and whatever dirt and shit that lives under the house in your nostrils while you work. (for those who've never gone there think about every local cat which explores, pisses and drags food down there as well as whatever building materials the tradies dumped while doing their work).
So its important to protect yourself while working.
This mask is rated to organic vapours and works so well I couldn't even smell the festering rotting cane toad that I found in the laundry back in the wet season which had died and been half consumed by rats ... but trust me it stank.
Its important to take precautions especially when doing home reno as health effects from exposure to building dusts is an increasing issue in Australia (as more people do their own). And as you can see in this quick video shit was falling down right onto my face:
So it is well to cover eyes (with my swimming goggles) and breathing intakes (mouth and nose) for safety.
Today the interior of the house actually got 3 degrees above outside temperatures without any other inputs. I'm pretty happy with that as normally it lags behind during the day (that roof insulation preventing the sun from heating the house in summer works the same way in winter). So with the temp overnight being something like 11 (this graph is for the sea way which is actually a bit warmer than we are here just a couple of K inland) the house is often only 3 or 4 deg above the outside minimum and then the same amount below the outside maximum.
Rather annoying really, but so common in Queensland where houses are often colder inside than the outside is soon after sun rises. People sit around alternatly saying "how cold it is" and "how dear the electricity is for heating".
With only 1/2 my downstairs floor area fitted with heating (and I can't fit the insulation till I've fitted the pipes) its all looking quite promising.
We're also attempting a poor mans double glaze with fitting of 1mm clear PET plastic sheets over the windows. You can barely notice them and as heaps of heat is lost via windows (glass being a good conductor not an insulator) we should have a warmer house again.
Sunday, 19 June 2011
solar floor heating - Part 1
Premise and purpose
Queensland winter often has sunny days which are warm outside. The paradox is we build houses which are often cold inside. I can only blame our colonial heritage.
Sitting around inside the house it is often still at 15°C at lunch while outside has risen to 20°C in the sunshine. (Its fcuking stupid isn't it!). I had been thinking about a roof mounted solution, but as it turns out the northern side of the house is actually in full sunlight most of the day. When doing any gardening on that side you have to strip back to a T-shirt or you'll start getting hot. So my goal was to work out how to get the heat of the winter northern sun into my house without spending a lot of money.
We have a reasonably typical old house here, raised 40cm or so from the ground on stumps with hardwood floors. They get mighty chilly in the winter. The solution to that from the 70's was carpet, but I think carpet is filthy stinky stuff which people don't quite get how impossible it is to clean and rarely think about it (or if they do think, quickly realize that "its stinky stuff which is impossible to clean").
discussion
So I got to thinking that the nice warm sun on the north side of our house would be able to heat my floor making the inside of the house warmer.
So for less than $200 I've bought:
- 100m of 13mm black poly pipe for both collector and floor heating section
- a solar powered water pump to circulate the water
- some cable ties and staples to attach the pipe
so ... next is to add some insulation under the floor (was going to use builders paper but a better idea is some thin foam) and make a more effective collector.
Right now, with just a single circuit, its just slightly cool to the feet while the unheated areas are uncomfortably cold on my feet (read need slipers). Not bad for no extra cost as time goes by...
For my next stage I reckon that I'll change this test collector to 4 collectors of about 500x500mm with clear plastic covers (to reduce wind induced heat losses) and black backs (to capture more heat), this should significantly increase the efficiency (reduce the losses) of the heat absorber and allow me to run solar 4 pumps to shunt the water around.
Right now I'm just running a single circuit of water (say the blue line in the figure to the left) so with the extra heat collector, I'll double up and reverse the direction.
If you look at the figure left, the blue line comes in and zig zags up the floor then come straight back to the heat collector. If I run the other circuit in the opposite direction (like the green line) then any heating change (as the water cools) of one circuit will be countered by the other which will have any temperature gradient in the other direction. This way I'll get 2 pipes between each floor joist (where as now I only have one) which should further increase the transfer of solar energy to my floor.
When choosing the pumps, there were 2 types, one was 200L/hour for $80 and the other was 140L/hour for $40. I reckon that 4 pumps covering the floor area under the house will (in combination with the insulation layer under the floor) actually make the floor warm to walk on in winter!!
Another point about the solar water pump is that it only turns on when the panel gets enough energy (which means the heat collector is now hot and ready) and turn off when the sun goes down (or when it goes behind a cloud) meaning that I do not need any other regulating system in this (to prevent it pumping cold water under my floor).
Simple, effective and cheap.
Further the system is then easily adapted to have GAS heat the water (using a simple and low cost instant heat gas system and a regular electric pump) if we want to keep the floor heat in the nights or to use on rainy or cloudy days (which aren't actually as cold in the evenings as the clear days are).
Water temperature on the outlet end of the pipe (after its gone around under the house) is coming out at 34°C
For reference:
- Part 2 with some extra details at
- Part 3 and
- some measurement here and
- here about the gas heating of the water in the junction tank and
- here about windy rainy days observations
Subscribe to:
Posts (Atom)