Wednesday, 1 October 2008

colour negative - wondering about getting better images

I once mainly used colour slide as my prefered film but I now commonly use colour negative as my film because I found that even after 12 years of development in scanners when scanning slides I don't get into the shadows very well. In contrast (say, was that a pun?) negative can cope with much greater holding onto highlights than slide can, and so you can tune your exposure to bias exposure to the shadows and expect the highlights to hold. See this example elsewhere on my blog.

Of course Colour Negative works rather differently and instead of getting a "ooohhh" when you see that on the light box you get something like this:


not startling is it ... yet from this surprisingly terrible image, you can pull out the scene below:


Now interestingly, I took a digital of this scene for working on a page I'm writing on exposure of film with a digital camera here, you might find that interesting reading too.


Immediately the colours are more punchy in the digital, but then again we've blown out the clouds to blinkies and there isn't much in the shadows over on the left there (unlike the film).

now, lets look at that area in more detail:


surprisingly good colour (even in the reeds in the shadows). I bet I can't do that with Slides either. Now going back to that horrible looking negative I had up there, lets look at what's in the Red Green and Blue channels (remember we're still in Negative here, so black is white in the finished product).


Despite the RGB looking like a broad histogram, there is heaps in the Red (gosh just look at the bloody thing above) , little in the Green and next to nothing in the Blue.

No wonder the sky is washed out and noisy. So, I'm now wondering if this can be fixed with a scanner which punches more into the dense areas? If so by how much? Perhaps its jut not there at all?? Perhaps the blue channel in the resulting scans of negative are always going to be weak?


I've just had a conversation with a fellow who drives a drum scanner. He says that his device gets into these areas more and has much cleaner results than what he's seen from consumer scanners (gosh why should that be surprising?)

I think that this shows when we look at what happens to the blue channel when we make the level adjustments required to set its black and white points (streching that small data range to cover 0 to 255 effectively).


Notice the numbers and positions of the sliders. In the on the left its as it came from the raw linear scan, and on the right its stretched steps 2 to 35 to cover 0 to 255. It is clear that heaps of noise results. I don't know if this is quantisation noise or CCD noise. But I expect its a bit of both.

The reds in contrast performed much better (well it started out better to begin with)


There was data from 44 to 139 which meant a more modest strech and not to forget that the lower end of the data was further away from the dense areas of the negative and within a more linear and reliable portion of the scanners ability.


So, now I think I understand why people think negs are harder to scan than slides. I wonder if I can get my hands on a linear scan of this neg done with a Nikon?

Tuesday, 30 September 2008

micro four thirds

Having come from a period where almost every 'serious' camera I knew of was 35mm (and Box Brownies were just lame) I looked at camera size as being only a thing about system camera VS non system camera. One of my favourite cameras was the Olympus Trip 35. These compact little cameras could take outstanding images with their simple but sharp fixed focal length lens you could take images excellent images with a compact camera that sat easily in your pocket or brief case. My good friend took just such an image like this back in 1974:


This image makes stunningly beautiful prints up to well beyond A3 sizes. If you click it the image which loads is 1600 x 1044 pixels, but scanned on a Nikon LS-5000 makes images easily 5000 pixels wide and beautifully sharp.


Now we're strongly in the digital era, and having been a fan of compact cameras (like my Coolpix 5000) since I started using them back in 2000. The up until the 2MP camera they weren't much chop for prints anything bigger than 5x7 inches. But the 5Megapixel 5000 changed that (see this dpreview review for details), now digitals were as good as what I could easily get from 35mm (and then only with the best scanners or professional enlargements). Pretty soon I was barely taking my 35mm outfit anywhere with me (or if I was, I was leaving it in the backpack more often than not).

You see now days I've learnt that when I want a "really" high quality image, I pull out my 4x5 camera. It has film which is so enormous after looking at 35mm its just ridiculous to consider using 35mm anymore. In fact since I've got a DSLR (great for sports and birds) I can't think what I'd do with a 35mm film camera anymore.

So I now carry my compact digital and my bigger format film cameras with confidence that I can get an excellent print image or simply satisfactory www image no matter what. But the camera makers gradually ruined that with the polarisation of digital "prosumer" cameras into gumby compact cameras or large DSLR cameras. Compact cameras have increasingly smaller sensor and higher megapixels. Leading to lower and lower image quality. Damn! Just when I get used to quality image making cameras not being bulky. So I'm stuck with my 7 year old (and getting older all the time) Coolpix 5000.


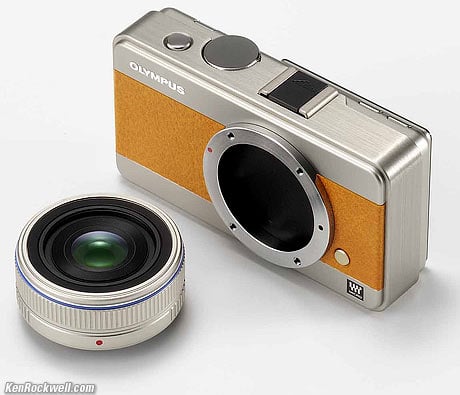
But then there was the Micro 4/3's announcment from Olympus / Panasonic. Better yet, Olympus have posted this. Boy it looks sweet too: This image is linked from Ken Rockwells site


ouhhh

and this one from DPReview:


So it looks like my (and many others) hopes are likely to be fulfilled. A compact camera which will make images as good as compact 35mm once was and be as compact (or more compact) to carry as they were too!

Fantastic

Sunday, 28 September 2008

Metz on my Coolpix - newer isn't always better

I've had my Coolpix 5000 for some years now, and it still pulls rabbits out of the hat when it comes to being a versatile imaging tool. I recently bought a Metz 32 CT-3 (an old favorite flash of mine, used for many years before going EOS and then A-TTL) and sure enough works atop the little coolpix like a bought one!


I grew up using flash which required me to use a table on the back of the flast to calculate the right exposeure (distance - film ISO - aperture f-stop) so when "auto flash" came along it seemed to take all the hassle out of things cos all I had to do was set my aperture to match what the flash "thought" it was an it just worked. Especially in combination with a camera with an Av setting it almost perfect.


Sitting it ontop of my EOS 10D helps understand the scale, actually it works fine here too and if you've used any of the EOS EZ flashes it has more punch with a wide lens than any of them, because they fudge the guide number with an internal zooming mechanism. A flash like a 550EX may be GN55 at 105mm but when you put on a wide angle they're back to about 17.

If you think this looks 'chunky' on top of my 10D wait till you put a Canon flash ontop of your Rebel..


Anyway, the Metz is great as it has fully featured abilitys, like swivel left and right (as seen below)


or the front of the flash element can pivot all the way to straight up like this.


Which enables you to get bounce flash from almost any angle or situation.

Of course all this is now available for you on the Coolpix too. Who says that 'compact cameras' have to be limited.


Its funny, the flash is nearly bigger than than the camera. So I can now get excellent lighting with bounce flash (which all these are) and certainly better lighting options than the coolpix built in flash.

This image below shows how much more 'even' and natural the lighting provided is compared with the flash pointed straight at the subject like a search light.


So a 20 year old flash on top of my old Coolpix gives it even more versatility than it had before. Its small when I prefer to have only the compactness and it can take an accessory flash to give it professional punch when I need it.

People often buy DSLR's because they perceive that they are some how more versatile. The soon find that the dinky flashes that pop up on their DSLR are not better than the ones that compacts have and end up buying and expensive system flash (which are often bigger than this flash unit).

Why don't they keep making stuff like this?

Saturday, 27 September 2008

Bessa - film slack is bad

Soon after I started using my Bessa I had some annoying problems occurring like in this image:

lightLeak

All the opinions I've had on this indicate that its light leaking along the edge of the film when changing the film (taking out the old, and putting in the new).

For those who are not familiar with 120 film this may seem a strange thing, but the fact is that 120 film is just wound onto spools (like in the above wikipedia link) with a light proof paper backing. This effectively sandwiches the film between two layers of light proof coated paper. It depends however on being tightly wound or else light can leak in at the edges of the paper and spool at the top.

There is a pinch spring arrangement which is designed to keep the film tight on both the takeup spool and the film supply spool.

It looks like this (I'll get to the foam in a minute)

Many people have suggested that this needs to be bent in a little more to keep the film from becoming unspooled with movement in the camera.

I tried this, but well .. its spring steel, thin and flimsy. So I was less than confident that this was going to work.

Well sure enough every film I took out of the camera needed a final "wind" in my fingers to "tighten it up on the spool".

I thought that what it needed was some 'friction' and something to 'grab' it to prevent it becoming slack. Sure the take up spool can't move backwards, but nothing is holding the supply spool.

I thought I'd add a little window sealing foam tape to the holders of the spools to ensure that it was firmly held and didn't unwind.

I put a little of it to go around the edges of the holders like in this picture. Even with no film on the spool you can see that it holds it nicely against the spring clip.

Its important to not use much tape either, as you only want to make the slightest effect. The tape here bends around over the spool holder so that the paper flow will not then snag on the foam and then drag it into the holder and cause any jam.

The tape is at both ends to keep the roll tensioned evenly as in the image below.


It then neatly drags the paper backing and the self adhesive tape has enough space on the other side so that it attaches well and can't be then dragged under and jam mid roll (this btw is what happened on my first attempt).


There is slightly more resistance on the uptake now when I advance the film, but since then 100% of my images have been perfect and film is wound on as tightly on the uptake spool as it was on the supply spool when I got it from the packet.

fantastic :-)