While I was in Singapore a little while ago I was standing at the lights waiting to cross and looked down.
interesting place to put anti-smoking ads ... but I like it :-)
Looking around the ground you'll also notice how clean it is there ... I'm betting the ban on chewing gum makes a difference there too!
Thursday, 28 May 2009
Tuesday, 26 May 2009
lens tilt on a Panasonic G1
One of the things which seems to be completely incomprehensible or ungraspable by the majority of photographers is the benefits of not having a stiff lens - body coupling. To a large format photographer such a restriction would render the camera all but useless.
Before I go much further I guess that I should explain what this is about to those readers who have never used anything else but compact cameras, 35mm and DSLR cameras (although there will be a few 35mm and DSLR users who know what I'm talking about already.
The image on the left is taken with a 'standard' lens at about f2.8.
As you see in the image focus is towards the bottom of the image around where I've drawn a blue ellipse.
The "depth of field" runs out due to the large aperture and as the table top moves away from the camera (towards the top of the image) things get out of focus or blurry.
Most photographers who were never trained on or used a view camera will say "sure, you just move the focal point further away to the middle of the image and stop down to f16 or f22.
Voilla ... its all in focus!
Well those of us who were trained on view cameras know that there is another way which is actually better (heck, classical education has merits?), that is to apply some tilt either to the lens or the back of the camera. View cameras have lots of movement aside from just focus you know. Check them out if you don't know much about them. They don't all have to be funny old stuff either, as you may be surprised to find that they are still used today for the top end photographic work on stuff such as jewelry or products.
So what doe the alternative look like?
Well, like this image.
Here I've held the lens in my hand and just tilted it manually (un-attached to the camera) to show that I can move the focal plane away from the normal "parallel plane".
You can see that focus goes up the table and even at a diagonal (gosh, I haven't taken takky images like this since I first played with a view camera decades ago in my student daze). I could have tried to just get the whole table in focus, but then how would you know it wasn't just kept in focus by depth of field at f22
This allows the photographer to not only better control of focus, but also gives control of composition giving the power to direct where the viewer places attention and remove items of distraction from attention.
Its well worth clicking on that image and looking around at the detail of where the focus goes.
Now despite there being no secret in this it is one of the best kept secrets of photography since rigid cameras came out. For years some photographers know about this and really long for such flexibility in rigid cameras and Canon provided their first Tilt lens with the TS 35 and then with the EOS system expanded it to include the TS-E 24, 45 and 90mm lenses (check them out on the Canon Camera museum). While I started using them as soon as I could afford it much to the marketing divisions annoyance they remain misunderstood and unknown.
Perhaps the problem was that serious photographers thought that 35mm was a 'toy' format ... there were some offerings in the medium format (MF) area such as the now gone Hassleblad ArcBody (reviewed here) and Flexbody. But MF being the expensive area it was I guess that most photographers who needed such things kept using view cameras.
Enter Digital
The digital age has brought us digital cameras which exceed the ready quality of 35mm and often come close to what was once MF quality. With photographers now using DSLR in earnest Tilt lenses are now entering a popularity never had before. With a TS-E lens on a DSLR camera you can do great things, for example I found that a fellow called Keith Cooper has a good review here.
Canon has has added a 17mm lens (perhaps to attract the APS sized sensor groups) and even Nikon has introduced (finally) Tilt lenses.
These are lovely devices but the problem is they're real dear. The Canon TS-E series lenses will set you back a grand ($1000) and even the old TS 35 (which is neither wide enough or standard enough to be useful) still fetches about US$500 on eBay.
lovely, but whats this got to do with the G1?
a good question, and I'm getting to that! You see to allow movements and tilt having a bigger "image circle" is essential. Large format lenses produce an image much larger than the film to facilitate this. This makes those lenses expensive and its also the reason that the TS-E lenses are expensive. They have to make an image to cover more than the 35mm frame.
Now, the sensor of the G1 is a 4/3rds sensor which is around 18mm x 13mm in size. A 35mm frame is 36mm x 24mm in size. So any lens which was designed to work on 35mm has plenty of coverage for a G1 and the short flange distance give the designer plenty of space for the mechanism.
Are you already using 35mm lenses on your G1 by an adaptor? I know I am. Heck its the main reason I bought the G1.
Right now, the only 'alternative' to the expensive TS lenses is stuff like the Lens Babies (which are essentially not good optics) and cost about $250 anyway. Imagine using an adaptor like that on any or all of your 35mm optics. Great (and cheap) lenses like 28mm and 50mm become equal to lenses like TS-45 and TS-90.
So if we could get an adaptor to allow tilt then the G1 would become one of the bargain of the year cameras for product and creative photograhpers!
In case you don't know the G1 well, the major thing which differentiates it from a conventional DSLR is the lack of a Mirror. The design is much more similar to cameras like the Bessa L which simply have a shutter behind the lens.
This means that to allow mount of 35mm SLR lenses that an adaptor must space off the lens by some 24mm. Looking at the picture to the left you can see that is quite a lot (this is a actually an FD 50mm f1.8).
I've drawn in some curves to show where a tilt to effect a nice easy to deal with center tilt would pivot around for such a lens.
Clearly there is plenty of space for a mechanism to mount to the G1 and attach a lens.
Whats in it for me?
Well, while I'm an ideas man, I'm a photographer not an entrepreneur and I'm also a great believer in the free market. Since the internet gives us (buyers) the possibility to form a community and become a cohesive buyer group we can start to have a say in what gets made for our needs (rather than just be consumers buying what ever gets served up). To some extent this is already happening with eBay sellers like this guy, and this guy are already making great adaptors (and cheaply) for the G1 before Panasonic even offered them.
I've had communication with both of these guys on the topic (one was interested the other didn't reply with much) but I'm sure that if they knew they'd sell some they'd be turning them out soon.
So, if you're as keen for this sort of development as I am why not send them an email and express your interest or even place a comment here on this article (as I'll be sending them this link too).
I've suggested some possible ideas such as this one (which is adapted from the Canon TS 35 mount by a Russian maker)
and another based on the simple mount system of the lens baby design. I don't know if that ball pivot is "patented" but it might not be when applied to an adaptor
or perhaps something like this?
anyway ... certainly heaps of other designs are possible.
Lastly for those interested in how I've done this without an adaptor, here it is.
I've put my smallest extension ring (12mm) onto my 28mm to force the lens iris to be fully open, then I've gaffer taped some rubber onto the bottom to light seal flexibly and neatly against the lens mount ring (and protect the camera too).
This allowed me to focus by simply pulling and tilting the lens to where I wanted the focal plane to be while looking in the view finder.
simple but neither precise or easy to use.
I've added 2 more samples of what can be done. In this image I've moved the focal plane to be parallel with the the bottle of cleaner but twisted it a little away so that even at the foot of the bottle the marker is blurred.
and then in this one I've tilted the focal plane back to get the table top in (nearly) in focus (plane runs from the mat in front to the middle of the salt shaker.
inexperience graphics people who may be experienced in photoshop and the use of selective blur with a gradient should note that the de-focus on the top of the bottle is impinging on the less de-focused items in the background (top) of the picture. You just can't get this kind of fully 3D de-focus after you've got a 2D image. This means you need to do it in the camera. And why not, with the right tools its easy!
Monday, 25 May 2009
Elgeet C mount 13mm
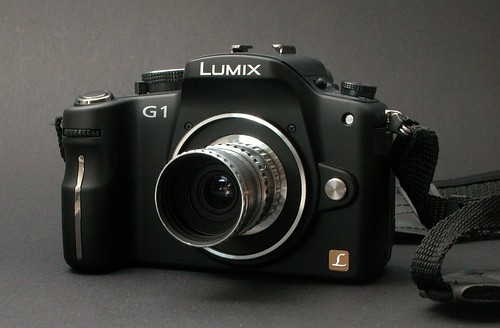
Today I got the adaptor to allow me to put my newly purchased lens onto my G1 to see how it goes.
The lens is a C mount lens which I thought I'd give a test drive to (seeing as there is quite a hullabloo about this stuff on the net). My guess is that its designed for 16mm cinema as it covers way more than 8mm would need.
Anyway I expected that these lenses were some sort of "fad" in the market as I wasn't sure if they would cover the sensor (16mm being smaller size than 4/3rds sensor size) or have reasonable 'resolution'.
This one came up on eBay at an attractive price so I thought "what the hell" and bought it so I could actually see for myself (and not many people are posting much about this topic yet).
Below I'll place some test images and comparisons to the kit lens which comes with the G1. The kit lens is 14mm which is in theory should make an image not quite as wide as 13mm (if it covered enough of the sensor).
Here is a couple of example shots of the lens on the camera:
and
These are from my Flickr account, so if you click on them it'll take you there (where there is some comments on the images).
Firstly lets look at coverage. The image below is simply resized from the camera and shows what you will get:
so clearly it misses out on covering the width and the corners. Since it does not cover as much width as the kit lens (14-45mm) it is effectively not as wide because it does not cover enough of the sensor (and you'll also waste some of your image by cropping out bits).
So, lets look at the details. The 3 images below are 100% magnification views of:
upper right
shows its falling off in detail to the edge significantly
upper left
as expected shows the same thing.
the center
seems to show that the image is quite comparable with the quality of the standard kit lens. Not bad really for a very old bit of gear.
my conclusion
This lens is f2.4 while the kit lens is around f3.5 both are reasonably bright but the kit lens has the advantage of being free (came with the camera) and having OIS which more than makes up for the little less brightness that it has. In the center its pretty darn sharp, and comparable to my kit lens with both at f16.
The Elgeet is 'focus free' (meaning its focused at somewhere in the middle distance) and essentially everything from a few meters away to infinity is as sharp as anything else.
Would I buy it? Well ... perhaps not if I'd read this first;-)
So now I know.
Since I have the adaptor I'm intending to try some other C-mount lenses and see how I go. Have a look for the label C Mount over there in the left column to see what happens...
:-)
Friday, 15 May 2009
35mm still useful?
Well, yes ... in some roles.
I've been going through some of my 35mm negatives from when I lived in Japan and scanning them with a Nikon LS-4000 scanner. The results are often slightly jaw dropping for me, especially after some years of using digital or 4x5.
Certainly the 4x5 film sheets have many characteristics which 35mm film can't come close to, but I'm learning afresh what 35mm can do well.
no matter how well my G1 performs (or my 10D before it) the compactness and price (especially now) of a 35mm camera with a wide 24mm or a super wide 21mm lens is really hard to beat.
For instance, this image was taken on garden variety Fuji superia 200ISO negative.
The dynamic range handling of shadow detail (I'm under a bridge) as well as the sunlight outside is well outside what a digital could have yielded without a HDRI. Given that bicycle on the move there HDRI would have been impossible with this image.
Did you notice that the freeway over my head is in the top of the picture? Man this is a wide shot. Then there is detail, have a look at these or click them for a pixel peek.
good dynamic range and look at the shop awning just over the rail at the base of that 'lamp' heck ... even the lamp is detailed.
and when there is a foreground item like this you can get great detail
Remember the original image is 3671 x 5639 Pixels (or 20.70 MPixels). So if the look is a little noisy, just sample it back to what a 10 megapixel or 6 Megapixel camera will give then look again. So good old negative film still has some advantages up its sleeve yet.
Now I'm not about to hang up my G1 in favor of an OM-1n using Negative but to get nice ultrawide images with my G1 will mean me needing something like the new (as yet unavailable) Panasonic 7-14mm lens. I can get an Olympus 21mm lens and an OM-1n for less than just that lens and I can't even mount a filter on the Panasonic lens.
Then there is black and white and even cooler infrared black and white
Where you can take quite cool and moody images.
Don't let all the nonsense written about IR black and white fool you its not hard. Especially if you aren't scared to develop your own black and white. Its not hard and its not expensive, more there's heaps of people out there who would love to help.
So you don't only have to have one tool in your kit you know. While I love my G1 for all the reasons you'll find here, I reckon that 35mm still has something which makes it attractive for a photographer, especially when you consider the value for money.
Now this isn't how its always been ... heck when I was in Japan in 2001 the costs of used or new 35mm gear was as high as the DSLR stuff is now. But since the herd has now headed off in the direction the marketing shepherds have taken them its rather different.
Heck you don't even need to invest in a scanner, cos as long as the place developing your film has a good Noristu minilab you can get great scans given to you on a CD.
So if you're thinking "hmmm ... I'd like a wider view" then consider a neat used compact 35mm camera (like the OM-1) and a sweet Olympus 21mm lens. Cos right now they're as cheap as chips.
You just have to thank the digital avalanche of the last 5 years for that!
I've been going through some of my 35mm negatives from when I lived in Japan and scanning them with a Nikon LS-4000 scanner. The results are often slightly jaw dropping for me, especially after some years of using digital or 4x5.
Certainly the 4x5 film sheets have many characteristics which 35mm film can't come close to, but I'm learning afresh what 35mm can do well.
Wide angle
no matter how well my G1 performs (or my 10D before it) the compactness and price (especially now) of a 35mm camera with a wide 24mm or a super wide 21mm lens is really hard to beat.
For instance, this image was taken on garden variety Fuji superia 200ISO negative.
The dynamic range handling of shadow detail (I'm under a bridge) as well as the sunlight outside is well outside what a digital could have yielded without a HDRI. Given that bicycle on the move there HDRI would have been impossible with this image.
Did you notice that the freeway over my head is in the top of the picture? Man this is a wide shot. Then there is detail, have a look at these or click them for a pixel peek.
good dynamic range and look at the shop awning just over the rail at the base of that 'lamp' heck ... even the lamp is detailed.
and when there is a foreground item like this you can get great detail
Remember the original image is 3671 x 5639 Pixels (or 20.70 MPixels). So if the look is a little noisy, just sample it back to what a 10 megapixel or 6 Megapixel camera will give then look again. So good old negative film still has some advantages up its sleeve yet.
Now I'm not about to hang up my G1 in favor of an OM-1n using Negative but to get nice ultrawide images with my G1 will mean me needing something like the new (as yet unavailable) Panasonic 7-14mm lens. I can get an Olympus 21mm lens and an OM-1n for less than just that lens and I can't even mount a filter on the Panasonic lens.
Then there is black and white and even cooler infrared black and white
Where you can take quite cool and moody images.
Don't let all the nonsense written about IR black and white fool you its not hard. Especially if you aren't scared to develop your own black and white. Its not hard and its not expensive, more there's heaps of people out there who would love to help.
So you don't only have to have one tool in your kit you know. While I love my G1 for all the reasons you'll find here, I reckon that 35mm still has something which makes it attractive for a photographer, especially when you consider the value for money.
Now this isn't how its always been ... heck when I was in Japan in 2001 the costs of used or new 35mm gear was as high as the DSLR stuff is now. But since the herd has now headed off in the direction the marketing shepherds have taken them its rather different.
Heck you don't even need to invest in a scanner, cos as long as the place developing your film has a good Noristu minilab you can get great scans given to you on a CD.
So if you're thinking "hmmm ... I'd like a wider view" then consider a neat used compact 35mm camera (like the OM-1) and a sweet Olympus 21mm lens. Cos right now they're as cheap as chips.
You just have to thank the digital avalanche of the last 5 years for that!
Thursday, 7 May 2009
bulk scanning with Epson flatbed
I was recently asked by a commenter to my blog to explore this question. I thought it was intuitive but its apparently not. Epson it seems (like many other IT companies) has taken the path of having numbskulls and under educated people take over support jobs (and perhaps even pushing out people there who actually know. I've worked in IT for about 15 years so I've seen it first hand elsewhere).
Anyway, to the point
How do you batch scan film and have the same setting applied to all
I do this by the following methods
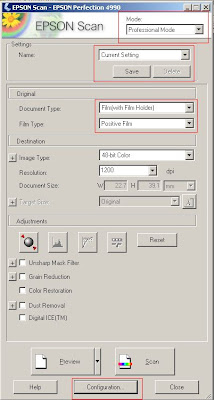
Firstly you must put Epson scan into an appropriate mode, Professional. Lets look at the main pannel where I've marked some important places
The next step is done in configuration, so click that.
we need to choose appropriate colour handling from the three options available.
The first option of Colour Control (gosh these poor Japanese keep following Amerikan Speling) will automatically duff your stuff and you'll have to make educated guesses as to which profile you'll assign to your image in photoshop. Note that I said assign ... not convert ... important point.
So I have my target set to ColorMatch RGB in this instance as I find it works well enough for gamut contained in Negatives ... and wider gamuts may just introduce noise.
I am a little superstitious so I often close the dialog box at this point and then bring it up ... you know ... just in case.
Next we need to do a preview of the image do not use thumbnails that's again where the computer will decide for you ... and wherever possible, don't send a robot to to a humans job. Preview the whole plattern and manually select a rectangle on that.
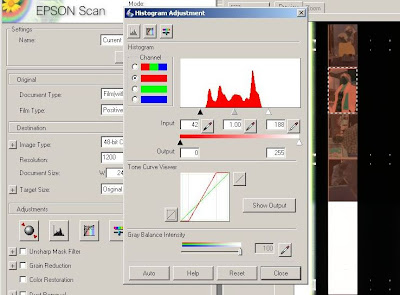
and then adjust each of the colour channels (red green and blue)
Notice that I've left a little space either side of the histogram in the red above and even in the blue here. This is important as often there is some shadow details or high light details which are not shown in the histogram but which you can identify are clipped later.
With respect to the blue, its important also to shove it right over there to the left. I have found that this alters the scan time to make it longer. I believe that this activating some sort of exposure compensation and is giving a longer exposure to the channel. My results discussed elsewhere in this blog support this theory.
Now we have a general setting which will more or less be adequate for all negatives (well all the ones I've got here fit within this range).
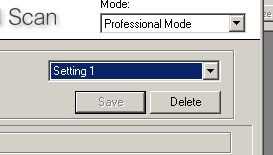
So now you can do the next important step and click save settings. Stupidly it seems you can't name it, but that's ok for me as I only have two, one for negatives and the other for slides.
Now, next time you open up (and every time after that) if you select Setting 1 (or 2 ;-) after you've done your preview and it will put a marquee back right were you put it and reset the settings in the histogram to what you've just painstakingly set up.
Great!
Next important section, how do we make more on this platen?
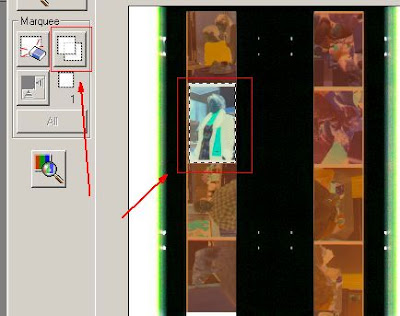
You use the copy selected tool that appears in the preview window (as in the diagram to left).
Click it and another marquee will appear with exactly those settings. So move it to cover the other image you want to scan from the strip.
Repeat this for as many as you want on the preview area.
Now, Ctl + click each image (which you want scanned) and click scan and all those images will be scanned into your application.
Click Scan and job done!
Now as I use Photoshop I have a customised Action set up which does:
Destination settings (like 48 bit or 1200dpi) are changed globally so will be applied to all not each. I guess this makes sence, but I can understand some may wish to have one scanned at 1200 and another at 4200dpi (I don't work this way).
works for me ... let me know if it works for you!
You may also find the following useful links:
Anyway, to the point
How do you batch scan film and have the same setting applied to all
I do this by the following methods
Firstly you must put Epson scan into an appropriate mode, Professional. Lets look at the main pannel where I've marked some important places
The next step is done in configuration, so click that.
we need to choose appropriate colour handling from the three options available.
The first option of Colour Control (gosh these poor Japanese keep following Amerikan Speling) will automatically duff your stuff and you'll have to make educated guesses as to which profile you'll assign to your image in photoshop. Note that I said assign ... not convert ... important point.
So I have my target set to ColorMatch RGB in this instance as I find it works well enough for gamut contained in Negatives ... and wider gamuts may just introduce noise.
I am a little superstitious so I often close the dialog box at this point and then bring it up ... you know ... just in case.
Next we need to do a preview of the image do not use thumbnails that's again where the computer will decide for you ... and wherever possible, don't send a robot to to a humans job. Preview the whole plattern and manually select a rectangle on that.
and then adjust each of the colour channels (red green and blue)
Notice that I've left a little space either side of the histogram in the red above and even in the blue here. This is important as often there is some shadow details or high light details which are not shown in the histogram but which you can identify are clipped later.
With respect to the blue, its important also to shove it right over there to the left. I have found that this alters the scan time to make it longer. I believe that this activating some sort of exposure compensation and is giving a longer exposure to the channel. My results discussed elsewhere in this blog support this theory.
Now we have a general setting which will more or less be adequate for all negatives (well all the ones I've got here fit within this range).
So now you can do the next important step and click save settings. Stupidly it seems you can't name it, but that's ok for me as I only have two, one for negatives and the other for slides.
Now, next time you open up (and every time after that) if you select Setting 1 (or 2 ;-) after you've done your preview and it will put a marquee back right were you put it and reset the settings in the histogram to what you've just painstakingly set up.
Great!
Next important section, how do we make more on this platen?
You use the copy selected tool that appears in the preview window (as in the diagram to left).
Click it and another marquee will appear with exactly those settings. So move it to cover the other image you want to scan from the strip.
Repeat this for as many as you want on the preview area.
Now, Ctl + click each image (which you want scanned) and click scan and all those images will be scanned into your application.
Click Scan and job done!
Now as I use Photoshop I have a customised Action set up which does:
- assign profile (to Epson ColorMatch RGB in my case)
- invert
Destination settings (like 48 bit or 1200dpi) are changed globally so will be applied to all not each. I guess this makes sence, but I can understand some may wish to have one scanned at 1200 and another at 4200dpi (I don't work this way).
works for me ... let me know if it works for you!
You may also find the following useful links:
- quick neg scan tutorial
- using the Epson for bulk scanning of 35mm colour neg (and getting your desired settings applied across all evenly)
- registration problems on older Epson scanners and why you shouldn't go too far in trying to adjust this or that because when you improve focus you may disturb registration
- using your scanner to understand film density.
- driving your scanner software differently to effect some changes in scanner side exposure on Epsons (meaning better noise characteristics in the dense areas of your negs).
- don't forget colour management on your Epson (its not where you might think it is)
- determining and tuning focus (if you suspect its out...)
- Black and White neg scanning
Wednesday, 6 May 2009
new FD lens adapter for G1
I've been happily using an adaptor purchased from a fellow on eBay called ciecio7. As noted in a previous post of mine the FD lens adaptor is a little long (fractions of a millimeter) but means that turning the lens around to infinity does not exactly reach infinity (using a 50mm lens @f1.8 worked out to be somewhere around 50 meters away and using a 28mm more like 15 meters).
I brought this to the attention of cieco7 and he offered to send me aonther adaptor. In the mean time my solution to that issue was to carefully "lapp" the lens side of the adaptor to reduce the length. I've documented that here as an appendix in the above mentioned post.
I mentioned this to ciecio7 and suggested that he did not need to send me another adaptor (why waste postage?)
He wrote back to say that he would send me one which was slightly shorter anyway.
So, this is that adaptor. I'm writing this blog entry because not only is the adaptor perfect out of the box but has undergone a few modifications which I think make the adaptor a much nicer looking bit of gear as well as more functional.
Where there was an engagement pin there is now a ledge running right around the inside of the adaptor. It has a gap in it to engage the pin for coupling the Aperture IRIS.
To mate with the FD lens and make the lens aperture ring functional there is a small lever on the back of the FD lens which needs to be engaged by the adaptor.
This is done when mounting the adaptor onto the lens by:
Below is the older system (which has a pin instead of the ledge the new adaptor has), and you can perhaps see that the pin may miss coupling with the iris lever this way.
In the past the adaptor was different to this one and instead had a simple pin arrangement to engage and activate the iris mechanism of the FD lens, as you can see on the image to the right.
This works, but allows you to incorrectly mount the lens leaving an inoperative iris.
The new system makes it impossible to mount the lens incorrectly, as if you don't go through the steps above then the adaptor won't fit on the lens properly. I'm sure he has had some complaints about this issue (indeed I contacted him about it when I first got the lens as it wasn't intuitive to me (not being an FD lens owner before).
So its good to see that he is not only making good products (at lower prices) but is also making them better in an iterative cycle of improvements.
So, why am I writing this?
I have always regarded the free market as kind of related to democracy. I vote with my cash and I pass on information about traders (good and bad). They say that bad reports travel 9 times faster than good reports, so here is my attempt at balance. I guess that this is my input into Adam Smith's Invisible hand.
In a harsh economic world which hardly ever caters for small markets and enthusiasts with specialist needs it is good to see a business which does not only cater for this need but a business which makes ongoing developments to its products rather than just sit there turning out the same thing. Having seen Nikon dis-continue the LS-V and LS-5000 film scanners (in what seems like a lot of demand at least in Europe) I am even more inclined to support those businesses which move photography more towards an "open source" method (which it once was) and away from the locked down proprietary (rip off) that it now is. For instance, tried buying a battery for your digital camera recently?
I brought this to the attention of cieco7 and he offered to send me aonther adaptor. In the mean time my solution to that issue was to carefully "lapp" the lens side of the adaptor to reduce the length. I've documented that here as an appendix in the above mentioned post.
I mentioned this to ciecio7 and suggested that he did not need to send me another adaptor (why waste postage?)
He wrote back to say that he would send me one which was slightly shorter anyway.
So, this is that adaptor. I'm writing this blog entry because not only is the adaptor perfect out of the box but has undergone a few modifications which I think make the adaptor a much nicer looking bit of gear as well as more functional.
Where there was an engagement pin there is now a ledge running right around the inside of the adaptor. It has a gap in it to engage the pin for coupling the Aperture IRIS.
To mate with the FD lens and make the lens aperture ring functional there is a small lever on the back of the FD lens which needs to be engaged by the adaptor.
This is done when mounting the adaptor onto the lens by:
- bringing the adaptor to meet the lens at the red dot shown below, at first the adaptor does not feel like it properly engages
- then, turning the adaptor to the other red dot on the left of the alignment dot.
- at this point the adaptor can be felt to 'drop in' to the mount now, and you turn it all the way till it clicks inside the lens (IE mounting an FD as one normally does).
Below is the older system (which has a pin instead of the ledge the new adaptor has), and you can perhaps see that the pin may miss coupling with the iris lever this way.
In the past the adaptor was different to this one and instead had a simple pin arrangement to engage and activate the iris mechanism of the FD lens, as you can see on the image to the right.
This works, but allows you to incorrectly mount the lens leaving an inoperative iris.
The new system makes it impossible to mount the lens incorrectly, as if you don't go through the steps above then the adaptor won't fit on the lens properly. I'm sure he has had some complaints about this issue (indeed I contacted him about it when I first got the lens as it wasn't intuitive to me (not being an FD lens owner before).
So its good to see that he is not only making good products (at lower prices) but is also making them better in an iterative cycle of improvements.
So, why am I writing this?
I have always regarded the free market as kind of related to democracy. I vote with my cash and I pass on information about traders (good and bad). They say that bad reports travel 9 times faster than good reports, so here is my attempt at balance. I guess that this is my input into Adam Smith's Invisible hand.
In a harsh economic world which hardly ever caters for small markets and enthusiasts with specialist needs it is good to see a business which does not only cater for this need but a business which makes ongoing developments to its products rather than just sit there turning out the same thing. Having seen Nikon dis-continue the LS-V and LS-5000 film scanners (in what seems like a lot of demand at least in Europe) I am even more inclined to support those businesses which move photography more towards an "open source" method (which it once was) and away from the locked down proprietary (rip off) that it now is. For instance, tried buying a battery for your digital camera recently?
Tuesday, 5 May 2009
digital vs (35mm) film, scans screens and prints
I've always had the impression that things should be as they seem. Sometimes they are, and sometimes they're not.
There is a debate which started in about the beginning of the 21st century about is digital as good as film, which has morphed into which is better digital or film. This bit of history in itself is a good bit of evidence as to the advances and development which digital photography has undergone in the last 10 years.
Looking at the market it would seem that the question is well answered for the 35mm film segment. Digital would seem to be better than 35mm if sales are anything to go by.
There are however a group of folks who still remain advocates of 35mm film and suggest that it can obtain better results than cameras such as Canon's 5D or 5DMkII or Nikons D3X. Now that's a pretty mean ask as even the 5D (a camera released 4 years prior to this writing) has a very flat sensor (flatter than you're ever likely to get film to sit) which divides the 36x24mm area up into 4368 x 2912 pixels. Now if we think about this in terms of film we would need a scan of 3082 dpi to equal it.
Not so long ago the Nikon LS IV ED film scanner was considered to be quite the animal to have as it did 2900 dpi scans of your 35mm. However even I felt (back in 2001) that 35mm was as good as (then) $2000 digital slr cameras, with film potentially holding more detail than 2700 dpi scanners could retrieve. For instance using my Nikon Coolscan LS-20 (a 2700 dpi scanner) from this overview:
I could only get this level of detail:
while looking into my Pentax microscope I see this. Now forgetting the chromatic aberrations created by poking my Nikon coolpix into the eyepiece directly you can see significantly more balcony details there.
Clearly there is more there in the 35mm slide than this scanner was getting.
Time has moved techonlogy along a lot since 2001 and cameras with much larger sensors than what I was comparing film to back then are not only around, they are actually cheaper than a good scanner!
A recent claim on a forum suggested that people were prefering DSLR's over 35mm film due to poor quality scans. So combined with all the above mentioned changes leads me back to answer the question again in the light of all this change and to my present test.
Given what I've personally seen with my 35mm film and my digital I disagreed with that claim. Now keep in mind that I'm a photographer with a history in film, a serious investment in film photography gear and a small one in digital. You would think that I will be biased towards film then. Well I am ... just not for 35mm.
Anyway after I got my first good DSLR (a 20D) I did a few tests and came to the conclusion that it was quite close to 35mm with some advantages to the DSLR and some advantages to film. I I've scanned a lot of my own film as well and am occasionally simply stunned by what I pull out of negatives I exposed around 10 years ago.
To settle the question for my self as of NOW with access to the best film scanning equipment, I wanted to compare 35mm film with a DSLR in a way that would give me an answer for how I use a camera.
As I don't have a full frame DSLR (same situation for many I'm sure) I chose to compare things framed equally. To do this I needed different lenses, so my test cameras were:
This gets each to capture the same image.
Now for the contentious issue, film choice. I happen to commonly use negative film and use 160ISO and 400 ISO films. While there will be some who will argue that I should only compare to ISO50 slide films like velvia, I didn't want to do that. Here's why:
Plenty of shadow areas at the base of the trees, plenty of scope for pushing the resolving power of the systems with fine scenery details and both high contrast and subtle textural details. From the 10D I used the CRW raw file, and to get the the negative into the digital domain I have done and had done scans with:
The results are quite interesting and perhaps easy to guess at. Here's the images
Drum scan of film
the Digital
Clearly they both look pretty similar. Now don't discount this comparison as "just the overview" as its important because it contains mainly the lower frequency information. Not the details but the tonals, the bass and midrange of photography HiFi. Assuming your monitor is OK its much like looking at a 4x6 print from each. But click on each and compare them in a larger view and you can perhaps get more information from that too.
Details
Now, lets look at some detail segments. The base of the Birch tree cluster in the left is were I focused and provides some interesting details to examine, as does a little cluster of brush on the middle right foreground. Now these are 100% pixel crops from segments of the
Drum scan
CRW Tiff file
of course they're slightly resized in this window, so click on each image to load the full thing.
But I bet you're in for a surprise.
Now, aside from the issue that the scan from the 35mm negative being bigger (which will have an important advantage discussed soon in printing) does the 35mm film really have more detail? To me the answer is not much, but not less, perhaps in the high contrast high frequency areas (like where thin branches and twigs are over snow) , but certainly not in the area of low contrast low frequency tonals like in the textures of in the snow (look again more carefully in the shadow areas of that ditch).
There was no wind on the day and shutter speed was quite high (250th of a sec) so there is no argument for blur of the small branches.
While it may be that the drum scan from the 35mm is larger, it does not seem to contain significantly more details (while it does provide more grain).
What it certainly does not contain is the the levels of tonal details in low contrast areas. You can see this clearly in the snow areas and in the small ditch. It is most startlingly clear in the ice chunk in the foreground. Shadows are absent and subtle tonal details nearly hidden. For example
Drum Scan
CRW
Remember, both these are 'ressed down' on this display, so they look better. Please click the image to download the full size.
To pixel peepers this reveals an important issue, and one often misunderstood:
Essentially this means that the image from the digital camera while smaller can be printed at lower DPI or rezzed up make a print of similar size to the 35mm drum scan which is so grainy that it must be printed at much more than 300 DPI or rezzed down.
This aspect of better low contrast definition in digital is not a finding unique to my own experience. On a photo.net thread the following images were posted by Richard Karesh (used with permission). It was observed that subtle tonal details were present on the DSLR image that were lost in noise in the film scans.
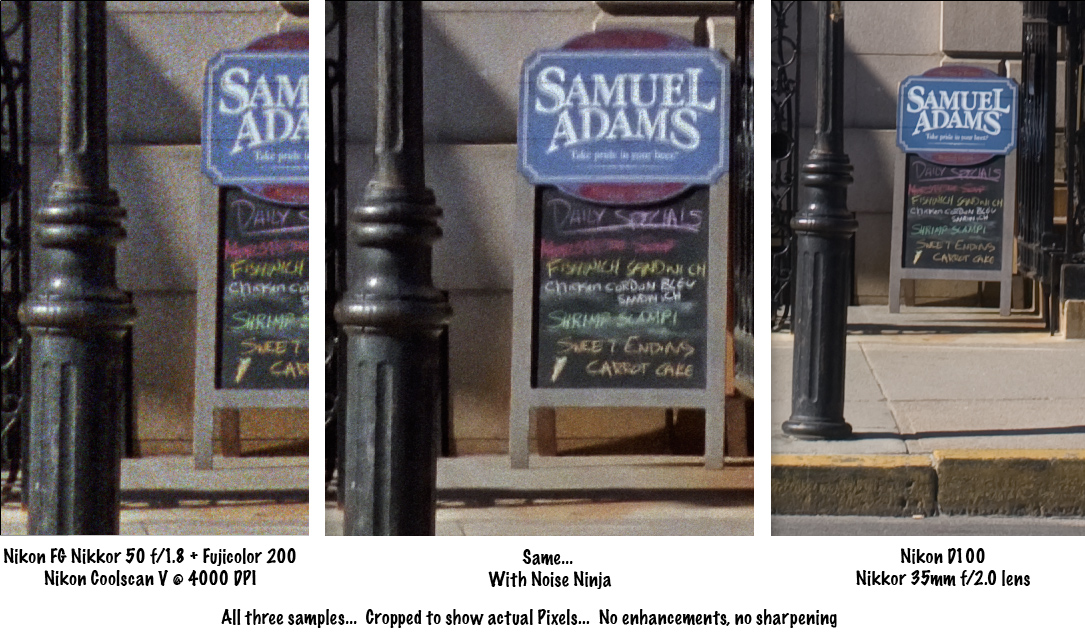
and again rescanned here
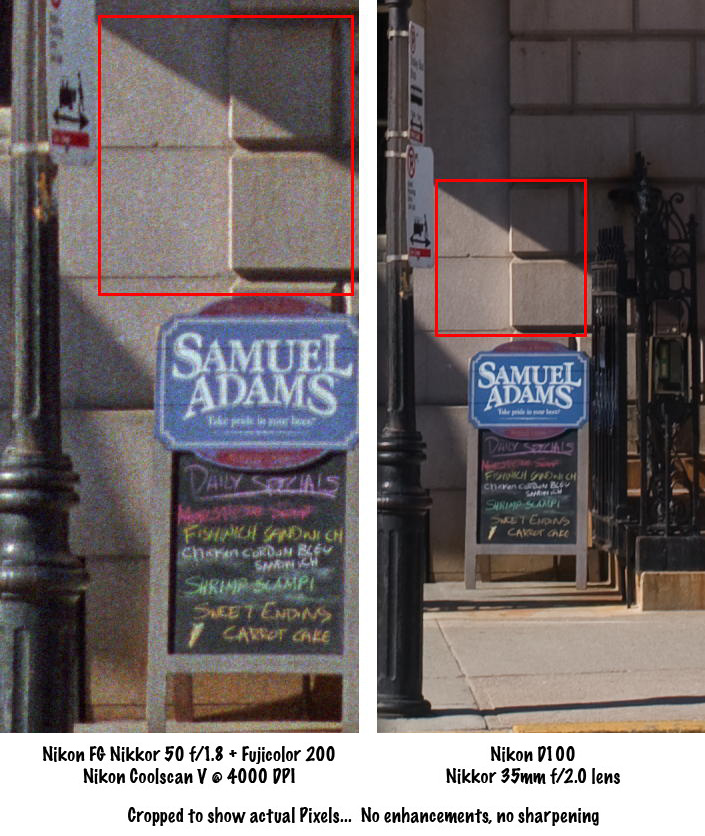
So things are not always as they seem.
Perhaps 35mm does hold more detail, but if you chase it you are like a cat staring at the fish tank ... there seems to be food in there, but you just can't get it out.
Now, having seen the drum scan lets look at what I could get with my Nikon LS-4000
and an Epson 4990
both done using my preferred way to scan negative as a positive. Looking at pixel level details really shows how well the drum scan performs. In fact it makes for interesting analysis in itself. If you apply a 1.4 pixel Gaussian blur across the drum scan image it starts to look like the other ones except not as precise when it comes to a spatial mapping of the pixels. But I'll talk more about that below.
After reviewing this its to me now its an open and shut case, DSLR with APS-C or larger sensor of greater than 6Megapixels will mean that there is no advantage in using 35mm colour film for either sharpness resolution or pretty much any other reason except black and white (including and especially IR Black and white ). Its also possible to recover those high-lights in the CRW file but I didn't bother to put much effort in to it (ohh and for the record the CRW is processed to a TIFF using dcraw then worked on for tonal adjustments).
Now before you go nuts about the obvious "grain" in the picture from the drum scanner lets move on to:
Screens and prints
this is of course the problem I can't show you prints on the www, but I can scan some and show you. But first I'd like to mention something about what will happen when printing.
Blur
One of the aspects of making a print is that some blur is going to occur. For instance if you are using a laser to expose RA-4 paper then the light dot will also illuminate the paper causing a little glow around that point.
If you are using an inkjet then the ink does not have nice square boundaries like the pixels on your display.
So it doesn't matter if your image is hard and sharp or full of broken up bits (as in offset press) the blur will soften it up as in the example to the left.
Just how much blur happens depends on a few factors like how small your printing pixels are and your enlargement. If you take the drum scan segment, scale it to 50% you'll see that the image looks 'neater' already as the noisy pixels are shrunk. If you were to then print that at 300dpi you'd get even more 'smoothing' of the noise by the printing onto paper blur mentioned above.
So, if we took that drumscan and printed it at 300DPI we'd get an image about 50cm wide (that's about 19 inches for you folks still working in inches). This is big no doubt about it, so I took a crop from the image to make a 10x15cm print at 300 dpi. I then made a copy of this and applied a mild 1.1 pixel radius blur to one of them and took them to the local place with a RA-4 system and had them printed. Here they are scanned on my Epson 4990 flatbed (yes, the prints).
NOTE: to keep it clear what print was which I used photoshop to put text onto the print, this renders quite sharply in the image and you can see the difference between the print and the image file when you look at the text.
There is still some sign of the 'noise' in there but printing makes it more tolerable and viewing distance normally associated with a 50cm wide print makes it all but invisible too.
Actually there is a little blur occuring in the RA-4 print, below is a sample of a scan of the print compared to the file (screen grabbed). The prints were scanned at 1200dpi to make sure I got the fullest amount of detail from the surface (and not introduce my own blur). You'll notice that the magnification of the print is 25% in this window.
Clearly the interaction of the light to the paper is also intensity dependent as applying a Gaussian blur to the file was close, but not perfect. In the following image I have restricted the viewing to the blue channel only (so as to avoid all the noise getting in the way of comprehension).
and then I have applied a blur to the JPG to attempt to match the print
its close, looking at the foilage you can see they are nearly the same, but looking at the dense text note the darkness (created by a much brighter light in the printing) spreads further making the font almost look bold.
So understanding what you will get on the print is very hard to replicate. You can get some idea but you'll really have to print it to see. Sounds tough but its apparently true. Certainly your own printing experience will give you some better guides as to what to expect, but it seems that what at first seems like a "pop corn fest" in the maximum enlargement drum scan when printed seems more reasonable. More so when printed a wee bit smaller it will only be better.
So it seems that I could print the CRW file with a modest upres on a Durst Epsilon (native res of 254dpi) up to 50cm and its overall cleaner image will still look neater than the image from the 35mm film which can't really be printed at such low DPI without that noise standing out and certainly won't tolerate the upres.
Science not religion
because I am a science trained person I don't expect anyone to simply believe what I say (although who knows ... a well presented argument may even be used as a citation later if accepted). Results of tests should agree with previous tests (assuming similar methods). I find that this work fits within other work I've done; here and here. My results should be replicable in your own testing too.
So if you've done some testing like this and have different results I'd like to hear about it. I will publish any links in the comments to work which attempts to repeat this comparison or aspects of it.
So, accordingly I am happy to make all of these files available for anyone. I can send you the files I used for printing too ... or simply post you a print if you send me the costs of postage and making a print should you live somewhere where you can't get a print made for a buck or so.
There is a debate which started in about the beginning of the 21st century about is digital as good as film, which has morphed into which is better digital or film. This bit of history in itself is a good bit of evidence as to the advances and development which digital photography has undergone in the last 10 years.
Looking at the market it would seem that the question is well answered for the 35mm film segment. Digital would seem to be better than 35mm if sales are anything to go by.
There are however a group of folks who still remain advocates of 35mm film and suggest that it can obtain better results than cameras such as Canon's 5D or 5DMkII or Nikons D3X. Now that's a pretty mean ask as even the 5D (a camera released 4 years prior to this writing) has a very flat sensor (flatter than you're ever likely to get film to sit) which divides the 36x24mm area up into 4368 x 2912 pixels. Now if we think about this in terms of film we would need a scan of 3082 dpi to equal it.
Not so long ago the Nikon LS IV ED film scanner was considered to be quite the animal to have as it did 2900 dpi scans of your 35mm. However even I felt (back in 2001) that 35mm was as good as (then) $2000 digital slr cameras, with film potentially holding more detail than 2700 dpi scanners could retrieve. For instance using my Nikon Coolscan LS-20 (a 2700 dpi scanner) from this overview:
I could only get this level of detail:
while looking into my Pentax microscope I see this. Now forgetting the chromatic aberrations created by poking my Nikon coolpix into the eyepiece directly you can see significantly more balcony details there.
Clearly there is more there in the 35mm slide than this scanner was getting.
Time has moved techonlogy along a lot since 2001 and cameras with much larger sensors than what I was comparing film to back then are not only around, they are actually cheaper than a good scanner!
A recent claim on a forum suggested that people were prefering DSLR's over 35mm film due to poor quality scans. So combined with all the above mentioned changes leads me back to answer the question again in the light of all this change and to my present test.
Given what I've personally seen with my 35mm film and my digital I disagreed with that claim. Now keep in mind that I'm a photographer with a history in film, a serious investment in film photography gear and a small one in digital. You would think that I will be biased towards film then. Well I am ... just not for 35mm.
Anyway after I got my first good DSLR (a 20D) I did a few tests and came to the conclusion that it was quite close to 35mm with some advantages to the DSLR and some advantages to film. I I've scanned a lot of my own film as well and am occasionally simply stunned by what I pull out of negatives I exposed around 10 years ago.
To settle the question for my self as of NOW with access to the best film scanning equipment, I wanted to compare 35mm film with a DSLR in a way that would give me an answer for how I use a camera.
As I don't have a full frame DSLR (same situation for many I'm sure) I chose to compare things framed equally. To do this I needed different lenses, so my test cameras were:
- Canon EOS 630 + EF24 f2.8 lens at f8
- Canon 10D + Tokina 12-24 lens at 15mm and f8
This gets each to capture the same image.
Now for the contentious issue, film choice. I happen to commonly use negative film and use 160ISO and 400 ISO films. While there will be some who will argue that I should only compare to ISO50 slide films like velvia, I didn't want to do that. Here's why:
- velvia vs digital has been done to death
- most people don't use velvia, and I'm sure looking at camera shop shelves that 200ISO negative is a common choice
- DSLR cameras do very nicely at 400ISO (with newer ones doing spectacularly at 1600ISO) so why hobble them when people want to use these tools
- I personally believe at this point in time that negative gives better results than slide when making a colour profile is not the prime concern. In this page I show my reasons for preferring negative, while some grain is apparent there is also better sharpness.
- finally, if you're really going to go to all the trouble to use ISO 50 slide film, angst over your exposure with a spotmeter, mount the whole kit on a good steady tripod, focus carefully then why not put a good 6x7 (or larger film format) camera there in the first place.
What I did for this compare
So with the above mentioned cameras (mounted on a tripod) on a bright sunny winter day I went out and took this image with both camera systems:Plenty of shadow areas at the base of the trees, plenty of scope for pushing the resolving power of the systems with fine scenery details and both high contrast and subtle textural details. From the 10D I used the CRW raw file, and to get the the negative into the digital domain I have done and had done scans with:
- Nikon Coolscan 4000 @4000 dpi
- Epson 4990 @ 4200 dpi
- Drum scan @ 4200 dpi
The results are quite interesting and perhaps easy to guess at. Here's the images
Drum scan of film
the Digital
Clearly they both look pretty similar. Now don't discount this comparison as "just the overview" as its important because it contains mainly the lower frequency information. Not the details but the tonals, the bass and midrange of photography HiFi. Assuming your monitor is OK its much like looking at a 4x6 print from each. But click on each and compare them in a larger view and you can perhaps get more information from that too.
Details
Now, lets look at some detail segments. The base of the Birch tree cluster in the left is were I focused and provides some interesting details to examine, as does a little cluster of brush on the middle right foreground. Now these are 100% pixel crops from segments of the
Drum scan
CRW Tiff file
of course they're slightly resized in this window, so click on each image to load the full thing.
But I bet you're in for a surprise.
Now, aside from the issue that the scan from the 35mm negative being bigger (which will have an important advantage discussed soon in printing) does the 35mm film really have more detail? To me the answer is not much, but not less, perhaps in the high contrast high frequency areas (like where thin branches and twigs are over snow) , but certainly not in the area of low contrast low frequency tonals like in the textures of in the snow (look again more carefully in the shadow areas of that ditch).
There was no wind on the day and shutter speed was quite high (250th of a sec) so there is no argument for blur of the small branches.
While it may be that the drum scan from the 35mm is larger, it does not seem to contain significantly more details (while it does provide more grain).
What it certainly does not contain is the the levels of tonal details in low contrast areas. You can see this clearly in the snow areas and in the small ditch. It is most startlingly clear in the ice chunk in the foreground. Shadows are absent and subtle tonal details nearly hidden. For example
Drum Scan
CRW
Remember, both these are 'ressed down' on this display, so they look better. Please click the image to download the full size.
To pixel peepers this reveals an important issue, and one often misunderstood:
that looking at straight pixels can be deceivingWhile the drum scan looks like a popcorn noise fest the image does look better when the size is reduced. This happens somewhat in printing, but if you try to print this at 300DPI it will look grainy while if you take the digital file and print it at 150 dpi it will look as you see it.
Essentially this means that the image from the digital camera while smaller can be printed at lower DPI or rezzed up make a print of similar size to the 35mm drum scan which is so grainy that it must be printed at much more than 300 DPI or rezzed down.
This aspect of better low contrast definition in digital is not a finding unique to my own experience. On a photo.net thread the following images were posted by Richard Karesh (used with permission). It was observed that subtle tonal details were present on the DSLR image that were lost in noise in the film scans.
and again rescanned here
So things are not always as they seem.
Perhaps 35mm does hold more detail, but if you chase it you are like a cat staring at the fish tank ... there seems to be food in there, but you just can't get it out.
Now, having seen the drum scan lets look at what I could get with my Nikon LS-4000
and an Epson 4990
both done using my preferred way to scan negative as a positive. Looking at pixel level details really shows how well the drum scan performs. In fact it makes for interesting analysis in itself. If you apply a 1.4 pixel Gaussian blur across the drum scan image it starts to look like the other ones except not as precise when it comes to a spatial mapping of the pixels. But I'll talk more about that below.
A quick plug for the fellow who did my drum scanning. Very accommodating fellow in the USA, he normally does not touch 35mm formats, so if you wish to send your 120 and 4x5 films to him I think you'll be more than pleased with the results. Sure noone sane will want 4000dpi done from 4x5, gosh that's 20,000 x 16,000 pixels or 320 megapixels could you even open the file?. But looking at the spatial quality as well as the sharpness (without any sharpening applied) its just astonishing. I'm not sure about Sydney but in Australia its hard to get good drum scans at a reasonable price.
After reviewing this its to me now its an open and shut case, DSLR with APS-C or larger sensor of greater than 6Megapixels will mean that there is no advantage in using 35mm colour film for either sharpness resolution or pretty much any other reason except black and white (including and especially IR Black and white ). Its also possible to recover those high-lights in the CRW file but I didn't bother to put much effort in to it (ohh and for the record the CRW is processed to a TIFF using dcraw then worked on for tonal adjustments).
Now before you go nuts about the obvious "grain" in the picture from the drum scanner lets move on to:
Screens and prints
this is of course the problem I can't show you prints on the www, but I can scan some and show you. But first I'd like to mention something about what will happen when printing.
Blur
One of the aspects of making a print is that some blur is going to occur. For instance if you are using a laser to expose RA-4 paper then the light dot will also illuminate the paper causing a little glow around that point.
If you are using an inkjet then the ink does not have nice square boundaries like the pixels on your display.
So it doesn't matter if your image is hard and sharp or full of broken up bits (as in offset press) the blur will soften it up as in the example to the left.
Just how much blur happens depends on a few factors like how small your printing pixels are and your enlargement. If you take the drum scan segment, scale it to 50% you'll see that the image looks 'neater' already as the noisy pixels are shrunk. If you were to then print that at 300dpi you'd get even more 'smoothing' of the noise by the printing onto paper blur mentioned above.
So, if we took that drumscan and printed it at 300DPI we'd get an image about 50cm wide (that's about 19 inches for you folks still working in inches). This is big no doubt about it, so I took a crop from the image to make a 10x15cm print at 300 dpi. I then made a copy of this and applied a mild 1.1 pixel radius blur to one of them and took them to the local place with a RA-4 system and had them printed. Here they are scanned on my Epson 4990 flatbed (yes, the prints).
NOTE: to keep it clear what print was which I used photoshop to put text onto the print, this renders quite sharply in the image and you can see the difference between the print and the image file when you look at the text.
There is still some sign of the 'noise' in there but printing makes it more tolerable and viewing distance normally associated with a 50cm wide print makes it all but invisible too.
Actually there is a little blur occuring in the RA-4 print, below is a sample of a scan of the print compared to the file (screen grabbed). The prints were scanned at 1200dpi to make sure I got the fullest amount of detail from the surface (and not introduce my own blur). You'll notice that the magnification of the print is 25% in this window.
Clearly the interaction of the light to the paper is also intensity dependent as applying a Gaussian blur to the file was close, but not perfect. In the following image I have restricted the viewing to the blue channel only (so as to avoid all the noise getting in the way of comprehension).
and then I have applied a blur to the JPG to attempt to match the print
its close, looking at the foilage you can see they are nearly the same, but looking at the dense text note the darkness (created by a much brighter light in the printing) spreads further making the font almost look bold.
So understanding what you will get on the print is very hard to replicate. You can get some idea but you'll really have to print it to see. Sounds tough but its apparently true. Certainly your own printing experience will give you some better guides as to what to expect, but it seems that what at first seems like a "pop corn fest" in the maximum enlargement drum scan when printed seems more reasonable. More so when printed a wee bit smaller it will only be better.
So it seems that I could print the CRW file with a modest upres on a Durst Epsilon (native res of 254dpi) up to 50cm and its overall cleaner image will still look neater than the image from the 35mm film which can't really be printed at such low DPI without that noise standing out and certainly won't tolerate the upres.
Science not religion
because I am a science trained person I don't expect anyone to simply believe what I say (although who knows ... a well presented argument may even be used as a citation later if accepted). Results of tests should agree with previous tests (assuming similar methods). I find that this work fits within other work I've done; here and here. My results should be replicable in your own testing too.
So if you've done some testing like this and have different results I'd like to hear about it. I will publish any links in the comments to work which attempts to repeat this comparison or aspects of it.
So, accordingly I am happy to make all of these files available for anyone. I can send you the files I used for printing too ... or simply post you a print if you send me the costs of postage and making a print should you live somewhere where you can't get a print made for a buck or so.
Subscribe to:
Posts (Atom)