Wednesday, 23 March 2022

Things I don't get about NATO

As it happens I love straps, but don't like NATO. Lets take a look at the things I don't get about NATO (and why I prefer just a plain strap) and there's a few:

  1. the (fundamentally useless) keeper strap that adds two layers under the watch and
  2. the direction of threading for wearing (common to all straps but made worse on a NATO). 

I prefer to have something neat and out of the way, not clicketty clacking into the desk (leaving marks) like this is:


Note that its also threaded buckle down and this brings with it some other benefits (which I'll get on to in a tic). 

Compare that to this, threaded the "conventional way" with buckle up and with the NATO extra useless keeper...


... causing not just two thicknesses under the watch but a bunch of extra stuff on the side where its folded in over itself. 

This is how your watch strap looks to everyone else if you thread it like (almost) everyone else.  I suppose its for people who want to be different with their dress but don't know how to tie a bow tie themselves ...


I've already covered why the keeper is pointless over here, and explained how to get rid of it, but the focus of this post is to look at the advantages of threading your single piece strap in what some would call "Grand Seiko" style (aka buckle down).

As you may have seen above it leaves the bottom of the strap clean, but the other benefit of buckle down if you're using a computer you'll often rest you hand with it tuned slightly out: where the bunch of folded strap gets in the way.


As you can see above the wrapped up extra length of the strap (designed to allow you to wear it over clothing) is now not under your wrist but up above it and out of the way

I used to always find wearing a watch while working on my computer (something I do for a living) annoying, and often took it off; resulting in me leaving it at work on many occasions.

Going back a few years nobody had heard of NATO straps and we all went on quietly using single straps, two piece straps (leather, fabric or nylon) and steel bracelets. Then NATO started shipping on watches standard (and wow, weren't watch makers happy to put on a $2 piece of nylon and have people clamour for it) that we see its rise on the internet on watch forums (note: most people still haven't heard of it).

The main argument for a single piece strap is that if the spring bar fails the watch is likely to fall off. As I ride bicycles and motorcycles this is actually important to me, but you can see that even if a spring bar fails the single pass strap will hold the watch 


Indeed the keeper isn't needed to keep the watch on the strap when taking the watch off ...


So just what the keeper does is a mystery to me (well aside from add to the mystery of the name). So unless you like to have conversation starters (you know, ask a bow tie wearer about that) or fulfil some fantasy of being a military spec operative then I suggest you take the punt, remove the useless bits and thread it in buckle down.

Its actually now the most comfortable watch strap I own (well I now own a few in leather too and can thread out a strap to pick one that will better go with my shirt on the day)


Indeed the earlier RAF style is to me so much more functional as a watch strap (this one inspired me into buying the SNK805)


... becuse I couldn't find that one.

Give it a go, here's a post on how to.

Sunday, 6 March 2022

over paneled

Well its been a lot in planning and significant preparation and then construction but my "shed project" has finally made it to "solar shed project" status with the mounting of my 250W panel... 


...but lets perhaps go back to the start and explain the title...

In the foreground there you can see a small 10W panel which I mounted some time ago which I discussed in this blog post, and has powered my simple lighting system from a humble Gel Cell 12V battery for the last few years.

The whole idea was naturally an extension of wanting a shed for tool storage and workshop (so that I'm not working on things in the house), the construction of the shed (and a bit of history) is discussed here, but in this blog post I'll focus only on the solar aspect of it, what I did and why.

Needs Assessment


My first step was an assessment of power needs which I did with one of these plug in power meters (easily obtainable from eBay or your local hardware shop).

I have been working outside on "flatish" areas when doing things such as building, and while I make pretty extensive use of 18V lithium battery tools I do still need 240V for things, a more powerful orbital sander, drop saw, circular saw, workshop vacuum cleaner and the like.

My normal process has been to run an extension lead out the window to where I'm working, which provides an ideal point to measure exactly what I use.

So doing some work on a few occasions I made some measurements and found that the number was about 200Wh for the days work (I took a few measurements over different days). Which isn't a lot really.

Basically if I got two 50W 22Voc panels that would give me entirely sufficient power to replenish my needs. Even if I used 1000Wh on a particular day that's only 10 hours charging, meaning that the battery bank would be back up to "float charge" after 2 days ... certainly no time for sulfation to occur there. However typically such a panel would cost about $60 which is about twice what I paid for this panel and I'd need two of those! Something like this was in my view ideal and was $160 per panel.


I'd need two because I will be charging 24V (2 FLA batteries) ... however I chose to go with the one higher Voltage panel because it was so darn cheap.

Storage

As I wanted to use 1200W tools in the shed (vacuum cleaner and compressor) I didn't want high amp loads coming from the battery to the inverter (not least because high amp loads distress the cables and distort the Amp hour rating of the battery) I immediately turned to 24V as the low hanging fruit (halving the Amp draw right there).

This has a knock on effect that you don't need as many Ah out of each 12V battery and so I picked a pair of batteries which were rated at RC95 (RC is Reserve Capacity), I'll spare you the cookie fest and paste below a definition (or you can seek your own)

Reserve minutes, also called reserve capacity, is the number of minutes a fully charged battery can sustain a designated constant load (usually 25 amps) before it is fully discharged. For a 12-volt battery, that means battery voltage will have fallen to 10.5 volts.

So I reckoned that I was not going to go close to needing 90 continuous minutes of 600W (by any stretch of the imagination) and so it was settled quickly there:
  • 24V 2000W (4000W peak) high frequency inverter (AU$240)
  • two 12V batteries

So we have energy captured by the solar, stored in the battery charge and delivered by inverter to the power points on the bench. Conveniently the solar charge controller has USB output which allows me to charge my phone and my Bluetooth speaker there. (*point, notice the multi meter on the bench? If you're even thinking about  this topic you must have something like that or frankly your're working blind.)

I recently did a draw down test on the system (panel, battery and inverter) running my fridge during an 8 hour power outage (IE most of the day) which was enough to pull the battery bank down to 24.5V. Now while this isn't ideal (and indeed is disappointing in some ways) it shows two things
  1. the system is entirely adequate for my needs
  2. the use of inverters off the battery does not allow the controller system to "see" what is going on and thus not divert sufficient (actually available) power to the "load" on the system (that's a long story right there) if one was to be going into the night and needing to keep sustaining the fridge (which is about 190W)

The Panel

One of the great things (for me at least) is the market distortions occurring due to government subsidies of solar. Pretty stupidly (but sadly not atypically)  what is happening is that are getting the subsidies to put new  systems on their roof and this includes people with existing (say 10 year old) systems and the older panels are removed and sold as surplus

This means I got my 240W 60 cell panel for just $20 ... fuck me dead, I can't even buy a (so called) 12V 100w panel for that (and BTW they aren't actually 12V), more like $120 each, and so getting a panel which is (more or less 32V (at maximum power) is a bargain.


The specs on the panel are something you should learn well, and you need to understand Voc, Isc, Vmpp and Impp.

Anyway to get that for a few bucks is just fantastic even if in excess of my needs. Basically this means that even if on a big day I run the workshop battery down to nearly "inverter power shut off" voltages, by the end of the next day it will be fully recharged and cell plate sulfation avoided (and my battery investment maximised). This is unlikely to ever happen as I simply don't need that much power in a day and I don't use the shed power even remotely hard most days.

So, next, the solar panel needs to be on the roof, and needs to be secure there.

Mounting

The shed I have (as you may have seen) is a basic 3 x 3 meter garden shed which I've used as the basic starter (for materials) and added a steel frame and other enhancements, accordingly the roof is not a trafficable roof and I'm against drilling holes (to later leak in the rain), and further because there is nothing underneath the "Trimdek" (like any battens) to screw into I decided to flush mount the brackets and to use a modern adhesive like Sikaflex 291 (rated to 1.8MPa tensile strength or about 140PSI) to secure the brackets to the "Trimdek" which the shed is made of.


The brackets (as you can probably make out in the first picture) are 25mm square section tube (so more or less an inch by an inch foot print on the Trimdek) and are 1200mm long (covering 7 high points). I added extra "feet" to extend out either side of the square section tube to prevent any rolling when I slid the panel up and across them, as well as add more grip surface for the adhesive.


To prevent any "movement" (slippage) while the adhesive was "skinning" I used two wooden "supports"


and again (with tape) on the upper side, giving me two nice mounts for the panel you saw back at the start of this blog post)


note that I've added some vertical mounts to secure the panel to the square tube too. These are screwed (and a small blob of sikaflex applied) into the aluminium frame of the panel. The whole thing then has overall 7 good joints like this...


... at each end to hold the panel down.

Now its important to note, that Sikalfex is humidity cured, and due to the thickness of the apparent bead (being squeezed in between the metals) you need to leave it for at least a few days to cure ... which I did.

A friend came over and helped me slide it up and screw the panel onto the side mounts.

So there we have it ... job done! (I might put some covers over the end ... I might not).


what's left?

basically the final sections are to
  • neatly mount the Solar Charge Controller to the wall beside the door inside the shed
  • add in some fuses / circuit breakers
  • add in a neat isolator for the panel (I'm intending to insert a power monitor in there now and then) which I'll do with XT-60 connectors
However right now its fully functional, and so the components for this are:
  • 250W panel (32v) = $20
  • MPPT solar charge controller = $40
  • 2x RC95 lead acid car batteries @$90 = $180
  • 2000W (4000peak) inverter = $240
  • sundry wiring
Now some may be asking "why didn't you just get an electrician to wire it to the house?", well the answer is that because of the distance down to the shed (about 30 meters) it would cost something over $1200, instead of $424.38 and I'd have learned nothing new.

Win Win

PS: I've now mounted the solar charge controller, run the wires neatly, and added a circuit breaker / fuse system which of course acts as an isolator.


The top one is for the panel (I sincerely doubt I need a circuit breaker, but as it has a manual operation its a handy isolator) and the bottom one to the battery is really for (hopefully) protecting the internal fuse that's built into the SCC.

Tuesday, 18 January 2022

(Arthur) two sheds (Jackson?)

Regular readers may have noted an absence of postings on my blog, well there's at least one good reason for that: I've been busy making my workshop / tool and storage shed.

A few years back now I made an alteration to the "solar hotbox" that my property came with and changed it from a useless spider habitat that was way too hot and into a shed I could park my 4by in.

(see this blog post for details)

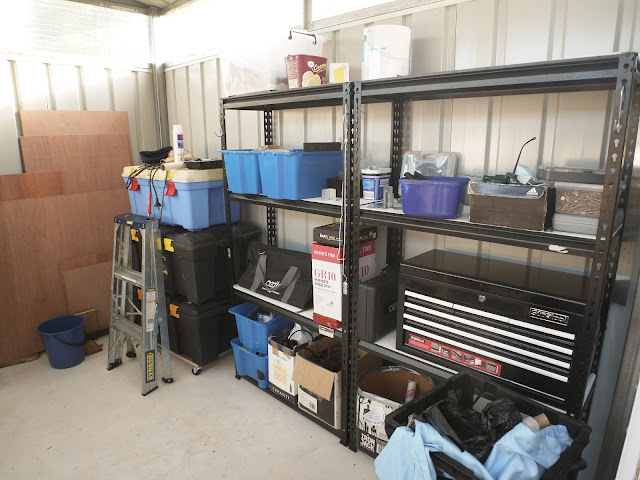
However I've not had a place for all my tools (a front room of the house being pressed into service for that) nor a place to work on things under cover (the kitchen table limits me).

So finally I have added the "workshop" I needed and wanted. I decided to go with a the same shed brand and determined a simple 3x3 meter arrangement would suit.


Some planning went into positioning and construction 


.. and now its pretty much a follow on from the earlier work ... and works nicely.

The kit shed walls are made up of panels of sheet metal and so I  could remove 2 of those at the back of my existing shed to give access to the new "room"

I'm still working on the "step across" into the shed


but it is now a fully functional workshop on the end of my shed.


with a newly installed (built it myself) bench and room for storage


So now all this is out of my house and into the workshop where it should be.

The lack of windows is countered by the full surround opening between walls and roof, which does offer some small problems with rain entry on the worst of storms, but as everything is kept off the floor that's not any sort of significant issue to me ... 

Lastly here is a quick look around.

So now its onto the next projects I've been planning, such as my solar floor heating in time for winter.

Saturday, 15 January 2022

Reviewers are the problem

Recently there was this headline on the site "Make Use Of" that exemplified why reviewers are probably the most significant part of the decline of technical gear (including software).

Reviewers are apparently so specialised on reviewing things more than using things that they are bored with offerings quickly and want some new thing to come along and dazzle them (NB allow them to dribble more about stuff). The truth is this simply muddies the waters rather than making better use of things.


This article (especially its title) clarifies that the author goes to their computer for some wizz bang experience and not to actually do work.

In contrast I use my computers desktop to access applications and the file system, I couldn't give a rats arse about animations and slick roll ins. I'm there to make use of my computer to do things:

  • development (you know, making software)
  • editors (video, image and text)
  • communications (email, and other services)
  • entertainment (playing music and watching video)
I don't want a desktop that gets in the way of the above. I don't want to be constantly re-learning how to actually get to what I want.

Now sure, I like to see some changes, but having been with Ubuntu (to follow this example) since about Karmic Koala and made iterative updates over time. I have always been cautious in my updates but each iteration has been better at fixing issues.

Notably the community of users is actually against adding bling  ... but then unlike the author what they want is functionality not "a UI as entertainment" or "user experience" (you can do twitter for that).

What happens with this sort of driver (shallow reviewers) is a thinning of depth of experience which often results in a loss of understanding of what can be done (or indeed the doing of that).

My phone (Android) is a good example of that. Reviewers made shallow and blinkered assessments of that version of software and ignored (because probably they were too naïve and shallow) the great advanced features that it came with (which took some years to find their way into Android officially).

Shallow and dim reviewers pushing stuff to an unsophisticated base of users (who should probably stay with Windows 8) result in people never actually making best use of their stuff (perhaps they aren't able to anyway if my support calls are any indication)

Ultimately my view on a good design is not to continually add more, but the view of when there is essentially nothing left to take away while leaving it functional. Updates should be based on user requirements changing. An example of this is that I once wrote a small bit of software that queried the HR system (on the Oracle server side) and returned names, office location, phone and email. I subsequently left the organisation (to do more advanced things elsewhere) and came back 10 years later to find that the modern iteration of that was just using my original software and wrapping it in a nice HTML presentation layer. Nice pat on my back there.

Ubuntu is pretty much there right now in terms of functionality.

So my next submission is about a phone of mine, I bought it soon after it was released even though I expected the reviews were wrong. I bought it mainly because it had VoLTE capability and as I was entirely "hot-spotting" here at home for my internet needs (laptop, tablet ...) it turned out that 1) VoLTE wasn't effective in my area and 2) the WiFi Hotspot was pretty inferior to my exsting phones exemplary implementation.

However one thing that's ball-tearingly clear in what was wrong with the reviews was Image Stabilisation in video ... this phone rocks!


and yet the brain dead lazy (clearly copy paste each others works) reviewers all said it didn't have stabilisation.

The only way they could have missed this is to not actually try any hand held video and then look at the results.

So sadly ... reviewers are the problem (them an spec sheet gazers)