For quite some time people have debated back and forward about which way is the best to remove the orange mask in Negative film and which software works best. After around 10 years of scanning my own films I've come to the conclusion that working with negative is not as hard as it seems and that all the 'automation' and funky converters just get in the way of doing a straightforward job simply.
The key point here in this article is why you should never send a machine to do a humans job.
 After working with negative in the darkroom for some time (as well as working with things like densitometers) I'm familiar with the sorts of ranges of light that a Negative can actually capture. I know that scanners can capture this density range (because slides have a greater one), but for some reason when I use my scanner supplied software to scan a negative it always washes out areas which I know it shouldn't (based on the negative).
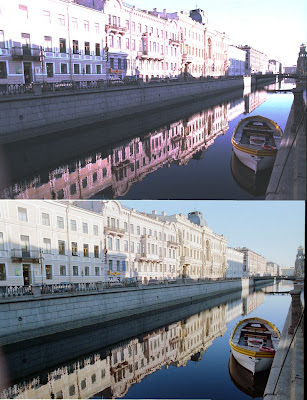
The figure to the left is a comparison of the results obtainable from a very contrasty negative using two slightly different workflows.
Both are scanned using the software supplied (in this case Nikon Scan 4.0.2), however in the top image the software was set to be scanning a negative, while the bottom one is obtained with the software told that I am scanning a positive.
I don't know about you, but aside from the areas in shadow (where I biased my exposure towards) I think that the software has done a shitty job. To me what's wrong with the to image is:
- the sky is washed out
- the buildings are colour cast and not showing their true colours
- image looks muddy
- rooftops blowout
- shadows block up
So how do I do it?
Surprisingly its not hard, so here goes my attempt at conferring a trade secret to you guys. It all comes down to understanding your tools. In this case the tools are:- negative film
- scanner operation
Firstly, negative film is not some sort of mythically complex thing and there is much dribble written about the "orange mask" (insert feelings of fear and confusion related to ignorance). Lets ignore almost everything about negative film apart from two things:
- its a negative - this means that dark things will appear light and light things will appear dark
- for various reasons each of the layers of Red Green and Blue sensitive material have different density levels (meaning are of unequal darkenss when you hold them up and look at them)
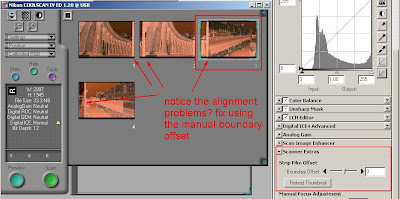
 This brings us to the first problem that you will encounter, when using the SA-21 the software trying to scan Negative as Positive the stupid software will not properly sense the boundaries between the negatives. This can happen anyway with particularly dark strips of slides anyway (like shots of the night sky) so its well to know this trick anyway.
Under Scanner Extras you you will find the boundary offset adjustment slider. Just give this a tweak one way or another to align the border.
Ok, now that problems solved ... lets move on.
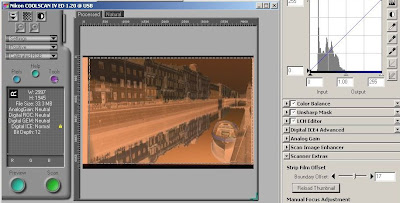
 So lets load a negative into our film holder and take a look at it.
Now if you set your scanner to positive and preview I'm sure that it'll look just like the image to the left.
Now heres where we do the important thing, go to your histogram control and select (as a start) the blue channel. Notice how much of the selected preview image is bunched up over to the left? Well that's because the blue channel has the shortest range in ability to record the scene. Now that doesn't mean that it records less information, just that it records it over a smaller range of density changes. If I cycle through the Red Green and Blue for this particular negative I get the following:

You might notice that there are quite similar shapes to each of them and all three have a similar peak at the brightest end. This actually represents the full amount of information recorded on the film for each channel. They are not the same because its Negative and not Positive (or Slide film). So each channel has by the nature of the film a different appearance. So lets adjust each of them (meaning each of Red Green and Blue) and have a look at what that does.
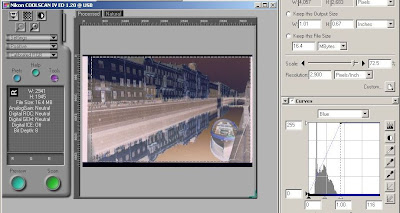
 To do this, grab the sliders and move the dark and light levels to more neatly encompass the 'hump' in the exposure. Don't go too far and start to clip off the ends because even if there is nothing useful there this will be better dealt with using curves later.
Take a look at the image to the left here to get a guide on how far to take that. Now repeat this for the Green and Red channel (although the red will be less important as it has the widest range and is already spread fairly widely).
So notice in the figure to the left that the scanning range is now much tighter around the blue area and also that the image now looks much more like a simple negative of what you'd expect an image to look like? When you are not sure how much data to encompass in this try leaving a little more of the boundarys in so that you will see at what level that is in the histogram. This will appear as a new 'peak' in the graph at the lighter end and will show you the level of the deepest shadows. This will require a little learning and intuition which is something that machines seem not smart enough to do at the moment.
From here its all down hill, as back in photoshop you simply (note: order is reasonably important here):
- assign the colour profile which matches the settings in Nikonscan (in my case I set it to Bruce RGB, but assign don't convert)
- invert image (it will now start looking really close)
- next, either trim up the levels by hand or use Auto Color Balance to get the image 90% right straight away. (Note: tricky images with lots of irregular colours will fool many Auto Colour Balance systems so you may need to then balance with careful levels and curves adjustment).
- lastly you can choose to tweak Hue and Saturation levels for (typically) Red, Yellow, Cyan and Blue. This last step is often only by a small margin and subject to taste. I often apply only a few increments of change in red and yellow and blue.
PS: since this post comes up in my top 10 now and then, here is some links to other posts which may be helpful to a scanner: You might find these quick notes interesting too:
- my colour negative workflow (which is similar)
- registration problems on Epson scanners and why you shouldn't go too far in trying to adjust this or that because when you improve focus you may disturb registration
- using your scanner to understand film density.
- driving your scanner software differently to effect some changes in scanner side exposure on Epsons (meaning better noise characteristics in the dense areas of your negs).
- don't forget colour management on your Epson (its not where you might think it is)
- a more detailed examination of scanning Neg as Positive here
- using the Epson for bulk scanning of 35mm colour neg (and getting your desired settings applied across all evenly)
Naturally, as always, feedback and comments are welcome


8 comments:
Good on you for posting this here too (unless I missed it was here already before I brought it to your attention again). Not easy having so many web sites...
Hi
yeah, it was here first. I'm guessing you found the link from an auction of mine and I'd wanted to keep a little distance / privacy from that to this one.
I'm working on something else right now which may interest you, and I'll answer your questions posted on the other article in a tic. If you wish you can send me an email to ask more about the Nikon stuff
The reason why the orange mask doesn't really bother you with your workflow is that you implicitly "remove" it by adjusting the maximum input level of each color separately. The orange mask is nothing but a color offset that influences the "white point" of the negative, or black point after inversion. After setting the max. input level for each color, the "orange mask" should appear white. It can be done like this, but I prefer a little preciser approach, which can be done in gimp or photoshop by picking the mask color into an additive layer. This will nicely adjust the white point of the negative with no guesswork for the proper levels.
Hi Matze
yes, implicitly removing is pretty close to it. The only issue I have with using a sample of "base" to use a layer to do the job is that this still does not get me much closer to "correct" colour balance because that does not take into account the ambient exposure colour balance (unless all shots are outdoor in full sunlight not shaded, or overcast).
I recall reading some time ago a very good post by an ex-Kodak film engineer about this on APUG, I will attempt to fish this out again and re-digest his words.
thanks :-)
Happy New Year
I find the same, it is still necessary to work with the levels to get good colors, adjusting the ranges of the individual channels to have something true to reality. I find it really difficult to have a workflow recreate the films "signature" colors without much manual intervention. Especially when the workspace is not color correct.
Hi obakesan,
This approach of digitizing negatives results in very appealing results indeed. I'd like to ask you a question. Lets say that we try to print a color prints from color negative film with the traditional way (the one that was used before the use of digital technology). What would the print look like? Like the first image of your example (the one with the color cast and washed shadows) or the second one?
Thank you.
Hey George
That's a good question and one which perhaps drove my interest. To answer first the short answer is if you go to a typical minilab then the prints are more likely to be like the washed out one. If (as I have always done) you look at the negative then you can take it to a good printer (a human not a machine) and they will usually do a great job. Back in the 1990's that was typically costing me $100 for a colour print.
An excellent example of a minilab VS my version can be found on my blog post here
http://cjeastwd.blogspot.com/2014/01/a-negative-printing-experience.html
I was then able to take the file to the minilab on a USB stick and ask them to print it. Then I showed them their effort ... they literally didn't know how I did it.
To me if you can see it on the neg, you can print it if you're skilled. Scanning makes those skills easier to gain in my experience.
Best Wishes
Thank you for your reply! It was more than helpful to me.
Post a Comment